
The illustrated long-form of the README’s 🟢 Flash & Run section. It takes a stock Phrozen Arco and moves it onto armbian-mkspi (Debian Bookworm, kernel 6.18) · Klipper v0.13 using the pre-built image.
Work through Steps 1 to 5 in order. Step 1 is the only one you may skip, and every screen you will see along the way is pictured. Steps 6 to 10 come after the printer runs. Of those, Step 7 (calibration) is required if you want to print; Steps 6, 8, 9 and 10 are optional.
The printer flashes itself, from a USB stick — no PC, no disassembly, nothing to unplug. You only open the machine once, in Step 5, to press two buttons inside the toolhead. Taking the eMMC module out is not part of the normal route; it lives in Appendix A for recovery, for a spare module, and for keeping a way back to the factory system.
⚠️ Hardware-specific: Phrozen Arco with MKS board (RK3328, STM32F407 + MKS_THR STM32F103), AP6212 WiFi. Not a generic Klipper kit. Working inside the printer means mains and electronics — power the machine off and unplug it before you open the housing. Use at your own risk (see the README disclaimer).
⚠️ Warranty: replacing the factory OS/firmware and opening the printer will very likely void your Phrozen warranty. If you may ever want to go back, make the backup in Step 1 — it is the only moment that copy can be made without opening anything. Note that the eMMC alone is not the whole way back. Step 5 also reflashes both MCUs, so a full return to stock needs their v0.11 firmware as well, and in the right order. See Going back to Phrozen’s system.
ℹ️ This project is not affiliated with Phrozen. Arco Unleashed is an independent, community-made project. It is not endorsed, supported or distributed by Phrozen, and Phrozen cannot be asked for support on a printer running it — if something is wrong, ask here, not them. Phrozen and Arco are the manufacturer’s trademarks and are used only to say which machine this fits.
🛑 The one thing that cannot be recovered later. The new system needs Phrozen’s gateway —
phrozen_master,phrozen_slave_ota,device_tableand~/hdlDat. The display talks to it, and the AMS work mode lives beside it. It exists only on your original, still-running printer, it is in no download and in none of Phrozen’s packages, and the flash erases it for good. Step 2 now collects it for you, while the old system is still there, and refuses to flash if it cannot. If you take the eMMC out and write it from a PC instead, the installer never runs at all. Then you must do A0 by hand first. Without those files the display spams connect to the server fail and stops returning to its home screen after calibration, and the AMS — runout protection included — does not work.
Install
| Before you begin | tools, space, what goes on the USB stick | |
| Step 1 | Back up the whole printer | optional, your way back to stock |
| Step 2 | Flash the printer from the USB stick | the printer overwrites its own eMMC |
| Step 3 | First boot: WiFi portal + USB install | from your phone |
| Step 4 | Connect via SSH | PuTTY |
| Step 5 | Flash the MCUs ⚠️ | the one step that opens the printer |
Once it runs
| Step 6 | The rest of the setup menu | backup/restore, guards, repair |
| Step 7 | Calibrate | |
| Step 8 | AddOn features, theme, verify | optional |
| Step 9 | First print | OrcaSlicer machine G-code |
| Step 10 | Unleashed × KAOS | optional add-on |
Reference
| Appendix A | Removing the eMMC — recovery, spare module, way back to stock. Starts at A0: rescue Phrozen’s gateway first |
| Appendix B | Troubleshooting |
| Appendix C | FAQ |
Read this manual before? Rescuing Phrozen’s gateway is no longer a step of its own: Step 2 does it for you while it flashes. By hand it only matters on the eMMC-out road, where it is now A0. Everything else kept its number. Older editions also called the self-flash path A and the eMMC route path B — those are Step 2 and Appendix A.
🛑 Do this before anything else, on the printer as it stands today. Install Phrozen’s firmware V199 the ordinary way — their own USB firmware update — and let it finish.
V199 carries the touch-panel firmware this project expects. The panel is the one part Arco Unleashed never touches or ships: it is Phrozen’s, it is updated only through their updater, and nothing here can put it right afterwards. Start from an older version and the display can behave oddly or stay dark — and the display is how you follow every remaining step.
It is also the cleanest starting point for everything else — the module, the AMS and the display firmware all match versions that way.
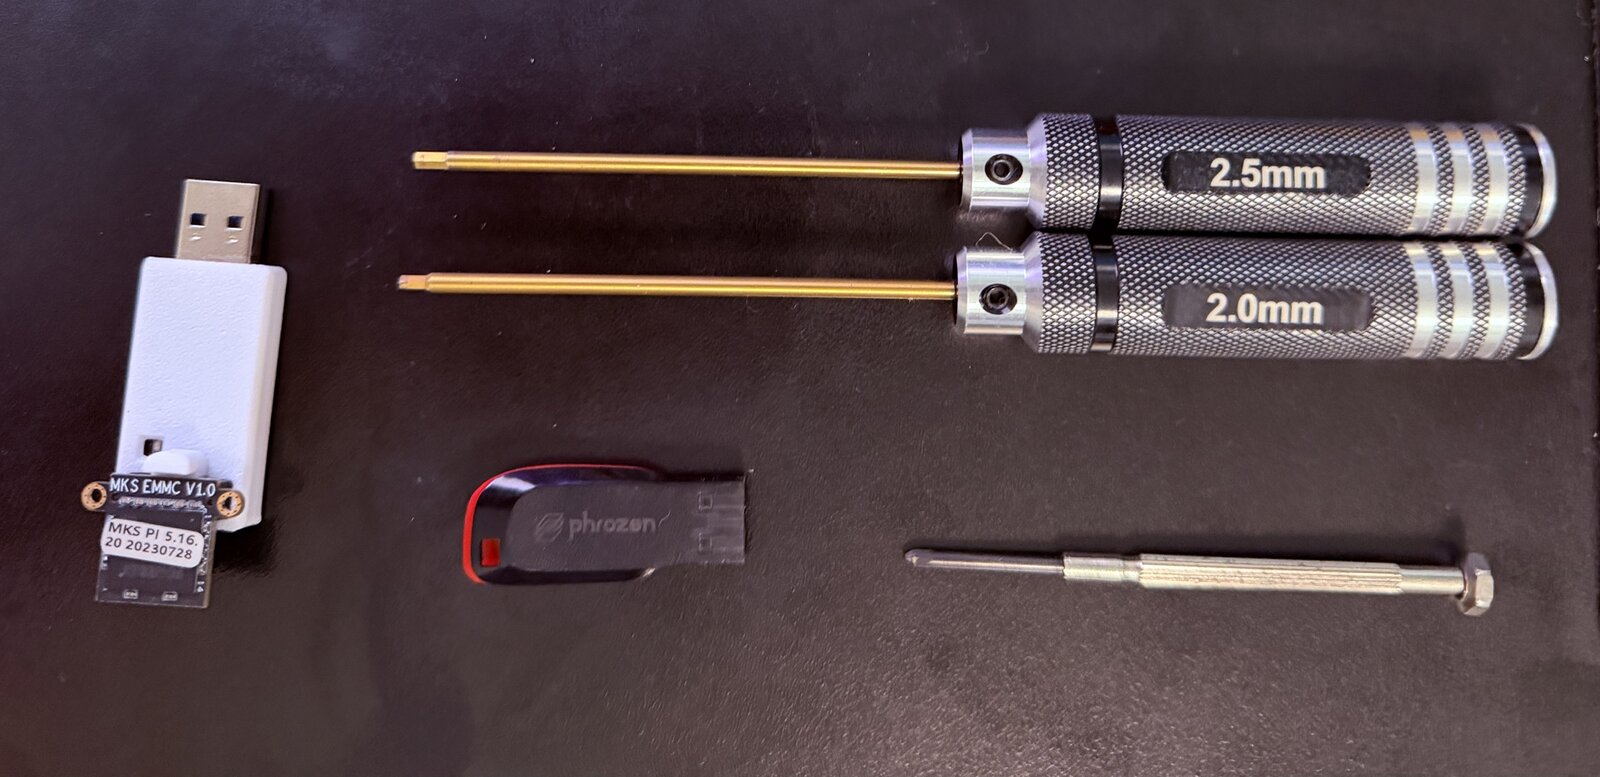
A FAT32 USB stick, two hex keys (2.5 mm and 2.0 mm), and a PC with an SSH client (PuTTY on Windows). That is the whole list.
Use 8 GB or larger if you intend to make the backup in Step 1 — that backup is the only way to keep a copy of the factory system. Without it, 4 GB is enough. Plug it straight into the printer — never through a hub. The original Phrozen stick is a good fit.
Start the stick empty. The tools pick their inputs
by pattern (Arco-Unleashed*.img.gz,
Arco_FW_V*.zip) and take the first match.
So an older firmware zip, or a (1) copy left over from last
time, can win silently and install something you did not intend. Format
it, then put on only what the table below lists.
The photo also shows a USB-to-eMMC adapter (the white MKS case) and a small Phillips screwdriver. You do not need those. They belong to Appendix A, which takes the eMMC module out for recovery or for a spare — and if everything goes normally you will never open the machine that far.
A spare eMMC module is still worth considering (the same MKS V1.0 part): flash the spare and the original stays untouched. Note that swapping it back also needs the MCU firmware put back to v0.11 — Going back to Phrozen’s system does both halves in the right order.
Put the printer somewhere you can reach all the way around it, not in its usual corner. In Step 5 you open the toolhead to press two buttons on its board. That is fiddly with the machine against a wall, and it is not something you want to do twice.
Running a PentaShield or other add-on panels? Take at least the rear panel off before you start — it is in the way of both the toolhead covers and your hands. Doing it now saves interrupting the flash halfway through. See the toolhead button step.
Extract Arco-Unleashed-USB.zip
to the top level of the stick. That covers everything
marked release zip below. One file cannot come from any
download: the AMS archive. The printer collects it for you while it
flashes, so you do not have to make it first.
| File | Where from | |
|---|---|---|
Arco-Unleashed_bookworm_6.18.30.img.gz |
required | the release zip |
…img.gz.sha256 +
…img.gz.rawsize |
required | the release zip |
unleashed-selfflash.tar.gz +
prepare_unleashed_self_flash.sh |
required | the release zip |
arco-phrozen-ams.tar.gz |
automatic | collected for you in Step 2 — or by hand, A0 |
Arco_FW_V*.zip |
optional | Phrozen — see below |
wifi-seed.txt or no_wifi.txt |
optional | you write it — see Step 2 |
Do you need Phrozen’s Arco_FW_V*.zip? Usually
not. Phrozen publish the display module in their own public
repository, and the printer offers to fetch it from there: you confirm
once, it downloads, and the checksum is verified before anything is
installed. Bring the zip in only two cases: the printer will have
no internet while you set it up, or you want the
PhrozenGo cloud app. PhrozenGo is in Phrozen’s package
and not in the repository. Display and AMS firmware are not a
reason — those come through Phrozen’s own USB firmware update, not from
this stick.
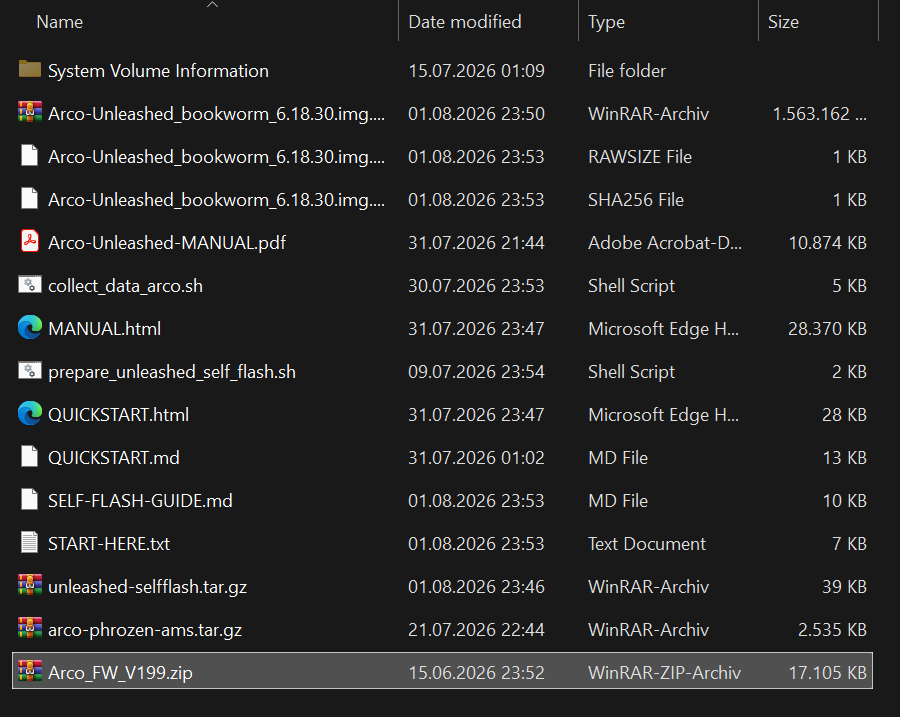
If a zip is on the stick it always wins and nothing is downloaded. On the stick it sits beside the AMS archive:
Nothing proprietary is bundled with this project. Phrozen’s module is either read from the zip you supply, or — only after you confirm — downloaded from Phrozen’s own public repository onto your printer. Nothing of Phrozen’s is hosted, mirrored or redistributed here.
This is your way back. Phrozen do not publish a
stock image for download, though their support has supplied one on
request. A copy you make here is a different thing: it is this
printer, with your calibration and your settings, ready the moment you
need it, without having to ask anyone. Step 1 writes that copy — every
file, the partition table, the bootloader — as one .img.gz
on your USB stick. No screws, no eMMC removal, no PC.
Skip it if you have no intention of ever going back to the factory system.
A USB stick of 8 GB or more, plugged straight into the printer — never through a hub.
The backup tool runs from that stick:
unleashed-selfflash.tar.gz and
prepare_unleashed_self_flash.sh. Both came out of the
release zip you extracted in Before you
begin, so they should be there already — worth a glance before you
start. They have to come from the stick because your printer is still
running Phrozen’s system and has nothing of this project installed
yet.
If the eMMC itself is nearly full, a backup can come out larger than one FAT32 file allows — that is handled by splitting and needs nothing from you. If you want it smaller anyway, look at what is actually large before you delete anything. Remove named files, not a whole folder:
ls -lhS ~/printer_data/gcodes/ | head -20rm -f ~/printer_data/gcodes/<the-one-you-named>.gcode # one at a time, and read it back
df -h /sh ~/printer_data/gcodes/USB/prepare_unleashed_self_flash.shIt unpacks the flasher fresh from the stick and asks whether to start
it. Answer y, give your password, then take
menu item 2 — Back up. (From a script, or if you prefer
the flag:
sudo bash ~/selfflash/install-unleashed.sh --backup.)
It measures the eMMC first — about a minute with no output, which is normal. Then it tells you how large the backup will be and whether the stick has room, and it asks before doing anything.
Say yes and the printer reboots and images the eMMC before the system starts. That is the only moment nothing is using it, and it is what makes the copy trustworthy. The display shows the progress. When it is done it says so, waits a moment and carries on booting by itself. Pulling the stick at any point cancels it.
It writes nothing to your printer. The eMMC is only read; the one thing written is the arming token, and that goes onto the USB stick. Pulling the stick cancels it at any point. Size is handled by splitting, not by asking you to tidy up — see below.
| File | What it is |
|---|---|
arco-emmc-backup-stock.img.gz |
the image — -stock from Phrozen’s
system, -unleashed from this one |
…img.gz.sha256 |
its checksum; the restore refuses without it |
…img.gz.rawsize |
its uncompressed length, used to reject an image that cannot fit |
The two kinds rotate separately on purpose. Once the printer has been migrated, an image of Phrozen’s original system can never be made again. Under a single name, the next two routine backups would have pushed it aside and then deleted it. Backups from older versions keep their plain name and still work.
Writing one of these back later — including a set that had to be split — is A3.
🔒 Keep it to yourself. It is a byte-for-byte copy of your printer: your WiFi password, your SSH keys, any API tokens — and from a factory printer, Phrozen’s own software, licensed to you. Never post or share it.
Measured on a 32 GB eMMC: about half an hour, and a 2.3 GB file. A stock 8 GB eMMC is proportionally quicker and smaller.
FAT32 cannot hold a single file of 4 GiB or more, and FAT32 is the
only format this guide asks you to use. You no longer have to solve
that: when the backup would cross 4 GiB, it is written as a numbered set
instead — arco-emmc-backup-….img.gz.001, .002,
and so on.
All the parts belong together. They are one file cut into pieces, so a set with a part missing is not a smaller backup, it is no backup at all. Keep them together, copy them together, and never delete one to make room. Restoring from the printer handles the set for you; checking a set, or writing one from a PC, is in the FAQ under split backups.
What you still need is room on the stick in total.
Before it starts, the tool measures the eMMC and prints the size it
expects and an upper bound, next to the free space it found. A stick
that is too small costs you one line of output rather than half an hour.
If the stick is too small, delete what you no longer need, or use a
bigger stick. The .previous copies are safe to remove; an
image of Phrozen’s original system is not.
If the stick fills up anyway — the estimate was
optimistic, or something else took the room — the backup stops and the
printer stays on that screen instead of carrying on. It
does not boot past it, because a job you left running for half an hour
is a job nobody is watching when it fails. Switch the printer off and on
when you have read it. Nothing on the printer was changed, and the
half-written backup is deleted, so it cannot be mistaken for a complete
one. The same message is left on the stick as
BACKUP-STOPPED-READ-ME.txt, for the case where the display
is not the thing you are looking at.
A smaller backup, if you want one.
--small compresses harder: perhaps 20 % less to store, and
about 1.5× as long to make. --fast is the default and is
what you want unless space is tight.
sudo bash ~/selfflash/install-unleashed.sh --backup --smallWhy deleting files does not shrink it. A disk image copies blocks, not files. A deleted file stays in those blocks byte for byte until something writes over them, and to the compressor it looks like noise. So freeing 5 GB of files changes the backup very little. This is normal for disk images and is the reason the size is handled by splitting rather than by asking you to tidy up.
The printer overwrites its own eMMC, streaming the image from the USB stick. No teardown, no PC, nothing to unplug.
🛑 One shot. Once the write begins it cannot be stopped, and a failure part-way through leaves a printer that will not boot — recovering from that means opening the machine (Appendix A). Before the write starts, pulling the stick and power-cycling stands the flasher down safely.
This is also the last moment the factory system exists. If you may ever want it back, make the copy in Step 1 first — or flash a spare eMMC module and keep the original untouched.
It has to be online afterwards, because Step 5 is done over SSH. You have three choices, and doing nothing is a perfectly good one:
| What happens | |
|---|---|
| Add nothing (recommended) | The flasher copies the network this printer is already using — known-good, keeps its region setting. |
wifi-seed.txt on the stick |
Your own network, useful if the printer is not online right now. |
no_wifi.txt on the stick |
Deliberately none: the new system raises its own setup hotspot on first boot. |
If you write a wifi-seed.txt, it is plain text with no
quotes:
SSID=YourNetworkName
PSK=YourWiFiPassword
COUNTRY=US
The network must be 2.4 GHz — the Arco has no 5 GHz
radio — and COUNTRY is your two-letter
region code. Get the region wrong and the printer may refuse to
join.
Nothing here is a dead end. If the WiFi does not connect, the first boot falls back to a setup portal you reach from your phone. If even that fails, you can still hand the printer a network from the stick afterwards (Step 3).
SSH in as mks — Host is the printer’s
IP (from your router, or the Phrozen display),
Port 22, login mks /
makerbase. unleashed.local
only exists after the flash; Step 4 explains how
to connect with it. The stick mounts itself at
~/printer_data/gcodes/USB, on Phrozen’s system and on this
one alike.
cd ~/printer_data/gcodes/USB
sh prepare_unleashed_self_flash.sh
It unpacks the flashing tool to ~/selfflash, replacing
whatever was there, and then asks whether to start it. So the version
that runs is always the one on this stick, never a leftover from an
earlier image. Answer y and the menu below opens. It
asks for your password first: the flasher needs root.
Nothing under
~/printer_data/gcodes/USB? Then the stick did not mount itself. Mount it to that same path and the commands above work unchanged —lsblktells you which partition it is:sudo mkdir -p /home/mks/printer_data/gcodes/USB sudo mount /dev/sda1 /home/mks/printer_data/gcodes/USB
One command, and it asks what you want:
![The install menu: 1 Check, 2 Back up, 3 Install, 4 Cancel, 5 Quit, with the prompt Choice [1] at the bottom](assets/manual/selfflash-0-menu.png)
1 is the default and the safe one: it finds the
image, checks it against its .sha256, names the eMMC it
would write to, and stops. Read that line and make sure it is the device
you mean. 2 runs the backup from Step
1, put here so you do not have to go back for it. Anything the menu
does not recognise is taken as 1.
Pick 3 to install. Choosing 3 from the menu does not confirm anything, and none of the confirmation steps that follow are skipped:
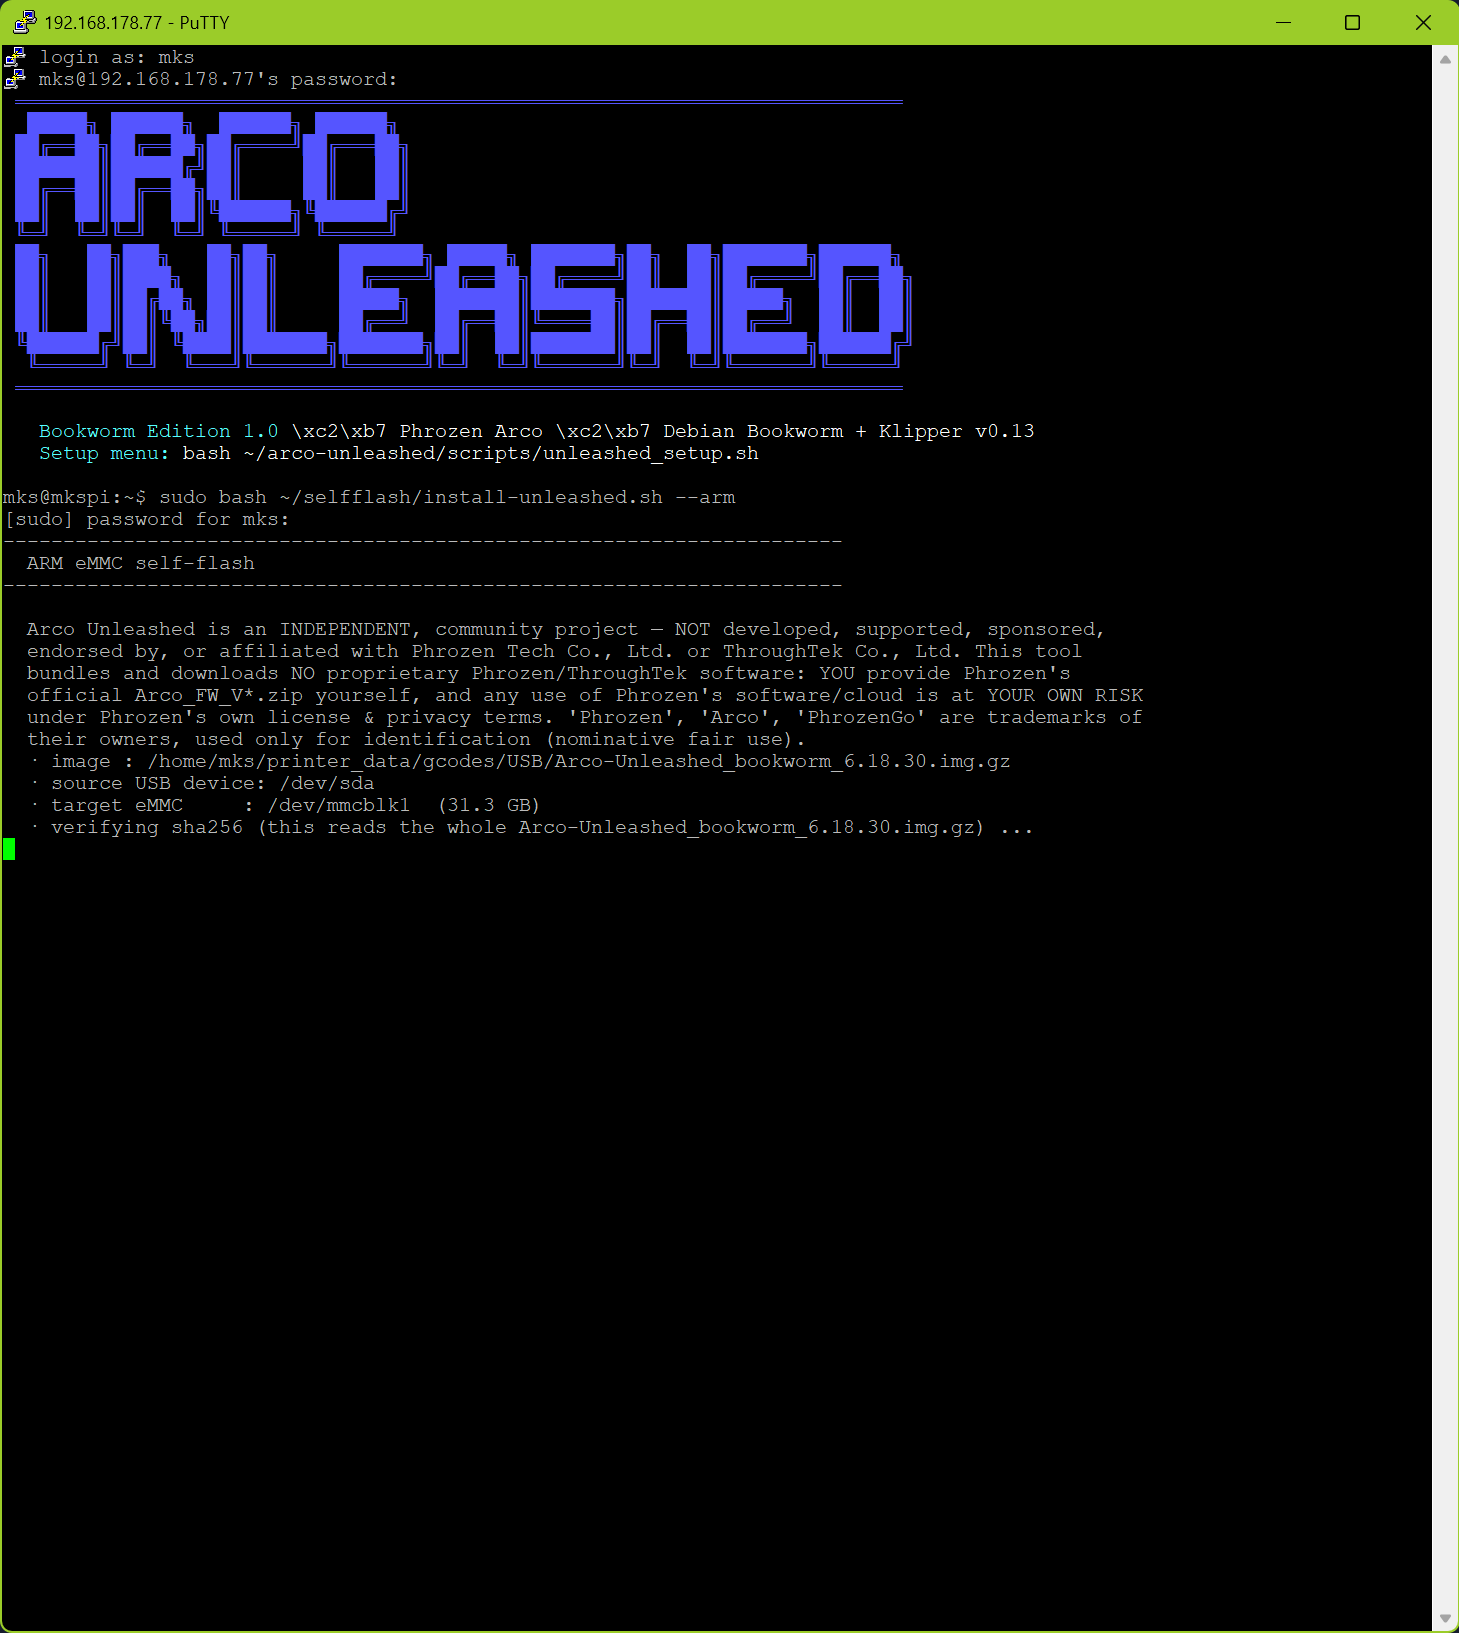
It asks you to type yes, and then the device name in
full. Two separate confirmations, on purpose: once the write starts it
cannot be stopped or reversed.
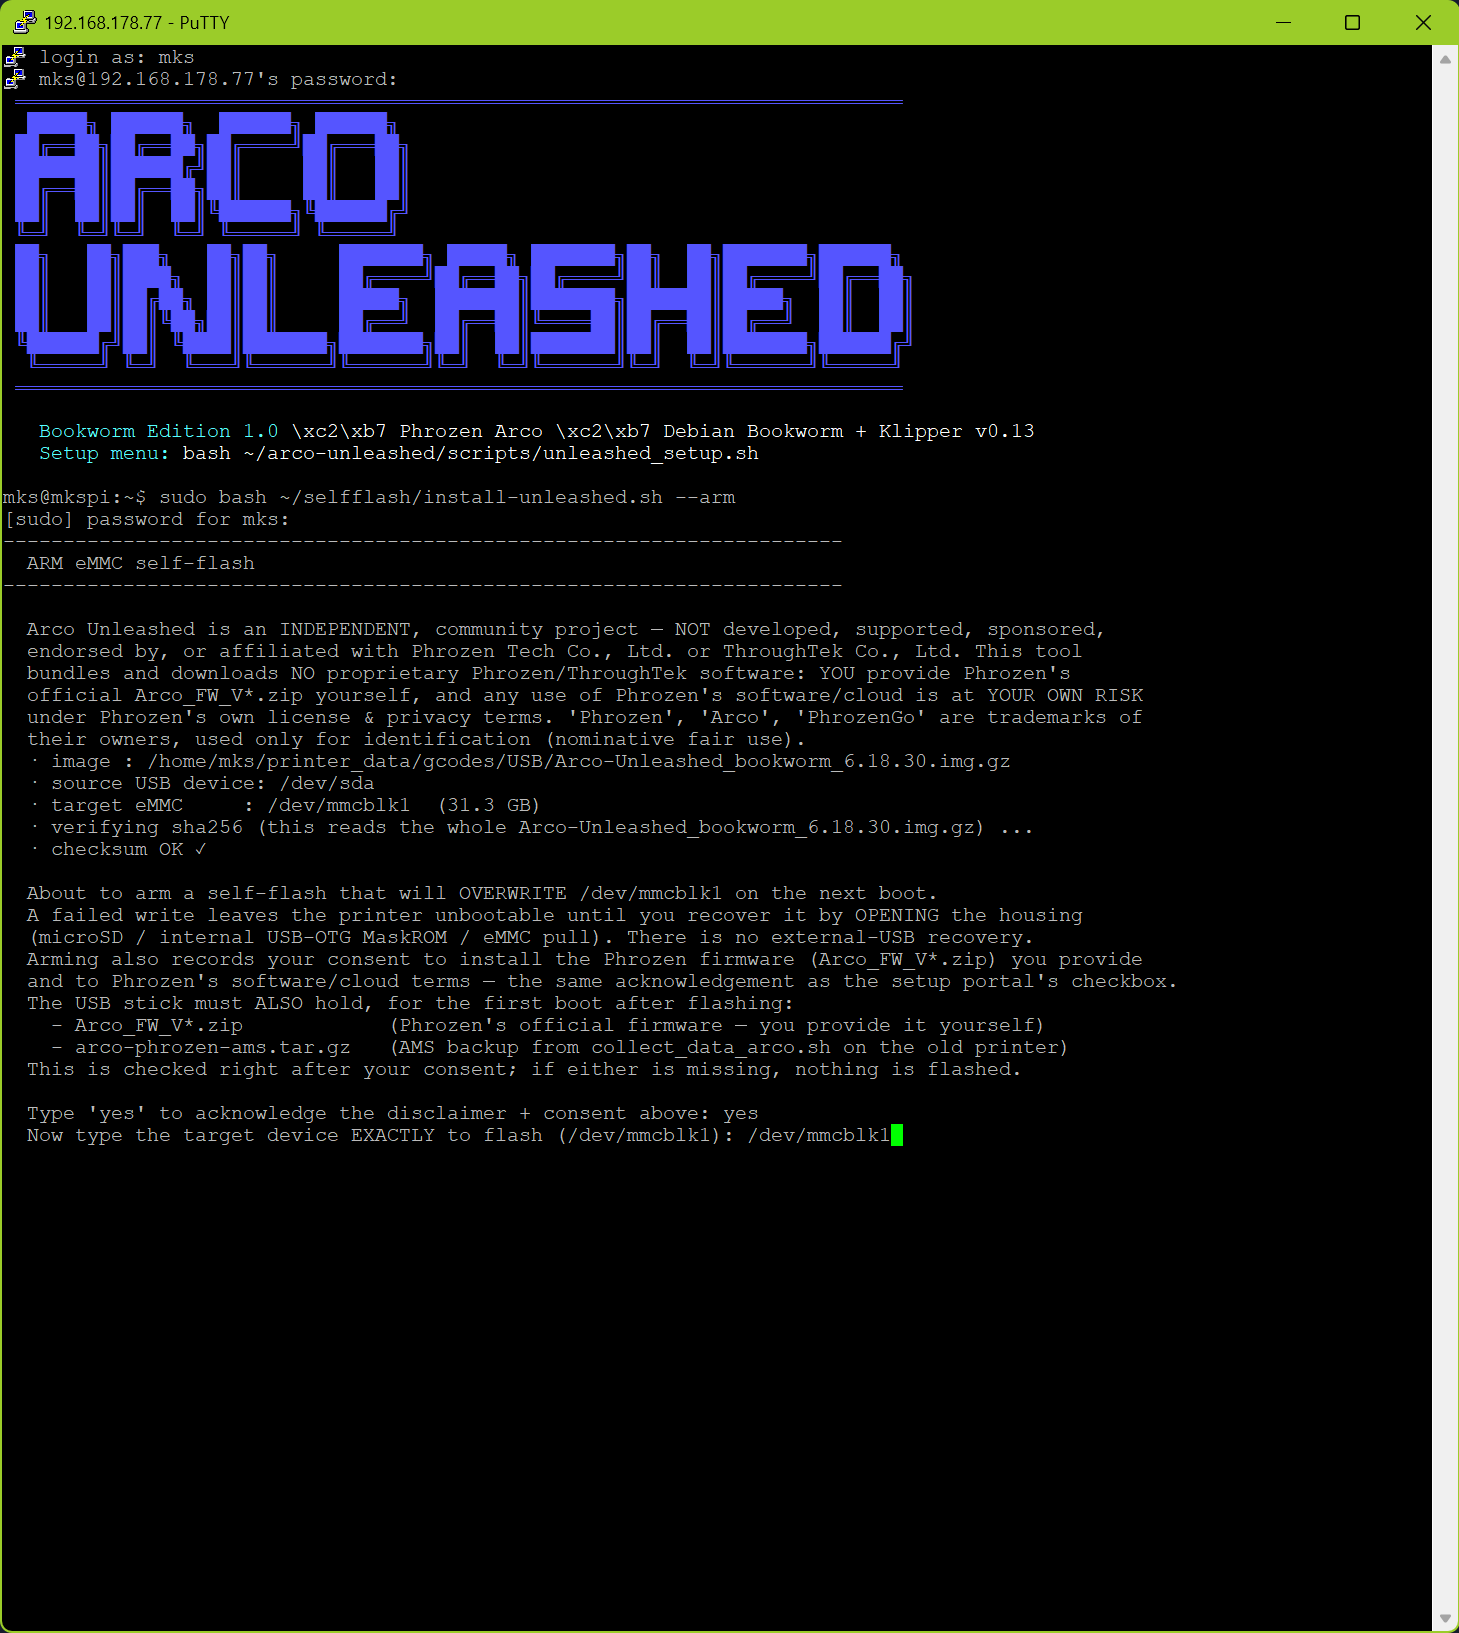
Then it makes sure the first boot will have what it needs. If
arco-phrozen-ams.tar.gz is not on the stick yet, it
collects it here, from this still-original printer.
That collection is read-only: nothing on the machine is changed. If it
does not work, the flasher refuses to flash. An archive already on the
stick is kept, never overwritten. Then it shows you the WiFi it
is going to use and asks you to confirm that too — decline, and
it sets up the phone portal instead. Finally it rebuilds the initramfs
and arms the flash.
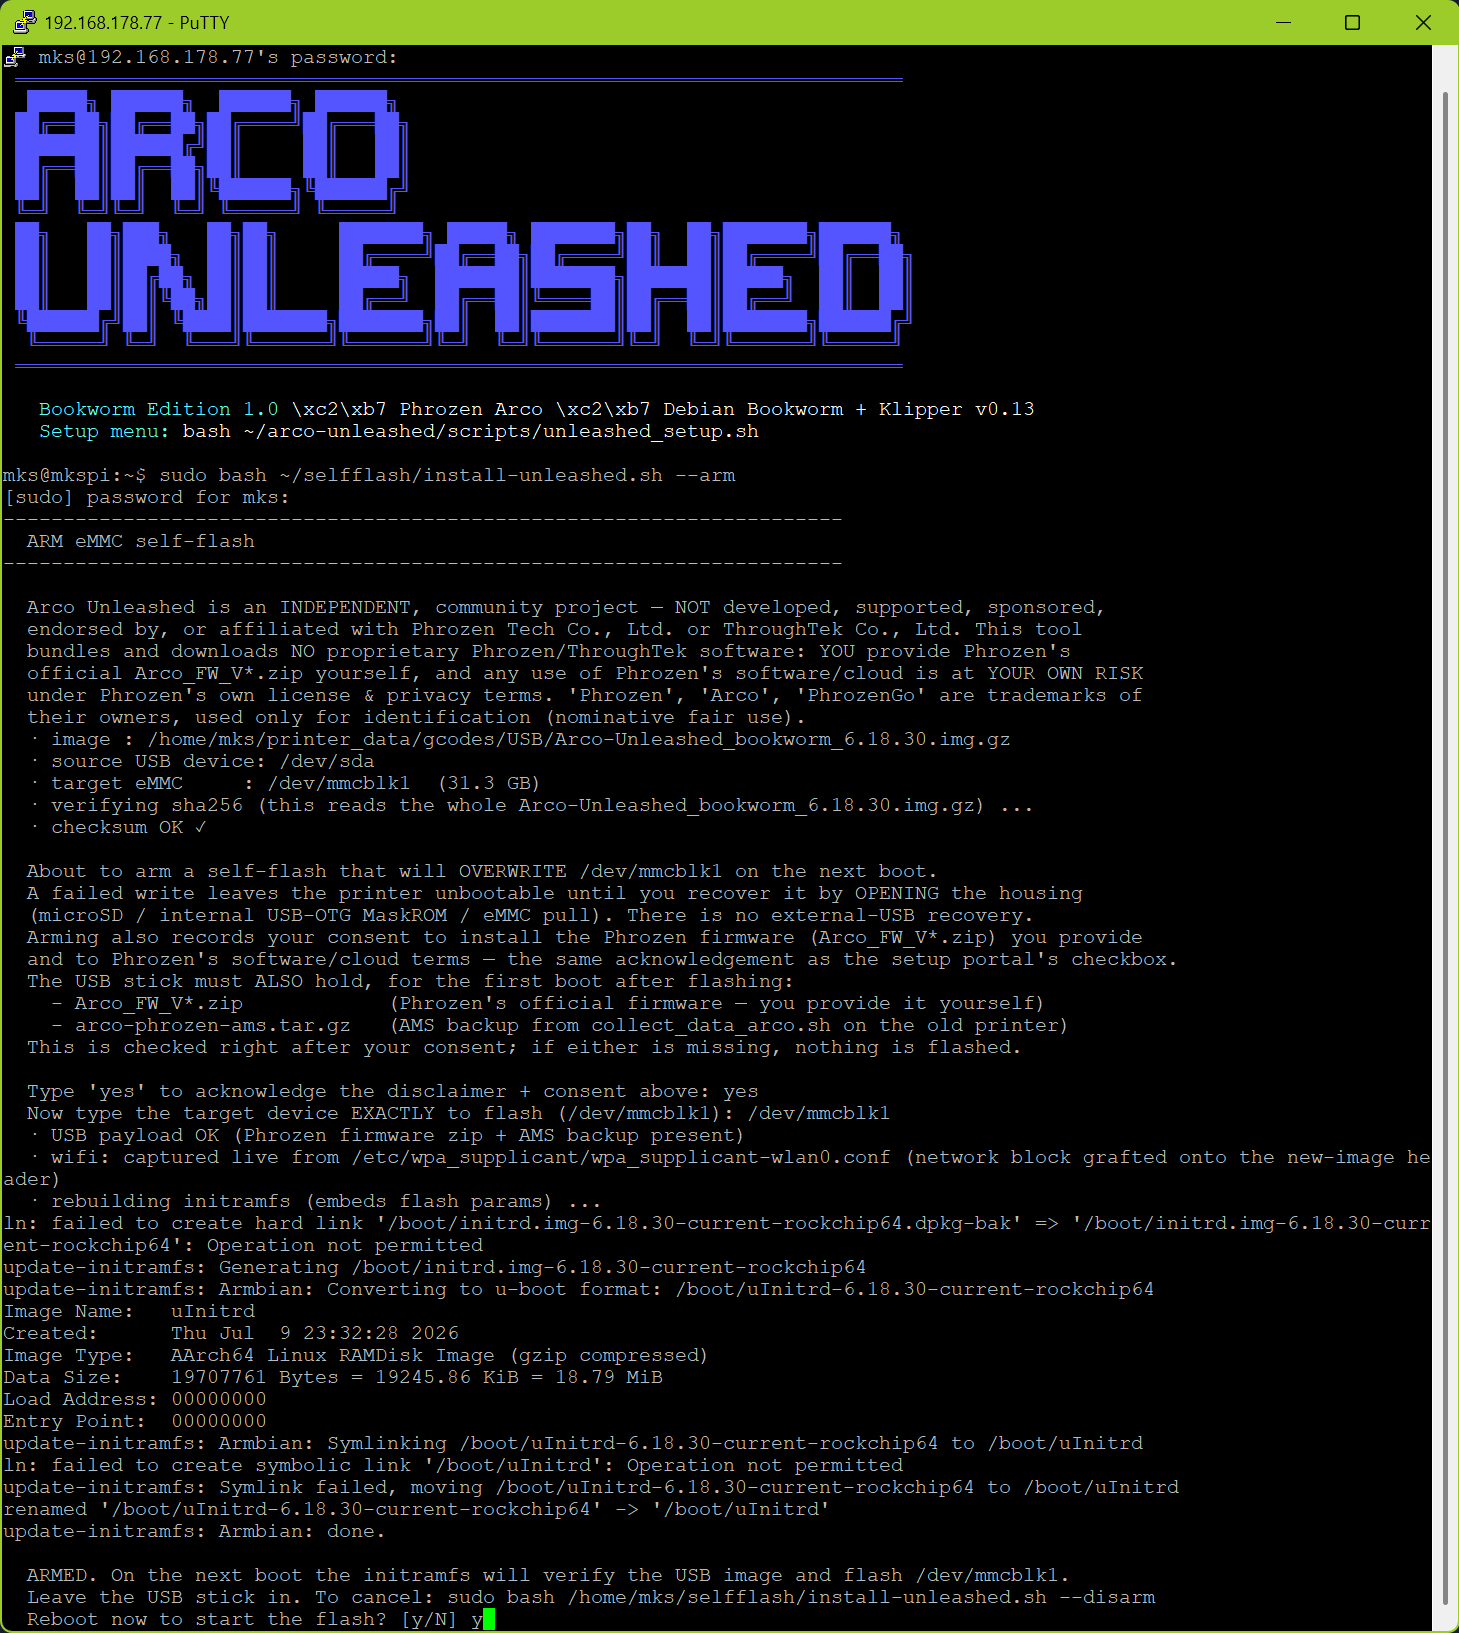
Two things in that screenshot are older than the current build: it predates the WiFi confirmation prompt, and the two
ln: … Operation not permittedlines are gone now. Those were harmless anyway —/bootis FAT32, which has no links, soupdate-initramfsjust copies instead. Current builds filter them out.
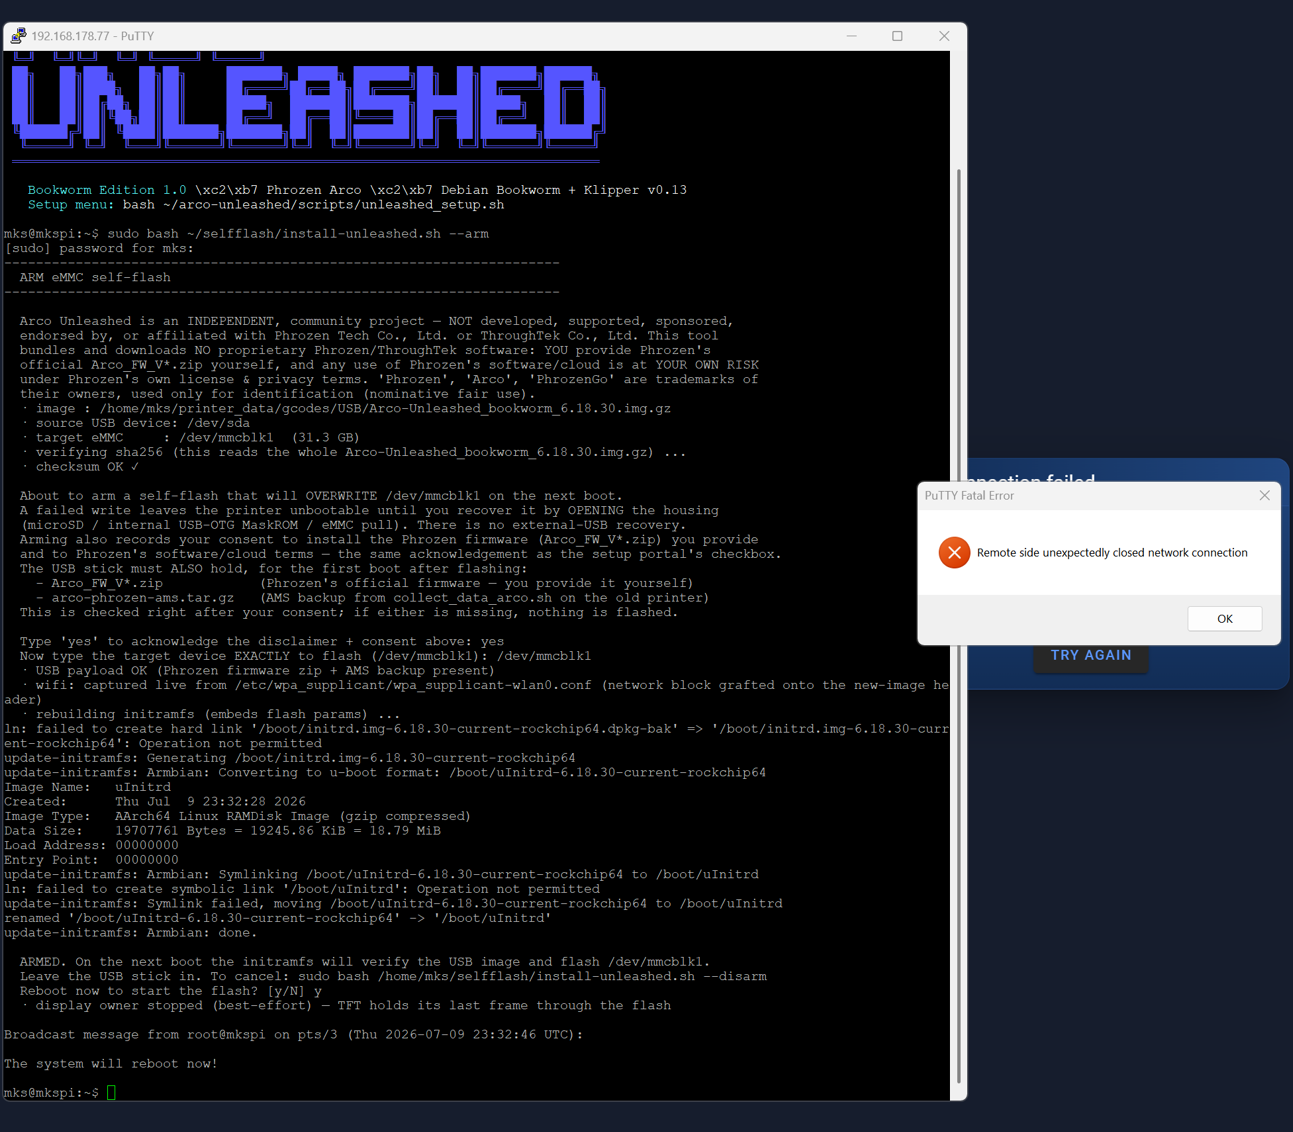
Answer y. Your SSH session drops immediately —
that is the reboot, not a fault.
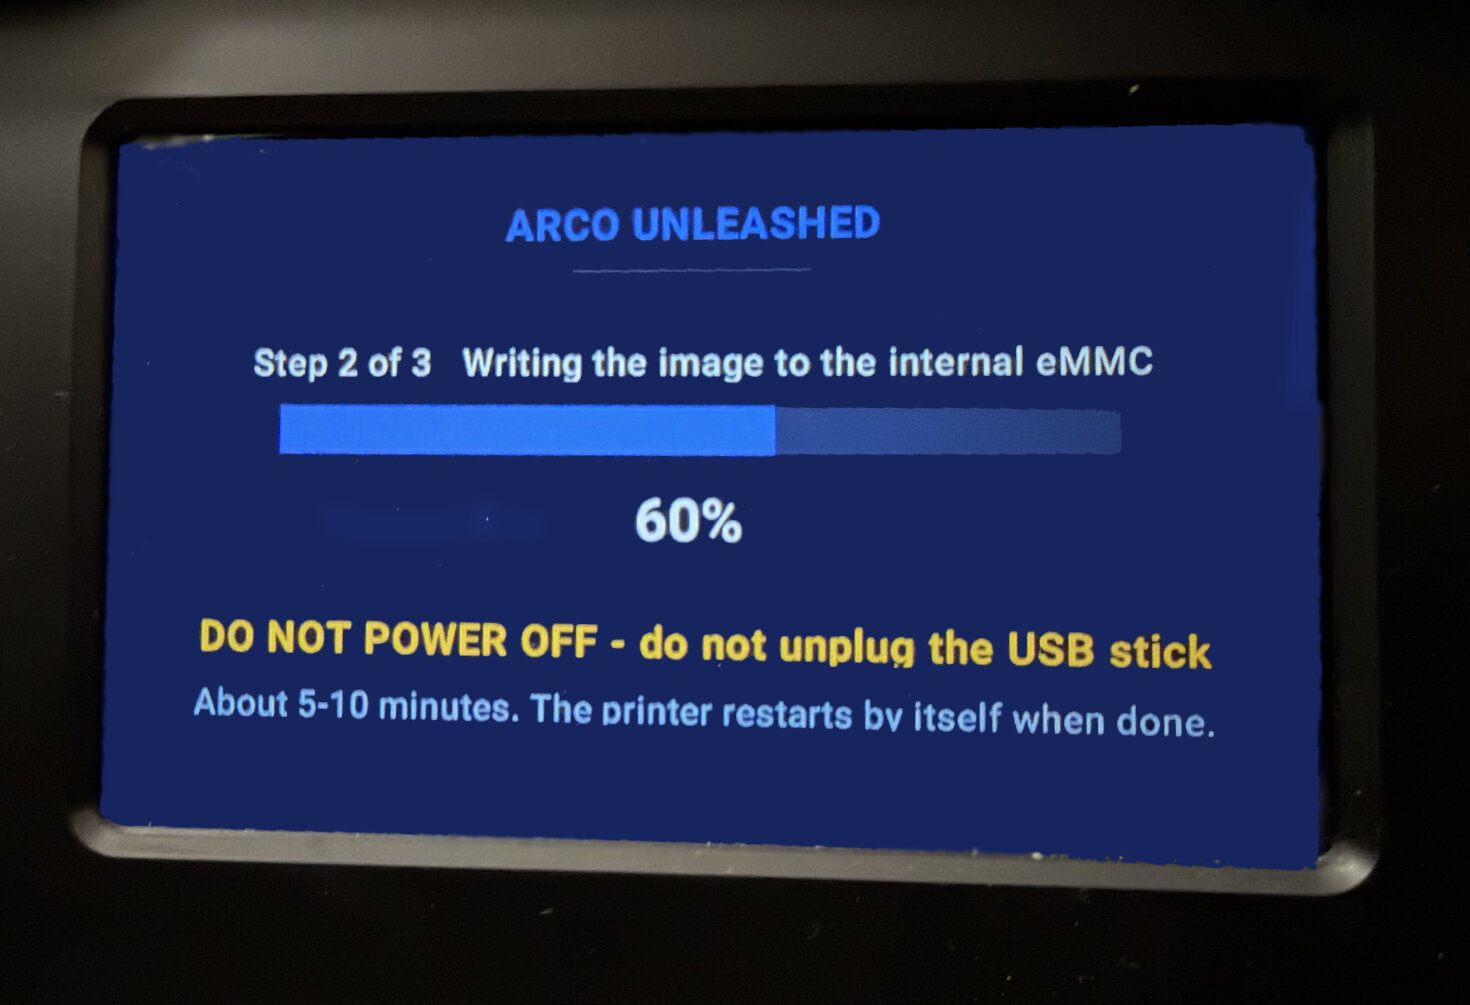
Three named phases run in order: check → write → verify. The check phase is the only quiet one: write and verify both say DO NOT POWER OFF, and both mean it — during the write the eMMC is mid-write, and during the verify it is still unproven.
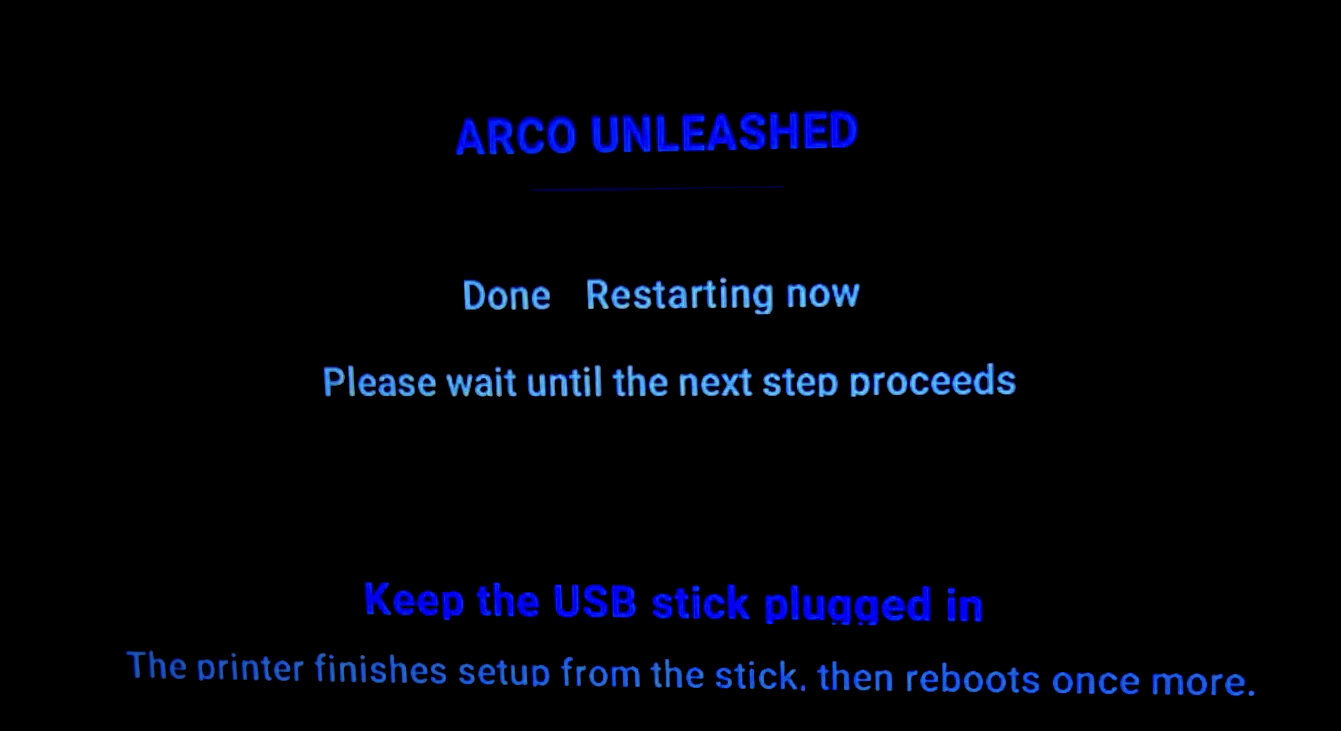
Leave the stick plugged in. The printer restarts by itself, brings up the WiFi, installs Phrozen’s parts from the stick and restarts once more. Then carry on at Step 3.
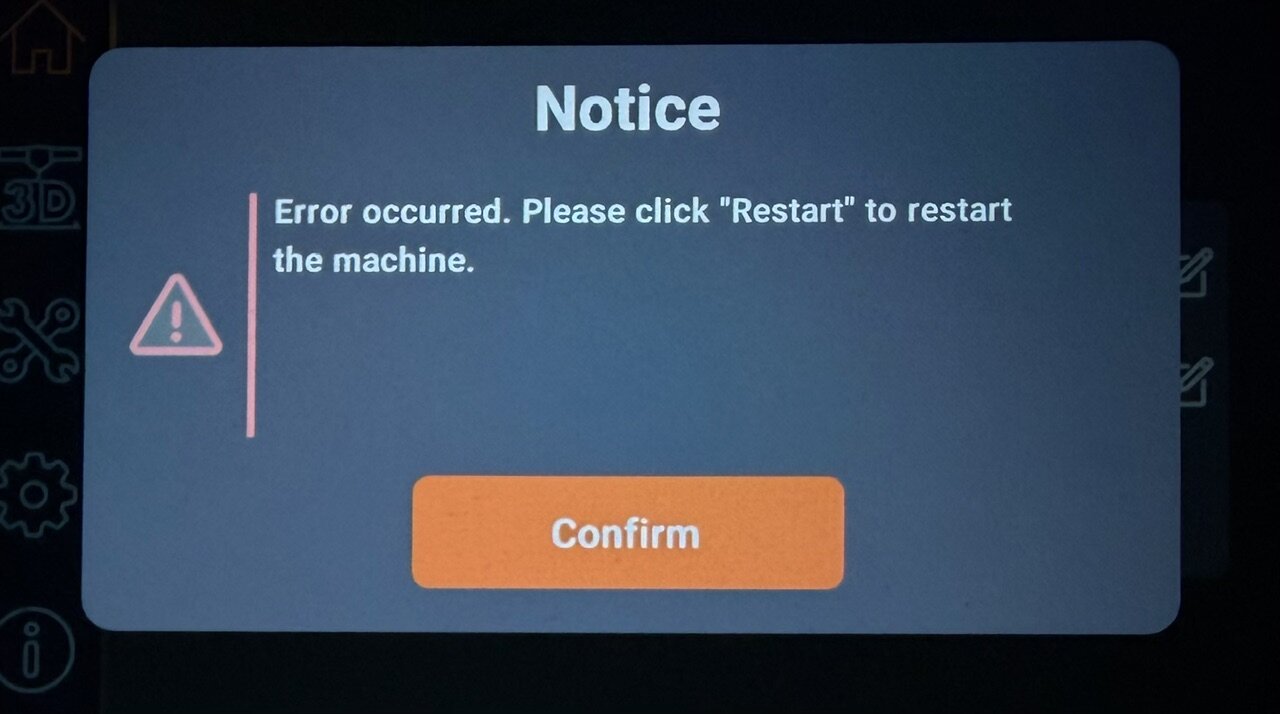
After the Phrozen install the display shows “Update complete — wait for restart…”, restarts itself a few seconds later, and then settles on a “Notice — Error occurred” screen.
That error is expected. Klipper cannot start until the MCUs are flashed in Step 5, so the display has nothing to connect to. Restarting or power-cycling will not clear it. Wait for that screen to settle — that is how you know the automatic restart is finished. Only then connect over SSH. Connecting earlier just means the restart drops your session.
You should not see Phrozen’s first-time setup wizard (language → name → chute calibration → homing). It is switched off on purpose, because it ends in a homing move that cannot complete before Step 5. If one does appear, do not work through it — power-cycle once or twice and it clears itself.
If the WiFi does not connect — wrong password, a changed or 5 GHz network, or you chose
no_wifi.txt— the printer raises its own hotspot instead. JoinArco-Unleashed-Setupfrom a phone, open192.168.4.1and enter your network. It waits about 90 seconds for the seeded WiFi before giving up, so do not pull the plug before then.
Image missing, checksum mismatch, the flasher hanging — pull the USB stick and power-cycle. With no image on the stick the flasher stands down and your existing system boots normally. (Once the write has begun, only Appendix A can recover the printer.)
The flash stays armed, and that is how you retry: put a good image back on the stick, power-cycle, and it tries again.
But if you stop here and go on using the old system, cancel the armed flash first. Otherwise the next boot with that image on a plugged-in stick overwrites the eMMC without asking:
sudo bash ~/selfflash/install-unleashed.sh --disarmThe image ships without Phrozen’s software. So the first boot does two things. First it asks you for a WiFi network from your phone. Then it installs Phrozen’s module: from the zip on your stick if there is one, otherwise by downloading it from Phrozen’s own repository once you confirm.
The stick needs arco-phrozen-ams.tar.gz on it — Step 2 put it there while flashing, unless you had
already made it yourself. Everything else it might use is already there
from Before you begin.
Only if the printer has no WiFi yet. If you let the
flasher copy the network it was already using — the recommended route —
the printer is on your network the moment it boots and there is no
hotspot and no portal. Skip to §2 and simply wait.
The rest of this section is for a no_wifi.txt, or a seed
that did not join.
Power the printer on and put the stick in before you press Connect in the portal.
On your phone, join the WiFi network
Arco-Unleashed-Setup. The captive portal
opens by itself (or go to 192.168.4.1). Pick your network,
enter the password, choose your country, tick
the consent box, and press Connect. The
printer reboots onto your WiFi.
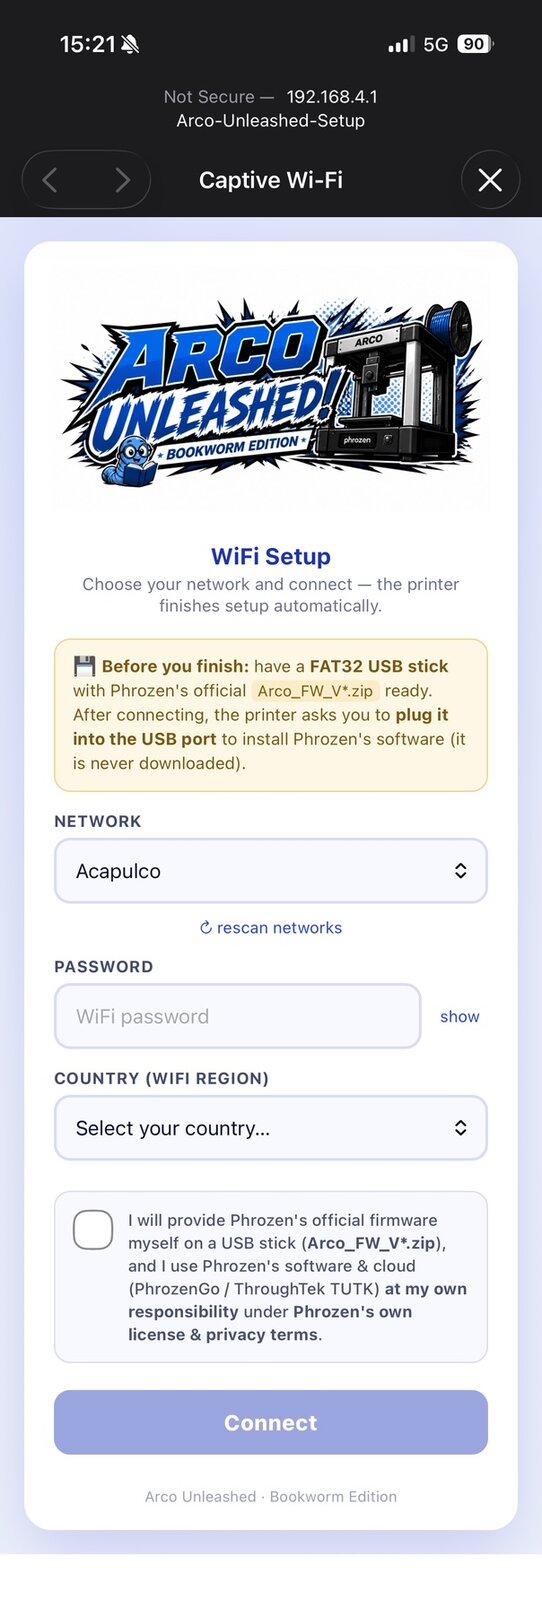
After that reboot the install starts from the stick, and the display shows its progress — Reading → Installing → Patching:
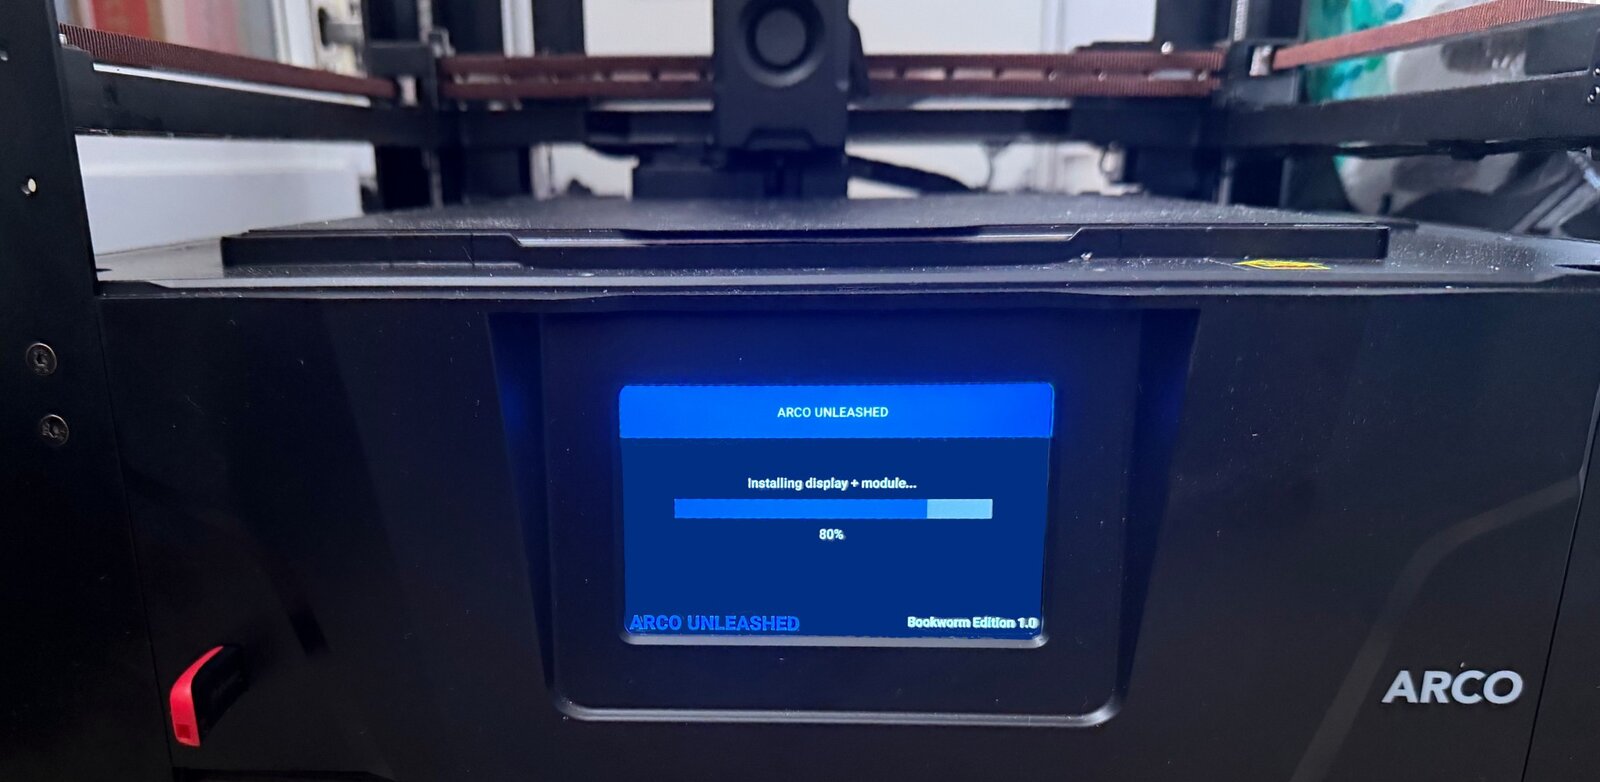
At 100 % it shows “Update complete — wait for restart…” and reboots on its own a few seconds later. Let it.
Do not switch it off here. The filesystem batches writes for up to two minutes, so pulling the power at this point can cost you most of the install.
Once it is back up you can remove the stick. The rootfs is resized to the full card during this boot, and the SSH host keys are generated.
The display settles on “Notice — Error occurred”.
The install did not fail. Klipper cannot start yet because the MCUs still carry Phrozen’s old firmware, so the display has nothing to talk to. Restarting or power-cycling will not clear the error. It clears by itself once you flash the MCUs in Step 5. Wait until that screen has settled — that is how you know the automatic restart is done — then continue with Step 4.
Two things you may be offered here, and should decline:
The printer tries any WiFi you seeded for about 90 seconds before it gives up and raises the hotspot. So wait that long — and up to 150 seconds if it is still making progress.
If neither the printer nor the hotspot turns up, hand it the network
from the stick instead. Create
wifi-seed.txt in the stick’s top-level
folder:
SSID=YourNetworkName
PSK=YourWiFiPassword
COUNTRY=USPut the stick back in and power-cycle. This stage
runs again on every boot until the Phrozen install has finished, so it
will pick the file up. The network must be 2.4 GHz, and
watch out for Notepad saving the file as
wifi-seed.txt.txt.
Each seed file is used once, on purpose. A later boot must not overwrite a network you set through the portal in the meantime. Once applied it is renamed
wifi-seed.txt.appliedso you can see it was picked up. “Once” is judged by the file’s contents, recorded on the printer — not by its timestamp, because FAT sticks record local time and Linux reads it as UTC, which made timestamps useless. To try again the details have to genuinely differ, for example a corrected password; rewriting the identical file changes nothing.
Older images do not read wifi-seed.txt yet. There the
rescue takes two files on the stick — note the leading
dots:
.arco-skip-portal — an empty file
.arco-wifi.conf — a complete wpa_supplicant
config:
ctrl_interface=/run/wpa_supplicant
update_config=1
country=US
network={
ssid="YourNetworkName"
psk="YourWiFiPassword"
}This project never updates the display firmware. If you install from Phrozen’s zip, that package happens to carry panel firmware, and Phrozen’s own updater may flash it when the versions differ. The download route carries no panel firmware, so nothing about the display changes.
If your printer was on an older Phrozen firmware and the display looks wrong, run one official Phrozen USB firmware update. That is how panel firmware is meant to be updated, and it is safe here — the self-heal guards re-apply the v0.13 Klipper patches by themselves on the next boot.
unleashed.local, Port
22, Connection type SSH →
Open (accept the host-key warning on first
connect).mks / password
makerbase. You’re greeted by the Arco
Unleashed banner:
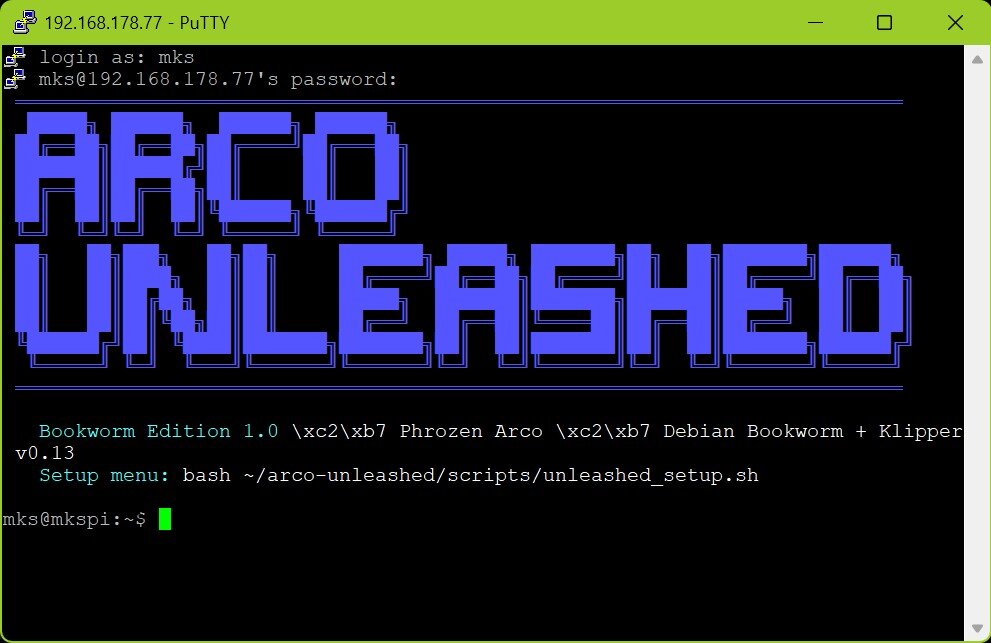
If
unleashed.localis not found, your network is not passing mDNS — some routers and most guest or corporate networks block it. Two ways to the address: the printer writesip.txtonto the USB stick at every boot, holding both the IP and the.localname — so put the stick in, power-cycle, and read it on your PC. Or find it in your router’s device list under the host nameunleashed.You cannot read the IP off the display here. The panel is still on the “Error occurred” screen from Step 3 and stays there until the MCUs are flashed in the next step.
Open the setup menu — everything from here on runs from it:
unleashed(If your shell says it does not know that command, you are on a
printer set up from an older image: the shortcut is installed on first
boot, so it is not there yet. The long form still works —
bash ~/arco-unleashed/scripts/unleashed_setup.sh — and
sudo bash ~/arco-unleashed/scripts/optimize-boot.sh puts
the shortcut in place, along with anything else the kit expects and your
printer is missing.)
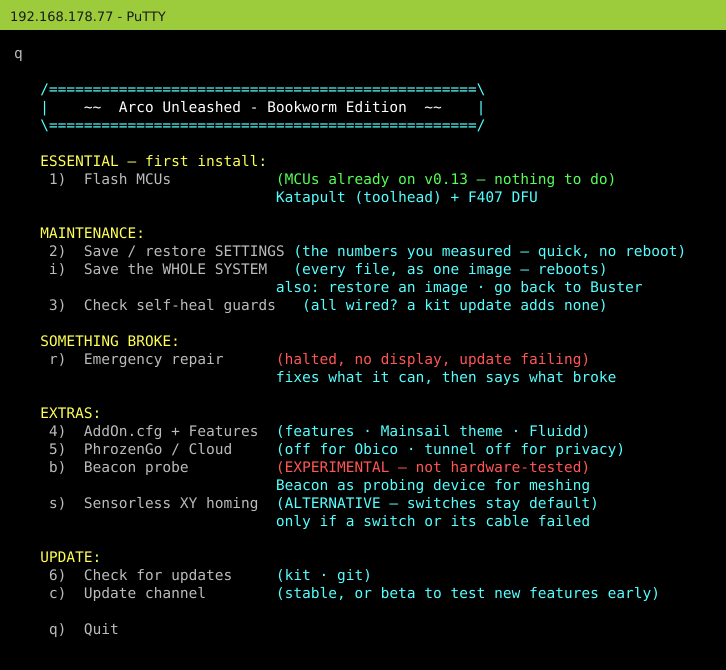
Take 1 — Flash MCUs. It is the only item you must run — everything else in the menu is optional. That is why it comes first, before the tour of the rest in Step 6.
First boot did everything else automatically. This is the
one thing you must still do by hand. The host now runs
Klipper v0.13, but your printer’s MCUs still carry the
old firmware. Flash them, or Klipper can’t talk to them
(mcu: Unable to connect /
Command format mismatch).
Until you do this, the display settles on a “Notice — Error occurred” popup and Klipper stays in an error state. That is expected, not a fault — tapping Confirm/Restart just reboots into the same screen, because the display cannot recover from an MCU-firmware mismatch on its own. Don’t set anything up on the display — the fix is the SSH MCU-flash below (this is why WiFi/SSH access matters after a self-flash).
You are now in the Flash MCUs submenu. Flash all three in one go, or one at a time — all three have to end up flashed:
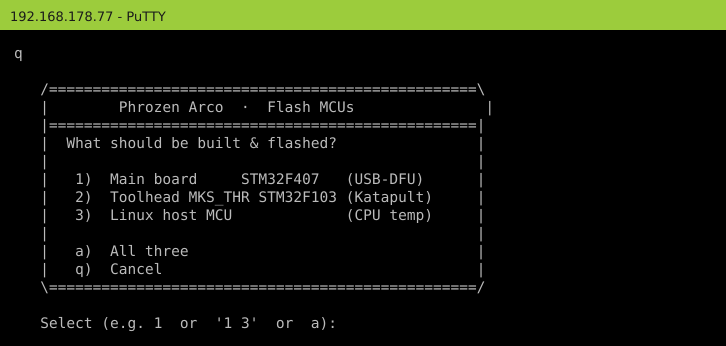
1) Main board — STM32F407 (USB-DFU) — flashes
automatically, no buttons. It also reads your
board’s chip id before flashing and writes it into
printer_MCU.cfg for you (the id is burned into the
chip and survives the flash).
3) Linux host MCU (CPU temp) — flashes automatically, no buttons.
2) Toolhead — MKS_THR STM32F103 (Katapult) — the
only one that needs a hands-on button step, and only
for its one-time Katapult install. Read the toolhead button step
before you pick 2. It needs the toolhead covers
off and the printer running. The script first offers
[i]nstall Katapult, then fetches packages and builds the
firmware — several minutes before it asks for the buttons. Do not pull
the power while the script or a DFU write is in flight.
The Katapult build configures itself from a setting the kit carries for this toolhead. If it ever opens a configuration menu instead, that setting was missing or a Katapult update renamed something — the script prints which value disagreed and what to set it to.
The buttons sit inside the toolhead, so two covers come off first — power the printer off and unplug it for the teardown only. The flash itself needs the printer running, so you will switch it back on before you touch a button.
PentaShield or other add-on panels fitted? Remove at least the rear panel now. The toolhead’s back cover and its four screws are not reachable past it, and you need both hands free at the printhead. Move the toolhead to a comfortable position by hand first — the motors are off.
1) Front cover. Take it off — but it is still wired: unplug the fan before you set it aside.
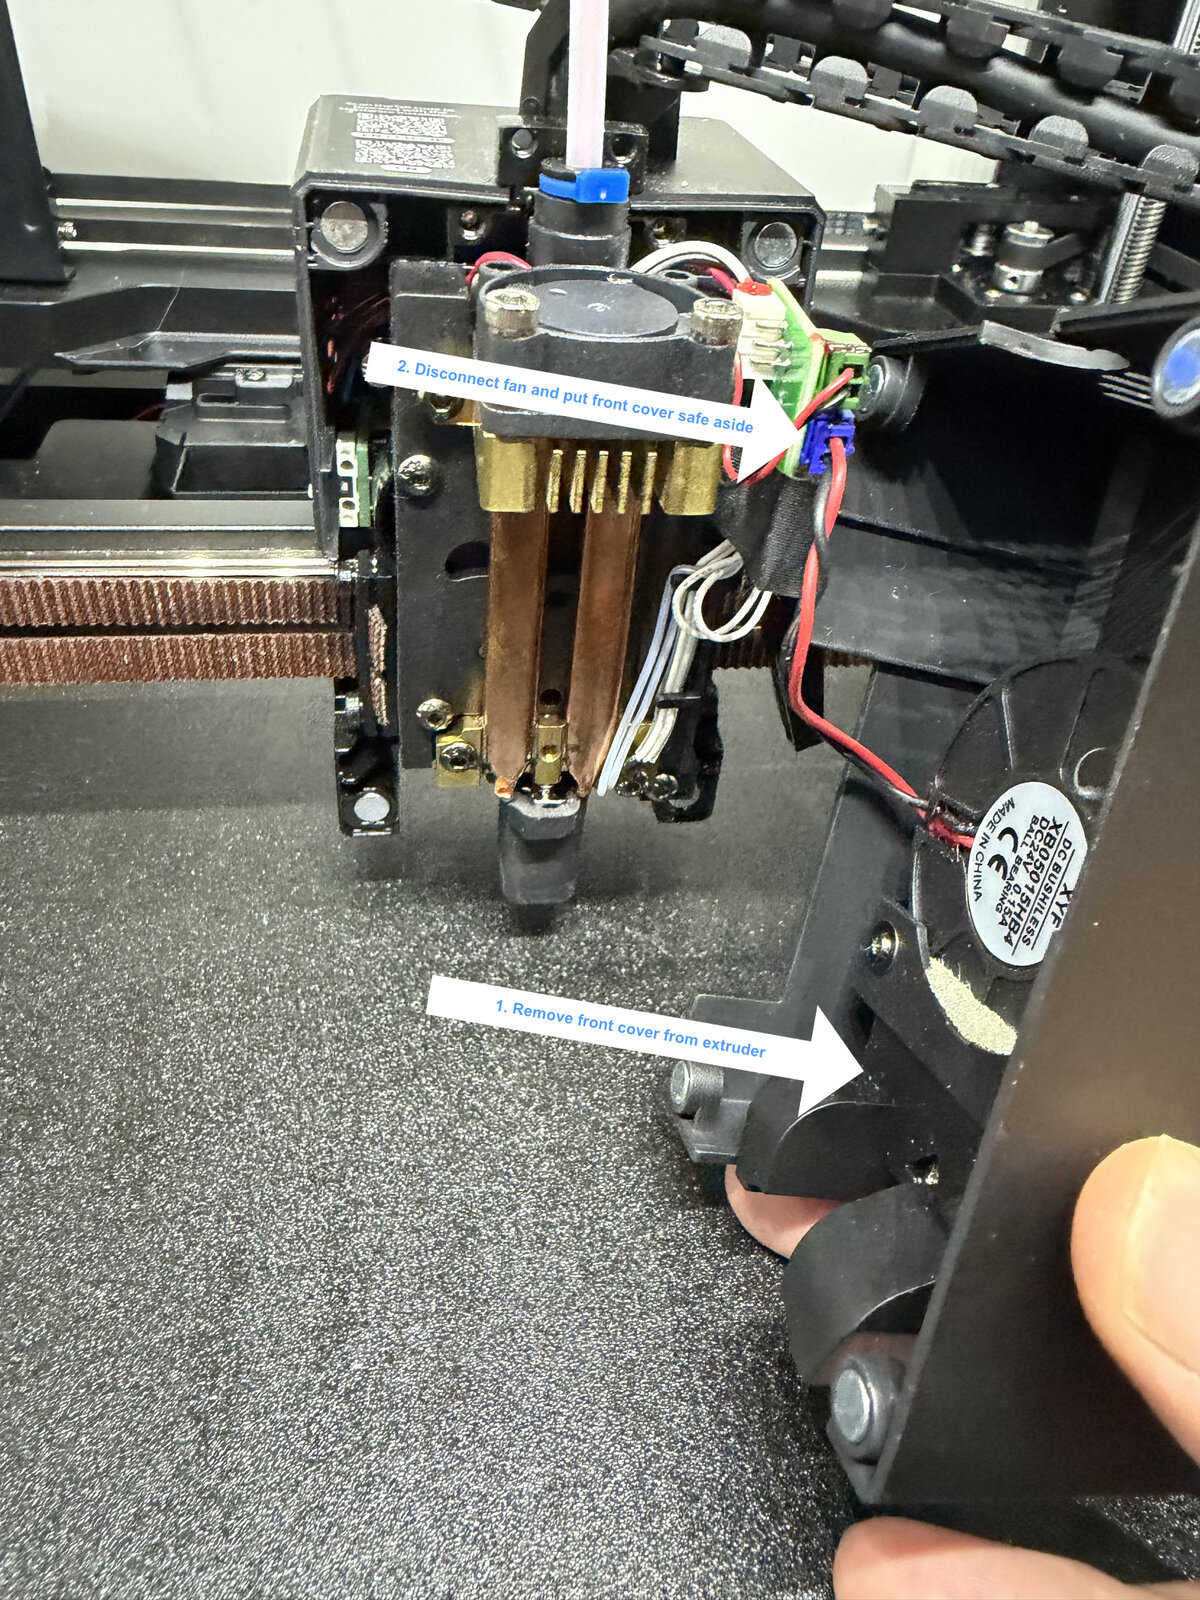
2) Back cover — four screws. Two on top, seen from behind the toolhead:
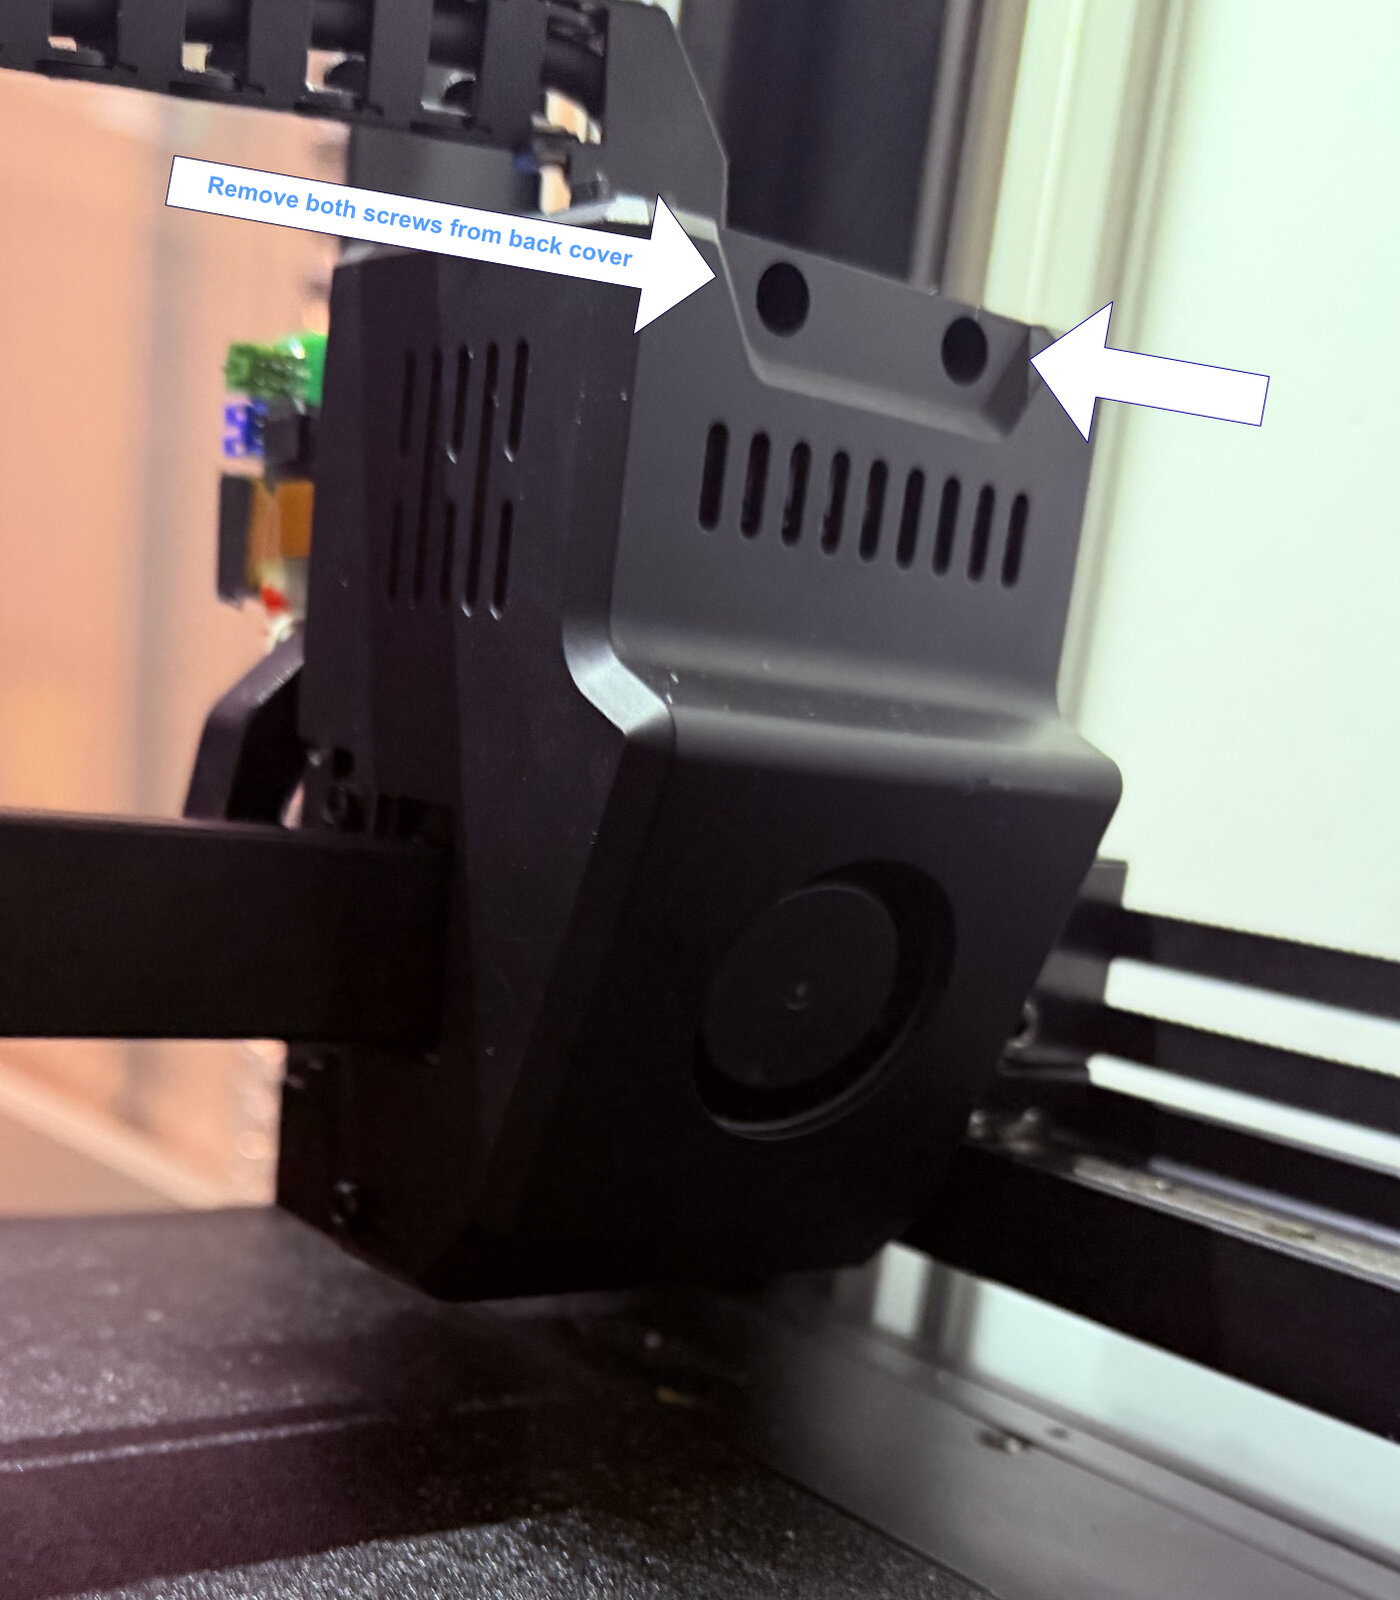
…and one low on each side — left, then right:
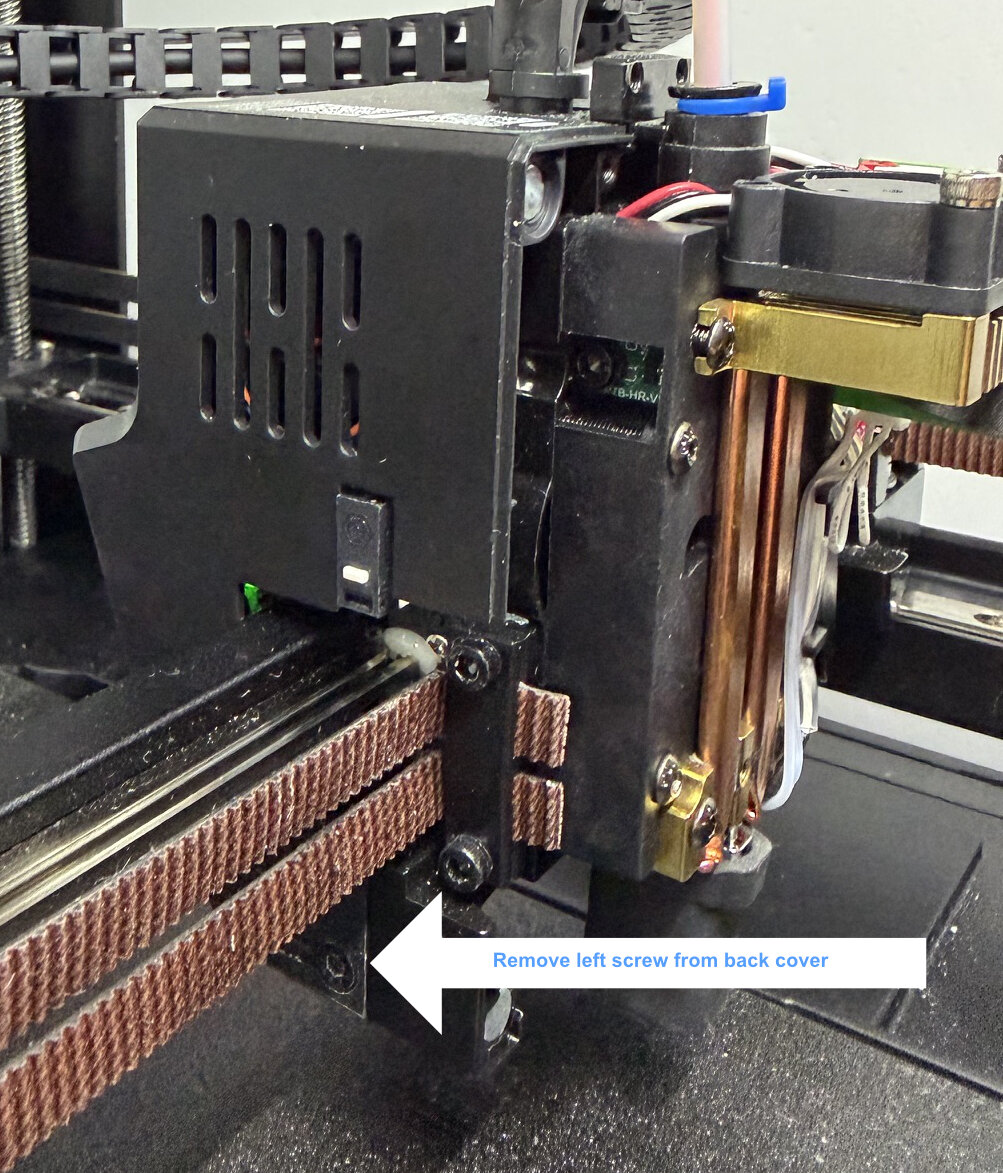
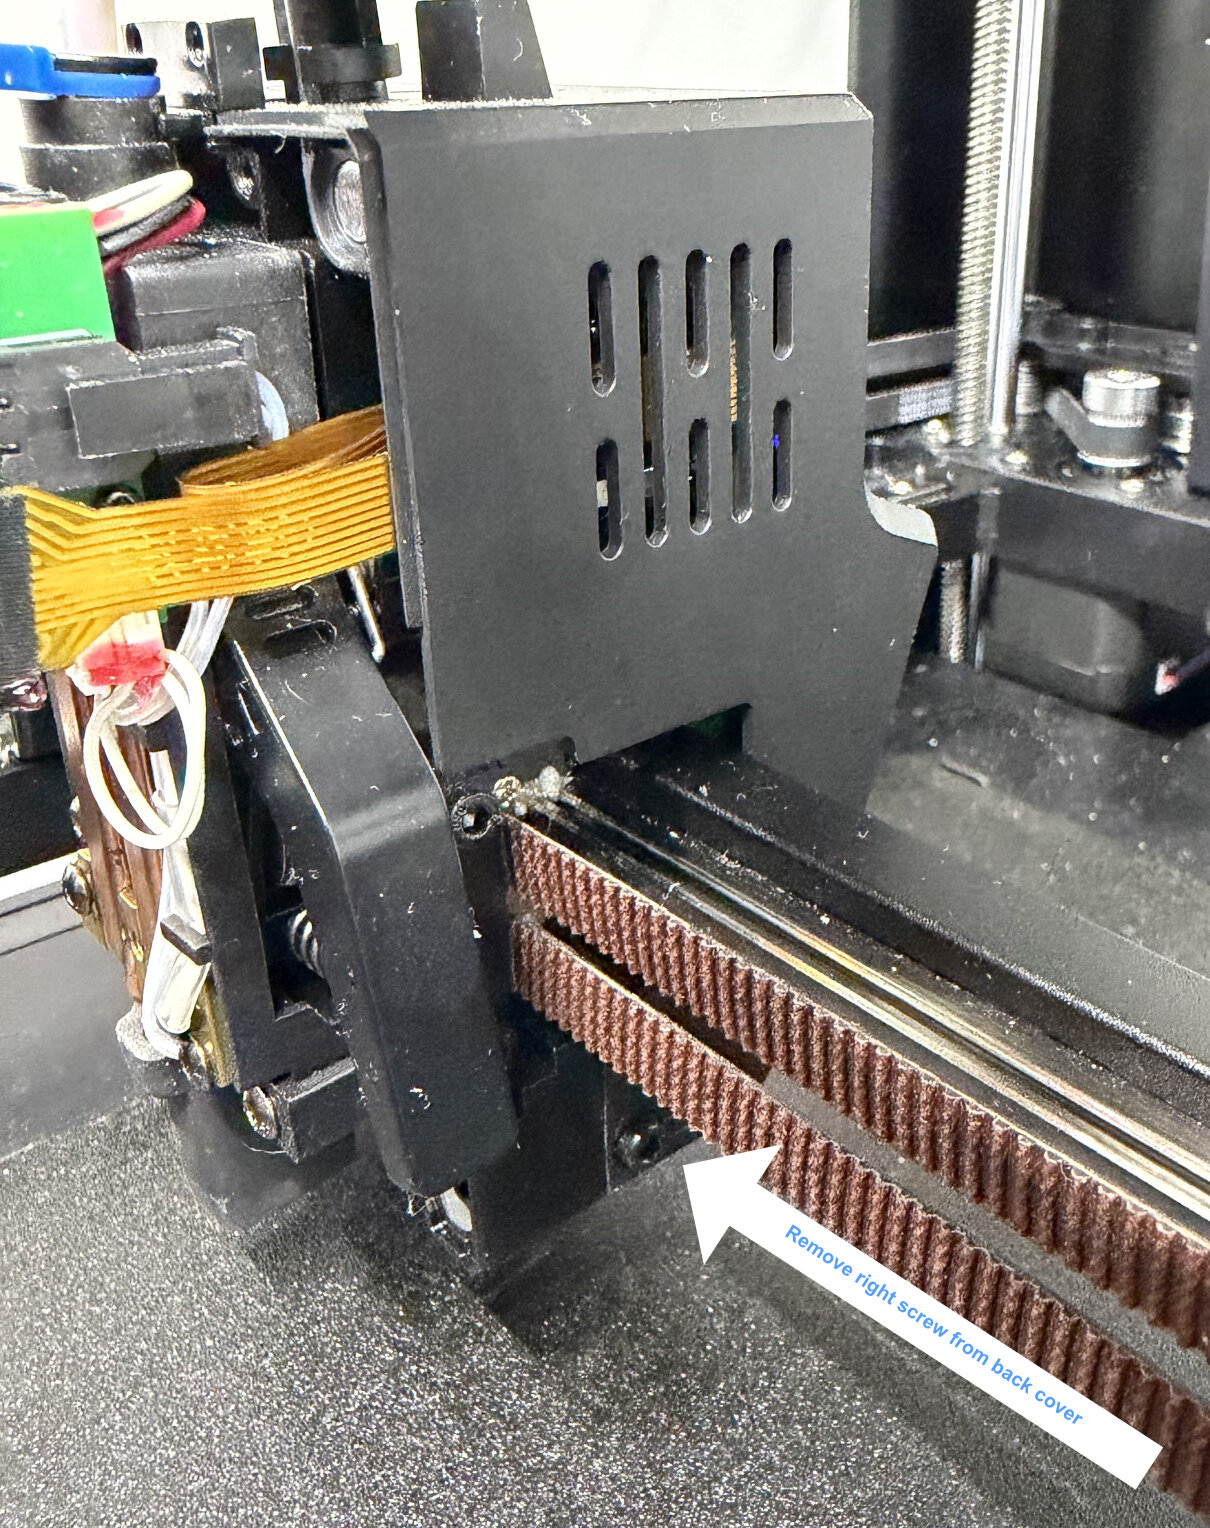
⚠️ Two things that catch people here.
The two screws on top drop backwards. As the last thread lets go they tip away from you — straight down the purge chute, where you will not get them back without taking more of the printer apart. Hold a finger behind each one as you loosen it, or lay a rag over the chute opening before you start.
A microswitch sits behind the left edge. The cover has to clear it, so press the housing slightly sideways as you lift that side off rather than pulling the cover straight towards you.
On the right, a ribbon cable is tucked in behind the cover. It is loosely folded and has plenty of slack, so it will not stop you — just take the cover off gently and let the cable follow instead of dragging it.
3) Power back up and get the script waiting. Plug in, switch on, wait for the boot, connect with PuTTY again (Step 4) and run:
unleashed→ 1 (Flash MCUs) → the toolhead F103. The toolhead stays
open from here: the flasher stops Klipper, so nothing homes and nothing
heats — just leave the part-cooling fan unplugged until the covers go
back on. Work through the prompts until the script says it is waiting
for you to put the toolhead into its bootloader. That prompt is
where the button procedure below belongs — the buttons do
nothing before it, because an unpowered board cannot reset and there
would be nothing listening.
Close it up when the flash is done. Power the printer off and unplug it, plug the front cover’s fan back in, refit the front and back covers and their four screws, then power it on again. Klipper needs the power-cycle in Finish below anyway, so do both now: refit the covers and power-cycle.
4) The board is now exposed. On the toolhead board (Phrozen-A V1.5), find the two buttons labelled RESET and BOOT:
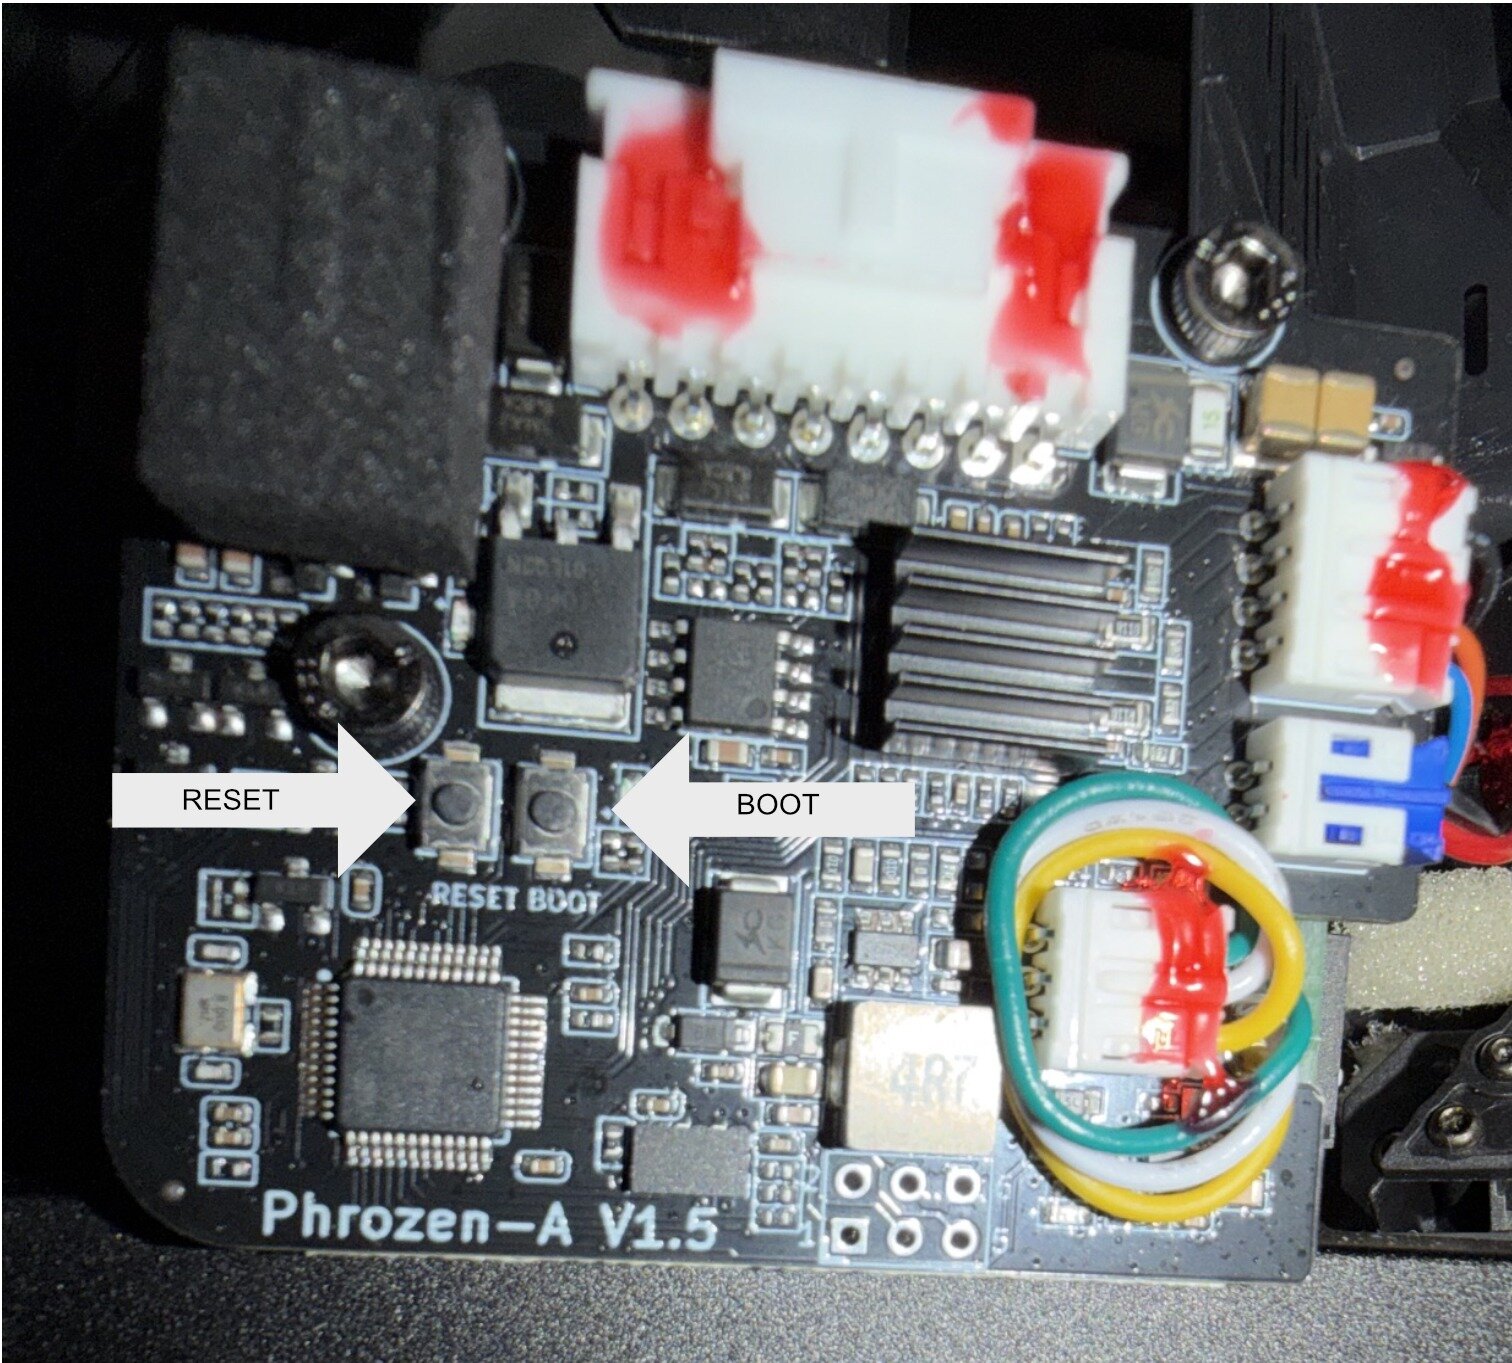
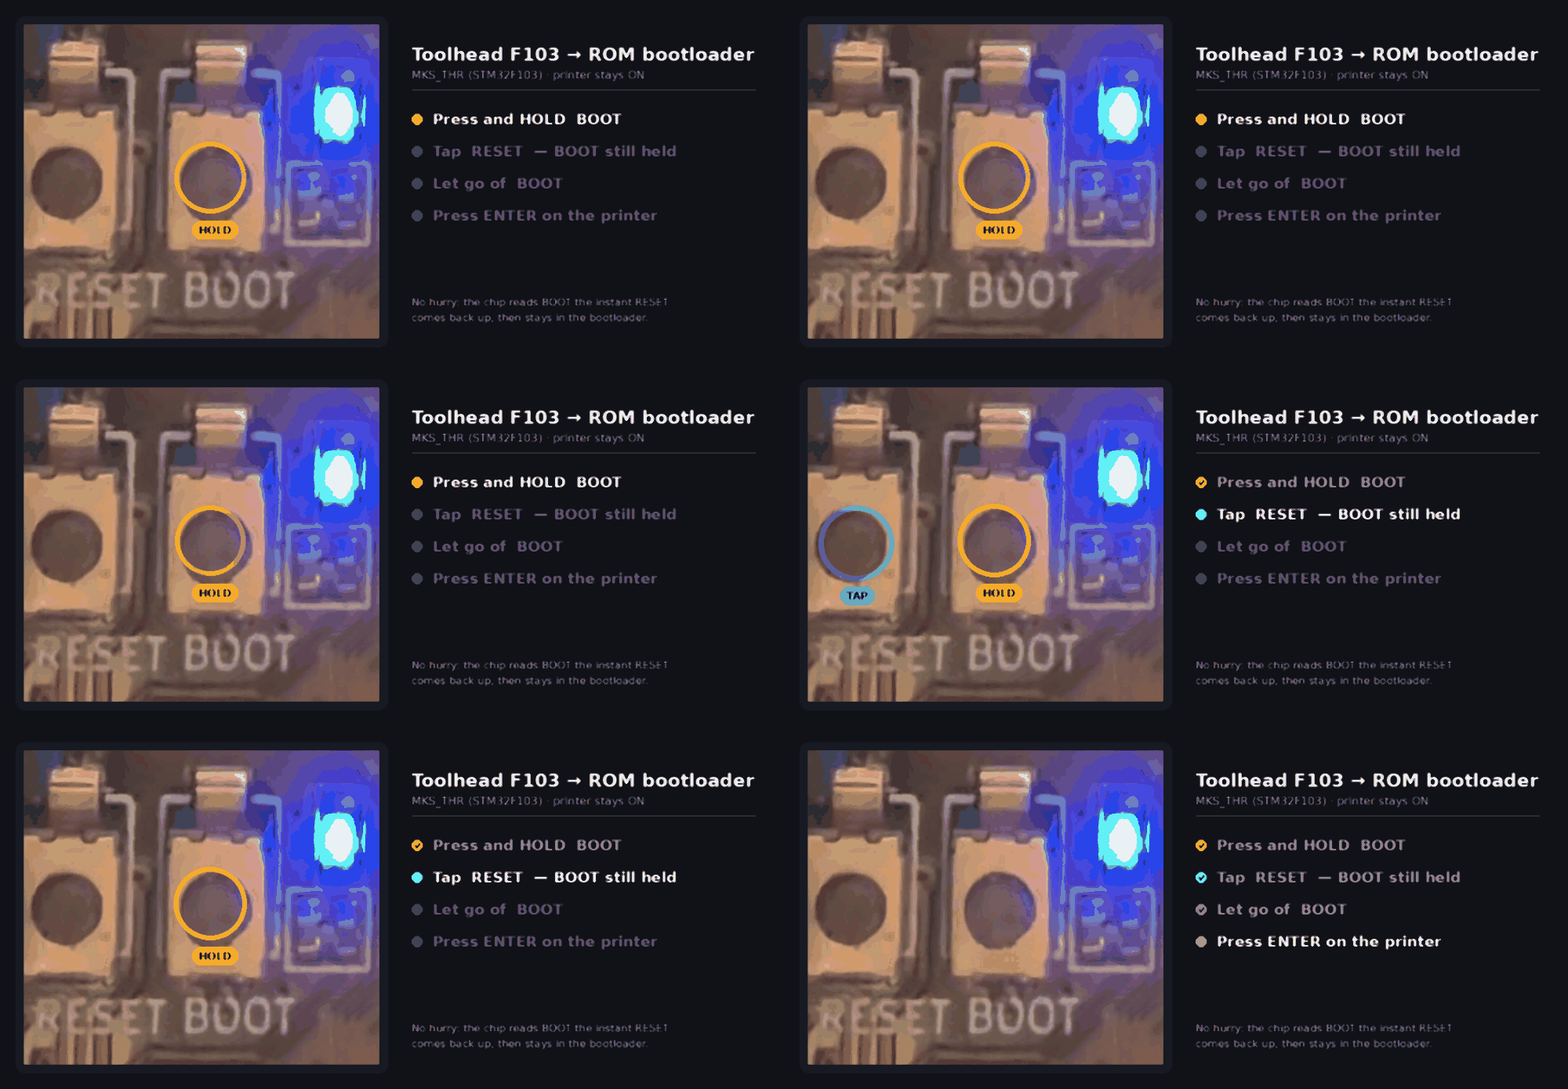
Procedure: 1. Press & hold BOOT. 2. Tap RESET — press and release it — while BOOT is still held. 3. Let go of BOOT. 4. Press ENTER at the waiting prompt. Take your time. 5. Wait until the flash runs through (~40 s at 9600 baud, after a mass-erase).
There is no countdown. Only one instant matters, and being slow cannot make you miss it. The chip reads BOOT the moment RESET comes back up — ST documents it as latched on the fourth rising edge of SYSCLK after reset release, half a microsecond in. Hold BOOT before RESET comes back up and the chip enters the bootloader. After that moment BOOT does nothing, and the chip stays in the bootloader until something resets it again. The old “~3 second window” cannot have been true of this procedure anyway: step 5 alone transfers ~40 KB at 9600 baud, so the session lasts about a minute. If the bootloader gave up after three seconds, this step could never have worked once.
Tip: after the one-time Katapult install, future F103 flashes run over the same serial link without the button dance (Katapult keeps it flashable).
Nothing to do with Arco Unleashed — it is how the STM32F103 starts up.
stm32flash talks to — is selected only by the
BOOT0 pin at reset. Unlike newer STM32 families it has no
nBOOT_SEL option byte that software could set to choose it.
(ST reference manual RM0008.)src/stm32/stm32f4.c
ends bootloader_request() with dfu_reboot() —
which is exactly why the main board flashes with no buttons at all. The
F103 path, src/stm32/stm32f1.c, has no such call. It can
only hand off to a bootloader that is already in flash
(Katapult, HID, stm32duino). A stock board has none, so the request does
nothing. In other words: to install Katapult in software you would
already need Katapult.1) Power-cycle. Full power off (~10 s), then on — a reboot is not enough here. Freshly flashed MCUs only start their new firmware after a real power cut, which is why the flasher deliberately leaves Klipper stopped: the power-cycle brings it up cleanly.
2) Check. Open Mainsail in a
browser at http://unleashed.local/ — the
same address you gave PuTTY in Step 4. The printer’s IP works too, and
:81 on either address. It should come up
ready, with no MCU error, and the display’s Notice
— Error occurred popup is gone too. That’s Step 5 done.
mcu: Unable to connect — the chip id
Every STM32F407 carries a unique chip id, so its
/dev/serial/by-id/usb-Klipper_stm32f407xx_… path is
different on every board. Any real id baked into the image would match
one single printer, so the image ships a
CHANGE-your-chip-id placeholder instead. The flasher
normally fills it in for you: it reads the id from your running board
before putting it into DFU, and the id survives the
flash because it is burned into the chip.
That read only fails if the board was already in DFU when you started (you pressed BOOT0, or an earlier attempt left it there) — a DFU device doesn’t announce a Klipper serial. Then the placeholder is still in the config. Fix it in one command, with the printer powered on and running its new firmware:
bash ~/arco-unleashed/scripts/set-mcu-serial.sh
sudo systemctl restart klipperWith the MCUs flashed, the printer is complete. What follows is a menu tour; the one thing you still have to do is Step 7 — Calibrate. The power-cycle at the end of Step 5 ended your SSH session. Give the printer a minute to finish booting, connect again as in Step 4, and re-open the menu — you can do this at any time, from now on:
unleashedThis is what it has to offer.
The menu groups the entries into five sections: - ESSENTIAL — 1 Flash MCUs (done) - MAINTENANCE — 2 Save / restore SETTINGS · i Save the WHOLE SYSTEM · 3 Check self-heal guards - SOMETHING BROKE — r Emergency repair - EXTRAS — 4 AddOn.cfg + Features · 5 PhrozenGo / Cloud · b Beacon probe · s Sensorless XY homing - UPDATE — 6 Check for updates · c Update channel
2 — Save / restore SETTINGS covers the one thing no
guard can do for you: guessing back numbers your machine measured —
worth running once you have calibrated (Step 7), since
that is when those numbers first exist. It saves your printer
configuration and calibration, the web interface’s own settings (theme,
presets, macro groups, history — none of which live in
printer.cfg), your WiFi and the phrozen_dev module, and
puts them back on request. It can also write the backup to a USB
stick, which is the copy that survives a reflash — the local
one sits on the very eMMC it is protecting.
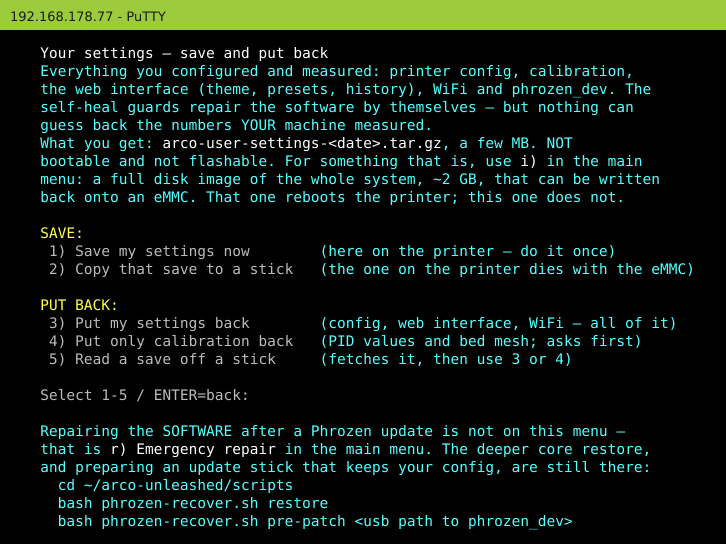
i — WHOLE SYSTEM: save / restore is the other kind of backup, and the two are easy to confuse, so the screens say what each one produces. Entry 2 above writes an archive of your settings, a few MB, which cannot be flashed and will not revive a printer that no longer boots. This one writes a bootable disk image of the entire eMMC — every file, the partition table, the bootloader. That image can be written back. It reboots to do it, images the eMMC before the system starts, and comes back on its own. The same entry restores: it lists the images on your stick and hands the chosen one to the flasher, which still asks for the target device to be typed out in full. Full walk-through in Step 1 for making one, and A3 for writing one back.
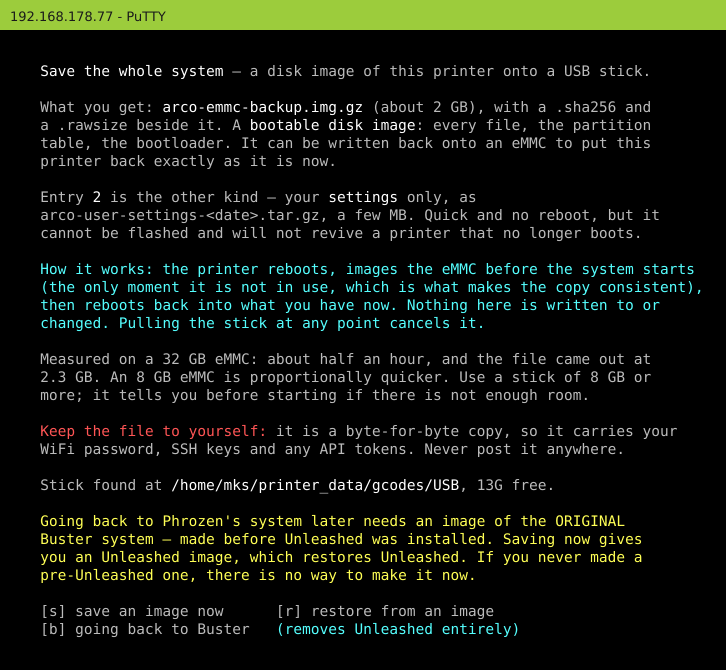
The same screen holds b — going back to Buster, which undoes this project completely and puts Phrozen’s original system back. It needs an image of that original system on the stick, made by you before Unleashed was installed. Phrozen’s firmware zip is not such an image: it is an update package, not a system. And once Unleashed is running, the original is gone and can no longer be copied. (Their support has supplied a factory image on request; what that does and does not give you is in Going back to Phrozen’s system.) If you think you may ever want to go back, that image is the thing to make first, in Step 1.
The menu drives this for you instead of leaving it to a note in this manual, because the MCU flash and the eMMC restore only work in one order. Swapping the eMMC back to Buster is only half of it: the MCU firmware sits on the chips, and a Buster host running Klipper v0.11 will not talk to MCUs left on v0.13 — the printer boots and then cannot find its own hardware. The flasher for those chips needs this system, so it has to run first. Do it the other way round and the only way to recover is to open the printer. The menu therefore flashes both MCUs back to v0.11, checks that this actually succeeded, and only then arms the eMMC restore. If a flash fails it stops there and changes nothing else — that is the safe outcome, and the printer still works.
Before any of it, three prompts. First you are told what disappears:
Klipper v0.13, the self-heal guards, sensorless homing, the AddOn
macros, Fluidd, the theme, the WiFi portal and this backup feature
itself. Then you confirm that the chosen image really predates
Unleashed. Finally you type
REMOVE UNLEASHED in full. Your prints,
Orca profiles and AMS are unaffected: this is about the printer’s
system, not your files. Nothing is undone by pressing ENTER at the wrong
moment.
AMS / Chroma Kit — the menu entry is gone, and so is the need
for it. Most printers do not have an AMS, and a printer that
opens an AMS serial port with nothing on the other end waits, retries
and reports errors for something the owner never attached. So the tool
commands T1 to T15 stay out of Klipper’s
command table until an AMS is actually attached.
The AMS enumerates as a USB serial device, so the printer can simply
look instead of asking you. It watches for the unit and keeps the
ams flag in step with what is actually plugged in — that
flag is the one the Orca start G-code reads.
T1–T15 come back within seconds of connecting,
and disappear again when the unit is removed. Never mid-print: if the
port disappears while a job is running, both the tools and the flag stay
as they are until the job has finished.
Earlier versions had AMS_ON, AMS_OFF and
AMS_STATUS macros and a menu entry that ran them. They are
gone. They asked you to declare something the printer works out better
by itself. And when that declaration disagreed with the hardware,
nothing told you: an attached, working AMS could read as “no AMS” to
every macro that asked, purely because nobody had pressed the button.
FILA_STATUS shows the current reading whenever you want to
check.
If the spools do not move, the missing piece is almost always
phrozen_masterfrom A0. It exists only on the original printer, no download contains it, and without it AMS detection hangs and the display spams connect to the server fail. To see whether it is there:ls ~/klipper/klippy/extras/phrozen_dev/frp-oms/
The waste conveyor hangs off the AMS, not the printer. It connects to the AMS with a DC barrel plug, and the AMS switches it on and off by itself as it works. There is therefore no setting for it anywhere on the printer, and nothing to configure: with the AMS switched off it simply never gets powered, and with the AMS connected it runs on its own.
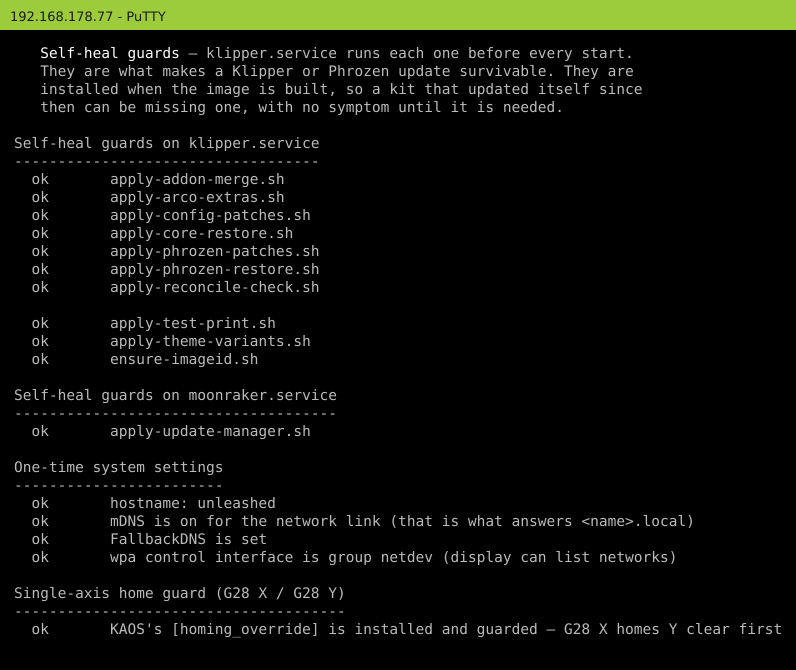
3 — Check self-heal guards answers a question you could not otherwise ask: does my printer have all the guards? They are installed when the image is built, so a printer that has been running for a while may be missing guards the kit has added since. It compares what is wired against what the kit expects, and offers to fix it.
r — Emergency repair is the single action for “something broke and I do not know what”. It does not ask you to diagnose first: every step is check-first and idempotent, so running it on a healthy printer changes nothing. It is described under Updating Klipper and Moonraker further down.

Bed mesh, PID, input shaper and purge position are measured per
printer, and the image ships none of them — another machine’s numbers
are worthless. Nothing here is optional if you want to
print. Pick one route. They do not quite reach the same place:
the two display routes leave PID out, so follow them
with PID_BED and PID_NOZZLE from Mainsail and
one SAVE_CONFIG.
Route 1 — factory-reset auto-calibration (easiest). Started from the Arco’s own touch display, in its settings/calibration area. It runs input shaper, bed mesh and purge position back to back and returns to the home screen by itself. Expect it to take a while and to move the toolhead a lot — that is the routine working. Done when it is back at the home screen on its own. (The exact menu path is Phrozen’s own UI and can differ between display firmware versions, so it is not pictured here — look for calibration or factory reset in the display’s settings.)
Route 2 — one routine at a time, from the display’s calibration menu. Same routines, run individually. Use this if one value needs redoing later rather than all of them.
Route 3 — from Mainsail, if you would rather see what is happening:
G28 ; home
SHAPER_CALIBRATE ; input shaper — needs the accelerometer
BED_MESH_CALIBRATE ; bed mesh
PID_BED ; bed PID (macros from AddOn.cfg)
PID_NOZZLE ; nozzle PID
SAVE_CONFIG ; writes the results and restarts KlipperRoute 3 misses the purge position, which only
the display routines measure. If you enabled the
shaper130 feature, CALIBRATE_SHAPER_NEW is
the kit’s shorter stand-in for SHAPER_CALIBRATE: it sweeps
to 130 Hz rather than 150, because above that nothing on this machine is
real resonance.
Done when SAVE_CONFIG has restarted
Klipper and Mainsail comes back ready. No z-offset
step: the Arco probes with a load cell, so the Z
reference is found automatically.
About the “print test” the factory reset offers. The old warning here said the bundled file could not run at all. That is no longer true. This kit replaces both built-in test prints — the single-colour one and the four-colour one — with its own, each cut for the profile you have just calibrated. A guard puts them back after any Phrozen firmware update, so they stay current. What has not been tested is Phrozen’s own factory-reset print flow on the display, which used to stall here. So if you want the test print, start
FDM_TEST.gcodefrom Mainsail; that route is verified. Otherwise go straight to your own first print in Step 9.
Now back up what you just measured. Open the setup menu and take 2 — Save / restore SETTINGS, then copy the backup to a USB stick:
unleashedThe menu calls it “do this once, right after setup” — this is that moment. Your calibration numbers exist from here on, nothing can guess them back, and the local copy lives on the very eMMC it is meant to protect.
That’s the essential install done — the printer runs.
From the setup menu pick
4) AddOn.cfg + Features:

Choose [c]heckbox features to toggle
individual add-ons — space toggles, Tab jumps to
<Ok>:
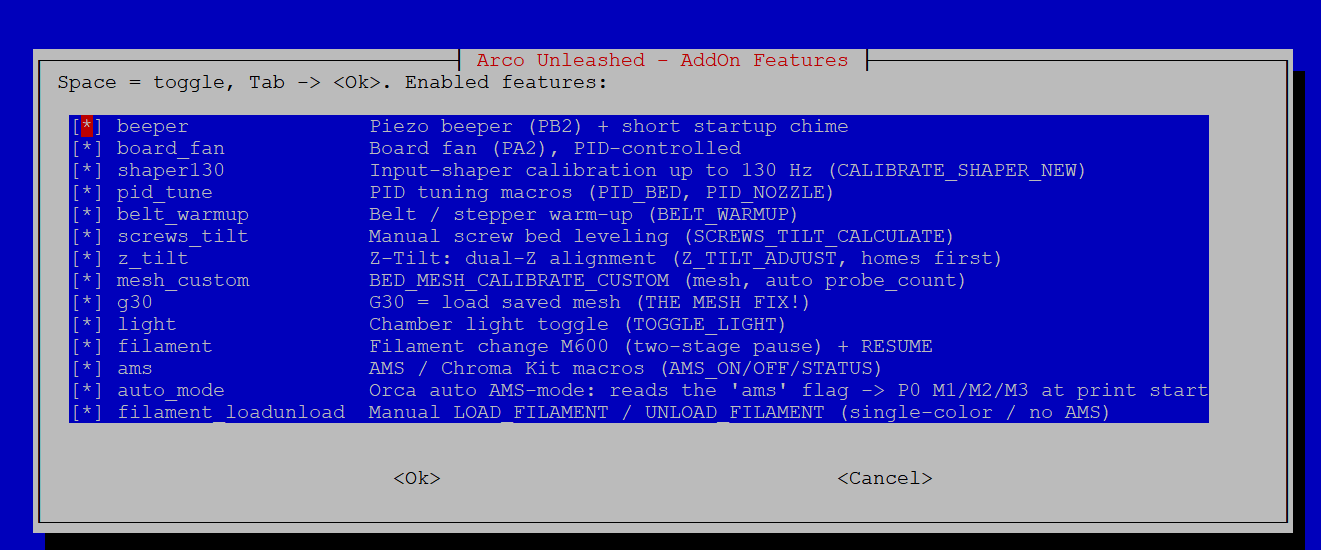
These are the quality-of-life macros: AMS auto-mode, the
G30 mesh fix, Z-tilt / bed-mesh / screw-tilt helpers, M600
filament change, chamber light, PID board-fan, input shaper, piezo
chime, and the AMS / USB-stick connection indicators under
Miscellaneous (green when connected, red when not — a light,
not a button: clicking it does nothing on purpose — in Fluidd they live
in a card of their own that Fluidd ships switched off, so the setup
menu’s 4 → [w] → [s] turns it on). Toggling restarts
Klipper and verifies it comes back up (with a one-click rollback if a
config error slips in).
Turning G30 off reverts to Phrozen’s original throwaway-mesh behaviour (the mesh fix is lost) — the menu warns you before it lets you disable it.
Setup menu → b) Beacon probe. Only
relevant if you have physically fitted a Beacon
eddy-current probe in place of Phrozen’s piezo. It switches Z homing to
the probe’s virtual endstop and scans the bed mesh instead of poking it.
The config was contributed by Philippe Humeau
(unPhrozen) from a real conversion; nobody on the Unleashed side has run
it, which is what “experimental” means here.
The toggle is reversible — off restores
printer.cfg exactly and keeps your calibrated
beacon.cfg — and it refuses to change anything unless both
the Beacon module and the probe are present.
⚠️ With a Beacon fitted, do not use the Arco display for anything Z-related — no Z-calibration, no auto-levelling, no mesh from the touchscreen. That flow was written for the piezo probe: it declares Z positions instead of measuring them, and loads a mesh probed against a different Z reference, which can drive Z out of safe bounds. Use Mainsail or Fluidd for homing, probing, mesh and Z-offset. Printing from the display still works normally.
⚠️ Check the
z_positionsorder inbeacon.cfgbefore trustingZ_TILT_ADJUST— it must match the physical Z motors, not the config order. Swapped, z_tilt diverges instead of converging. Verify withSTEPPER_BUZZ STEPPER=stepper_z/stepper_z1and watch which side moves.⚠️ A Phrozen firmware update replaces
printer.cfgand would silently put the piezo config back under a Beacon. The kit re-applies Beacon mode automatically before every Klipper start, but run the menu’s Save / restore SETTINGS step anyway — see the README.
First steps after switching, all in Mainsail/Fluidd:
STEPPER_BUZZ both Z steppers → G28 →
Z_TILT_ADJUST → BEACON_CAL →
BEACON_MESH.
Setup menu → s) Sensorless XY homing —
it changes how X and Y find home, and nothing else: Z is untouched and
keeps its load-cell probe. What it actually does, and when it is worth
having: README
› Sensorless XY homing.
This is an alternative, not an upgrade. The microswitches are the default and the recommendation: they stop at the same physical place every time, for free, with nothing to tune. If your switches work, leave this off.
It earns its place in one situation, and it is a good one. X’s microswitch hangs off the toolhead MCU, while the driver’s DIAG line goes to the main MCU — so a broken toolhead cable kills the switch but not the sensorless path. That can get a printer homing again without waiting for a spare part.
Proven on this hardware: G28 X, G28 Y and a
full G28 all home on StallGuard, and the (now electrically
disconnected) switches still click audibly at the end
of the move. That click matters: it means the stall happens at
the mechanical stop, so the zero point does not shift — the filament
cutter at X=319, the wipe position at Y=322 and any saved bed mesh keep
their meaning.
The toggle equalises both homing speeds (levelling down,
never up) because StallGuard’s reading is velocity-dependent, and
installs a small sensorless.cfg that gates StallGuard by
velocity. Without that gate Klipper arms StallGuard at standstill and
every G28 ends in a twitch — which is the single most
confusing failure mode here.
⚠️ Watch the first few homings and keep
M112within reach. If the sensitivity is wrong the carriage grinds into the rail instead of stopping, and on CoreXY it drags the other axis with it. Listen for the switch to click — that is how you know it reached the wall, because Klipper reports position0either way.⚠️ Sensitivity is
driver_SGTin the[tmc5160 stepper_x]/[stepper_y]sections, and the scale is counter-intuitive: LOWER is MORE sensitive. Grinds without stopping → lower it. Stops early with no click → raise it. The shipped value of1is the one proven here at 30 mm/s and 1.2 A.⚠️ Calibrate at your running current. A value found at a reduced current does not transfer: with too little current the motor slips instead of building the load StallGuard measures, and nothing ever triggers.
off restores printer.cfg byte-for-byte,
including the original homing speed. A Phrozen firmware update replaces
printer.cfg and would quietly hand back the switch you may
have switched away from — the kit re-applies sensorless mode before
every Klipper start whenever it is enabled.
Your Arco shipped with two of them, and so does this build. Both talk to the same printer; use whichever you prefer, or both at once.
| URL | ||
|---|---|---|
| Mainsail | http://unleashed.local/ or
:81 — the IP works too |
:80 is the address the stock Arco uses, so old
bookmarks keep working. :81 is where the migration put it
and stays valid. |
| Fluidd | http://unleashed.local:8808/ — the IP
works too |
Phrozen’s own port for it. Install or update with the setup menu →
4 → [w], or
bash ~/arco-unleashed/scripts/install-fluidd.sh. |
The branded Arco Unleashed theme exists for both (optional).
Mainsail: switch with the SWITCH_THEME macro or
unleashed-theme.sh. Fluidd:
bash ~/arco-unleashed/fluidd-theme/setup-fluidd-theme.sh —
then reload with Ctrl+F5 and pick the
dark theme with Primary Color #2E74F2.
Fluidd has no hook for a custom logo or favicon, so those stay Fluidd’s
own.
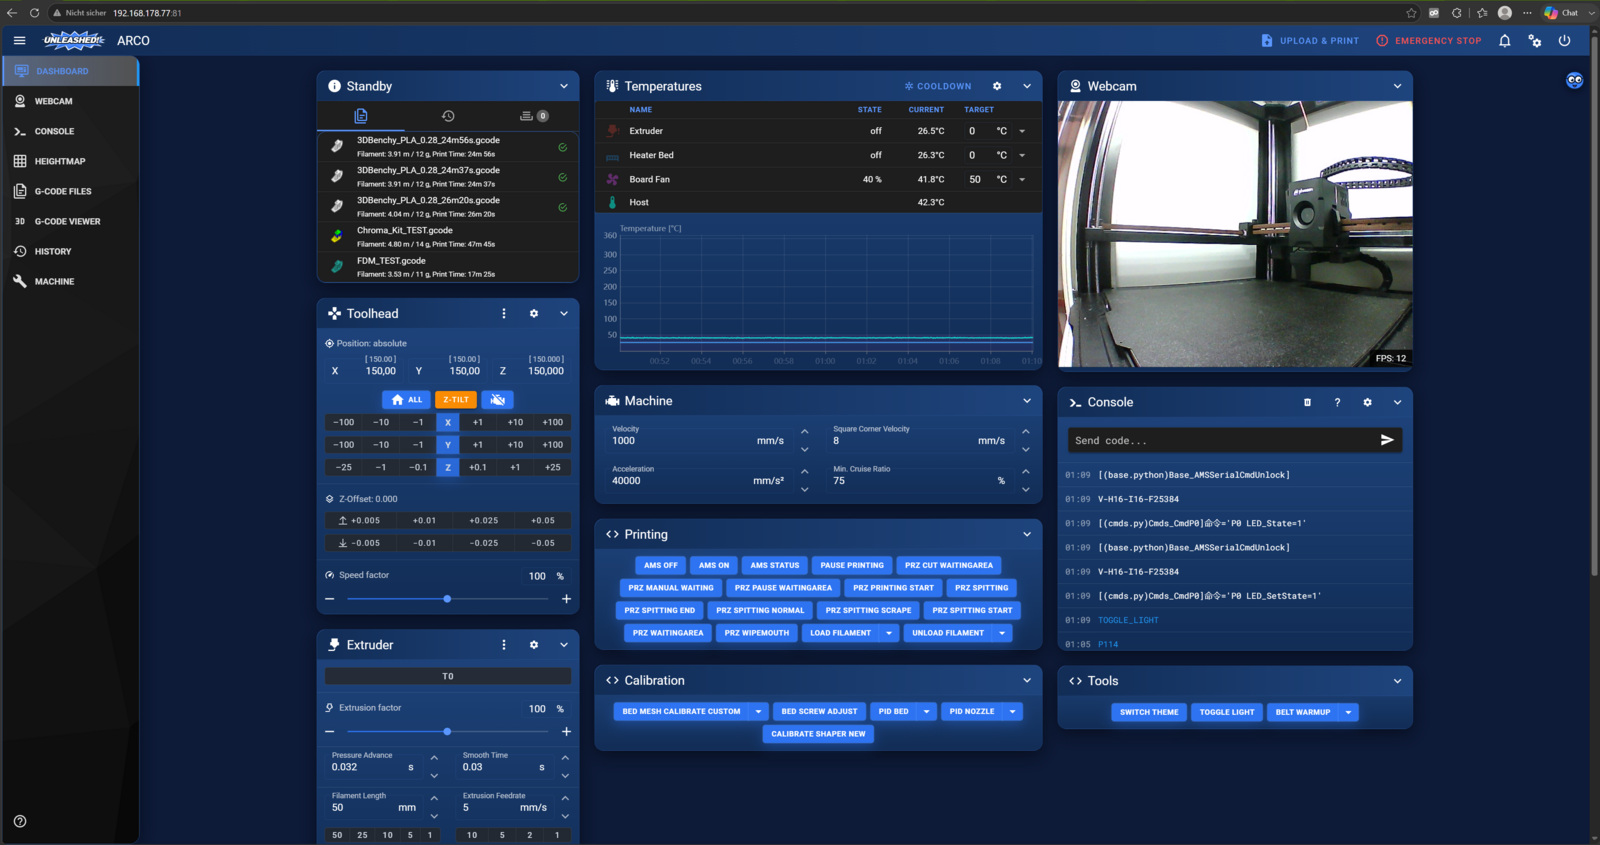
Moonraker updates normally. Nothing in this project touches its source tree, only its config file.
Klipper is not pinned either. It sits on
master with HEAD attached, so the update
manager offers newer versions exactly as it does on any other Klipper
machine. The repository itself is clean and valid —
everything this project adds lives in untracked files, so no tracked
file is modified and nothing is greyed out. Earlier images pinned the
built commit and also left HEAD detached, and it was the
detached HEAD that actually cost the update button. Neither
the pin nor the detached HEAD is in this image.
Klipper will always report “untracked source files” — that is
correct, not a fault. Open the update manager’s detail view and
it names all seven: gcode_shell_command.py,
arco_tool_gate.py, arco_mcu_timing.py,
arco_sdcard_select.py, arco_fila_status.py,
arco_virtual_pins.py and
arco_presence_sensor.py. Those are this project’s own
Klipper extras, and untracked is exactly where they belong — that is
what keeps the repository is_dirty: false
and the update button working. Moonraker only sets
pristine: false beside it, which means “there is more here
than the repository knows about”, not “something is wrong”. Moonraker’s
and Unleashed’s own entries say pristine: true; Klipper is
the only one with this note, permanently.
🛑 Do not answer that note with “Hard recover”. Moonraker offers that button in exactly this situation, and it deletes every untracked file: the five listed above, plus Phrozen’s entire
phrozen_devmodule. See the table below.
Right after a fresh flash both Klipper and Moonraker may show
INVALID with version ?. That is a
timing artefact, not damage: Moonraker runs its first update check
before the WiFi has associated, the check cannot reach GitHub, and
Moonraker caches that result rather than retrying. The printer works
normally throughout; only the update button is missing. The image clears
this by itself a minute or two after the first boot, and Moonraker is
configured to re-check on its own as well. If you ever see it linger,
one press of the refresh icon at the top of the update
manager panel is the whole cure.
One thing is worth knowing before you take an update: the phrozen_dev
module is patched for the Klipper API this build ships, so a jump to a
much newer Klipper can need those patches redone. The guards below
re-apply those patches on every start. Even so, take a Klipper update on
purpose, not out of habit. If you would rather hold a known-good
version, scripts/pin-klipper-updates.sh does that — it is
opt-in, and nothing on the image does it for you.
“System — OS Packages” is the one entry that cannot work, and
that is deliberate. Moonraker runs as the mks
user, and this image gives it no password-free sudo. Its
apt-get update therefore fails, and the UPDATE button ends
in “sudo: a password is required”. Granting that permission is
the usual fix on a Klipper machine and the wrong one here: Moonraker
answers the whole network without a login, so anyone who can reach the
printer could then install packages as root. A printer login would
become a root login.
Two consequences are worth knowing. The package list is refreshed when the image is built and not again by itself — so a green UP-TO-DATE means “nothing pending as of the build date”, and it will keep saying that rather than visibly going stale. And packages are deliberately held back from upgrades. Five of them are the kit’s doing and are the ones that matter: the kernel, the device tree, u-boot, the board support package and the BCM43430 WiFi firmware. Upgrading those is what replaces the custom device tree with a stock one and brings the printer back with no WiFi at all.
A stock image carries three more — linux-headers,
base-files and armbian-zsh. Those come with
the base system rather than from us, so showhold usually
lists eight. They are not dangerous: the headers only ever matter if you
build kernel modules yourself, and the other two are the system’s
identity and its shell setup.
Do system updates over SSH instead, where you can type your password:
apt-mark showhold # kernel, dtb, u-boot, armbian-bsp*, armbian-firmware must be listed
sudo apt update && sudo apt full-upgradeThat is safe while the holds are in place — apt keeps them back and
upgrades everything else. If any of the five above is missing from the
list, put them back with
sudo bash ~/arco-unleashed/scripts/apt-hold.sh before you
upgrade. That script restores those five and leaves the other three
alone, on purpose: the kit holds back only the packages it is
responsible for, and leaves the base system’s own choices to the base
system.
If you use KIAUH, leave two of its entries alone. It is a fine way to update Klipper, Moonraker and the web interface, and a poor one for the rest of this printer.
KlipperScreen is the trap. There is a service called
KlipperScreen, and a real KlipperScreen checkout in your
home directory. But that service starts Phrozen’s touchscreen program,
and nothing ever runs the checkout. KIAUH cannot tell the difference: it
looks for the directory and the service name, both of which are there.
Update is merely wasteful — it stops the display for the
duration, pulls code nobody executes and installs packages nobody
imports, then starts it again. Remove deletes the directory and
the service, and the touchscreen is gone for good.
System packages fail outright, with
Held packages were changed and -y was used without --allow-change-held-packages.
That is the holds above doing their job: KIAUH hands apt an explicit
list of everything upgradable, held packages included, and apt refuses.
Use the two commands above instead.
Two update channels: stable and beta. A fresh image
follows stable, and that is where it should stay unless you
want to help test. beta is the same kit plus the changes
that have not earned their way over yet. It is not a separate fork:
stable is always an ancestor of beta, never a
branch off it, so switching leaves nothing you have behind. Type
unleashed, then c:
bash ~/arco-unleashed/scripts/channel.sh # which channel, and what the other one would change
bash ~/arco-unleashed/scripts/channel.sh beta # follow beta from now on
bash ~/arco-unleashed/scripts/channel.sh stable # go backSwitching only moves the branch. The update manager follows at the
next moonraker start. The guard that writes
primary_branch: into moonraker.conf runs when
moonraker starts, not when klipper does. channel.sh says so
at the end, and names two things that finish the switch:
sudo systemctl restart moonraker —
moonraker.conf follows the channel. Its update panel keeps
showing the old one until the next refresh./etc and no guard touches. If you are in a hurry, you can
do that root work now instead:
sudo bash ~/arco-unleashed/scripts/optimize-boot.sh.Switching back does not undo everything: the files go back to the
stable versions, your configuration does not. If a beta feature was
merged into your AddOn.cfg, it stays, because that file is
yours and nothing here edits it. Going back to stable lists what beta
added so you can switch those features off yourself under AddOn
features.
There is a third channel, alpha, for changes that have
not been tried anywhere yet. It asks for an access phrase, and you get
that phrase by arrangement with the project, not from the printer. Beta
is the channel for helping to test; alpha is the channel for helping to
build. A change moves alpha → beta → stable, so everything
that reaches a stable printer has already survived alpha and beta.
Whichever channel you are on, the login banner says so after the edition
line, and every update check names it.
Earlier images showed Klipper as invalid with “repo is dirty”, because the MCU timing was patched into the tracked
klippy/mcu.py. That was more than a cosmetic badge: Moonraker refuses to update a dirty repo, so Klipper could never be updated at all. Those three values now come from the untrackedarco_mcu_timingextra instead.
The three recovery actions are not equally harmless:
| Action | What it does | Effect here |
|---|---|---|
| Update | refuses on a modified repo, otherwise pulls | safe |
| Soft recover | resets tracked files; never runs git clean |
safe — untracked files survive |
| Hard recover | git reset --hard + git clean -d -f |
deletes everything untracked,
phrozen_dev included |
On its own that would halt the printer: the config would declare
sections whose modules just vanished. It needs no action from you.
Before klippy starts, klipper.service runs a set of guards
that reinstall our modules. And for exactly this case, a copy of
your own phrozen_dev is kept outside the Klipper
tree, in ~/.arco-phrozen-backup. Phrozen’s software is
never shipped with this kit, so that copy is made on your printer, from
your own installation.
If something does go wrong, the setup menu’s Emergency repair is the single action to run — it repairs everything it can without needing to know what broke, and tells you what was actually wrong.
To update Klipper — safe, for the same reason:
cd ~/klipper && git checkout master && git pull && sudo systemctl restart klipper
# (Klipper is not pinned by default any more — pin-klipper-updates.sh is only for holding a version)Nothing is lost: every patch is re-applied before klippy loads. Be aware you are then off the version this build was tested against.
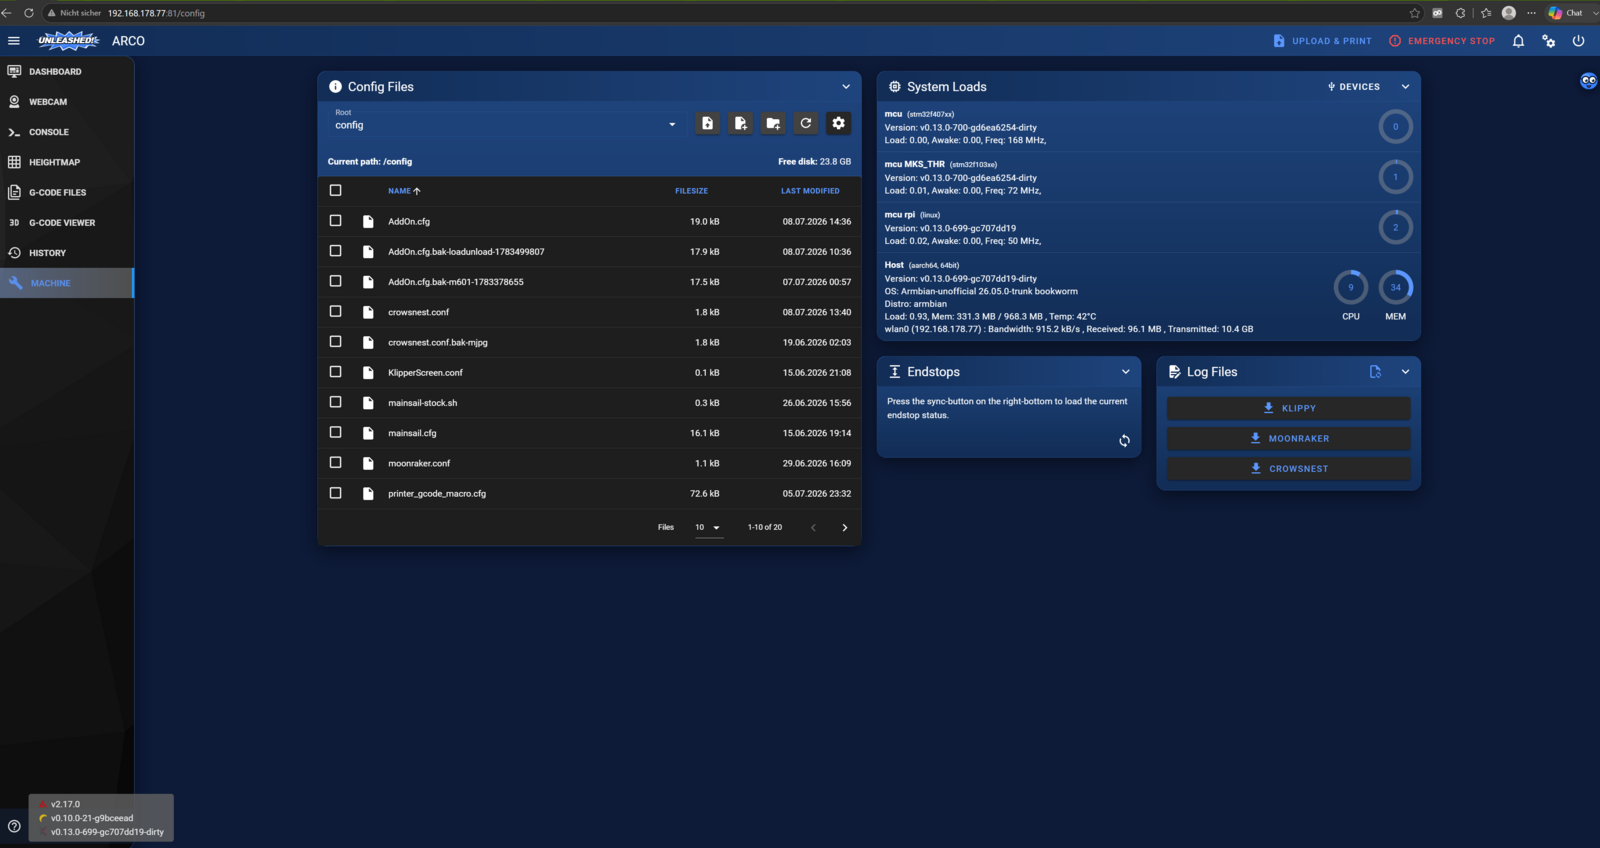
Machine → System Loads confirms the whole stack is on the new versions — all three MCUs and the host on Klipper v0.13, OS armbian … bookworm:
Stock OrcaSlicer already ships the Phrozen Arco
profile (vendor Phrozen). This kit does not replace it — it
adds a preset that inherits from it and changes only what is needed
here.
First get the files onto your PC — OrcaSlicer runs
there, the kit lives on the printer. Download them from this project on
GitHub: github.com/solutionphil/arco-unleashed/tree/main/orca
— open a file and use Download raw file. They are also on the
printer at ~/arco-unleashed/orca/ if you would rather copy
them across with WinSCP or scp.
Then in OrcaSlicer: File → Import → Import Configs…, and pick one:
| Profile | Bed mesh at print start |
|---|---|
Phrozen Arco 0.4 (Unleashed).json |
G30 — probes the whole
bed (36 points) each print, into the phrozen
profile. |
Phrozen Arco 0.4 (Unleashed, adaptive mesh).json |
probes the print area each print (~30–60 s), leaving your saved mesh untouched |
Either one fills in all four G-code fields for you, and you can stop reading here. Label objects, which adaptive meshing needs, is already on in the official Arco print profiles.
Starting a print from the printer’s own display? Then slice it with one of these presets. The display prepares the machine — it homes, heats, and, with the levelling box ticked, applies the mesh you saved as
phrozen. Everything after that comes from the file’s own start G-code: the AMS start-up, and, with the adaptive preset, the bed probing itself. A file sliced for a different printer still prints, but it begins without any of that — the AMS is never started, and the bed keeps whatever mesh was loaded last. Worth remembering for files that arrive ready-sliced from someone else.
After a print you may see “Configuration has been updated”. Measuring the bed writes the fresh mesh into the
phrozenprofile, and Klipper marks the configuration as changed. Saving it keeps that mesh across restarts, which is worth doing — but never pressSAVE_CONFIGwhile a print is running: it restarts Klipper, and the print ends there. Wait until the printer is idle, or leave it alone entirely; the bed is measured again at the start of the next print either way.
Open the printer preset with the pencil icon next to the printer name:
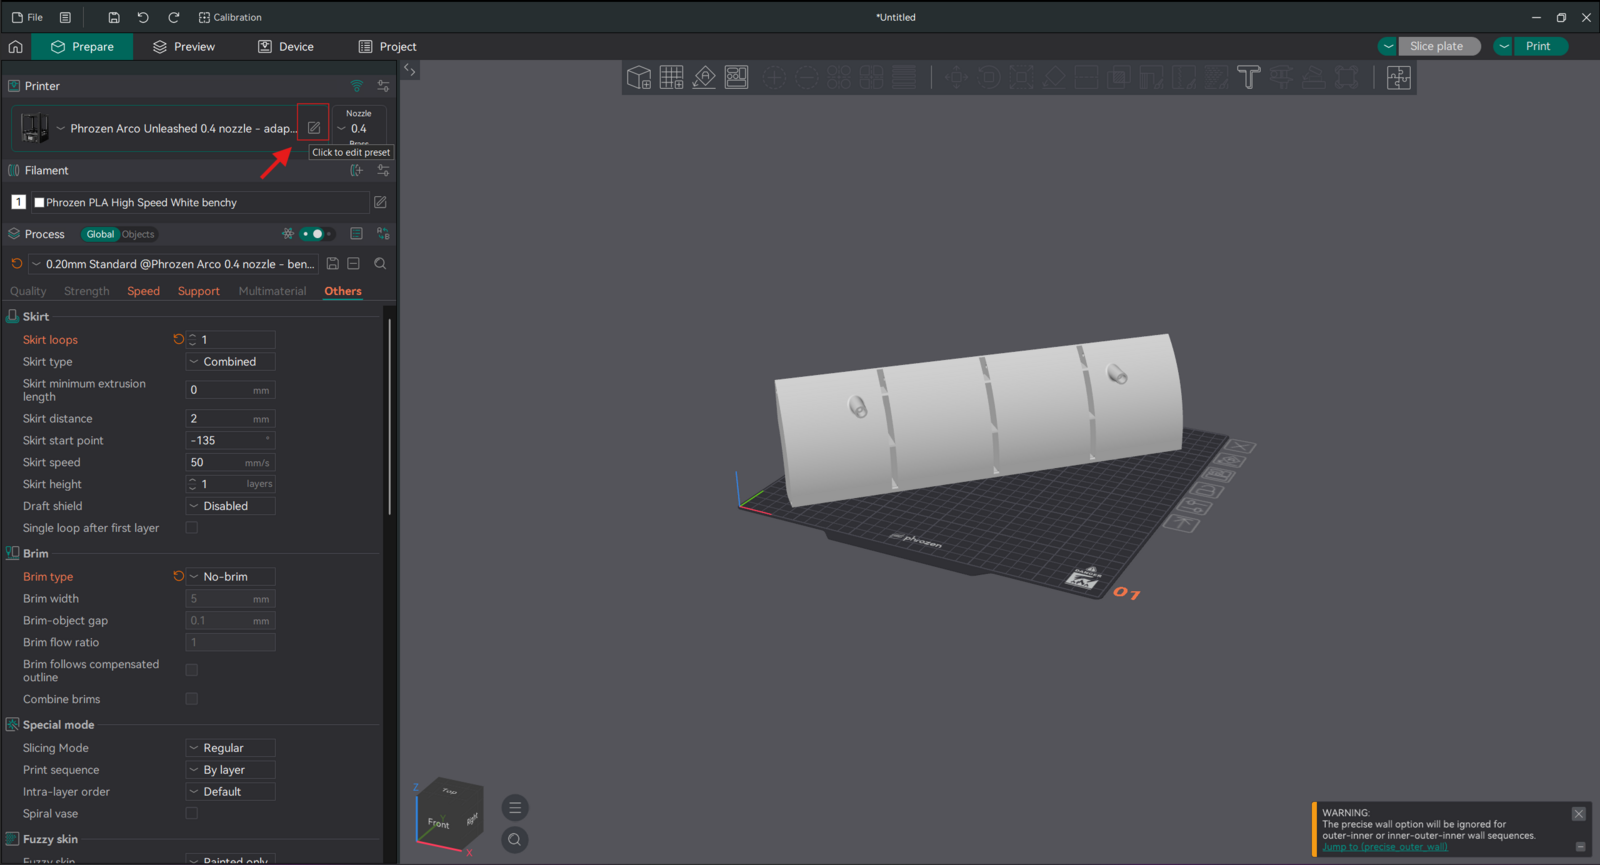
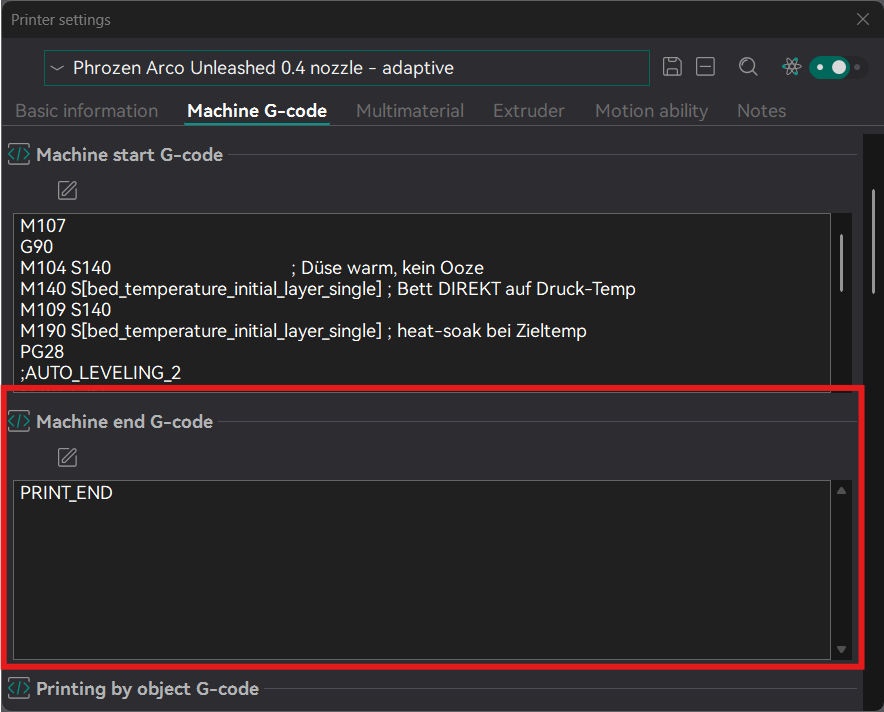
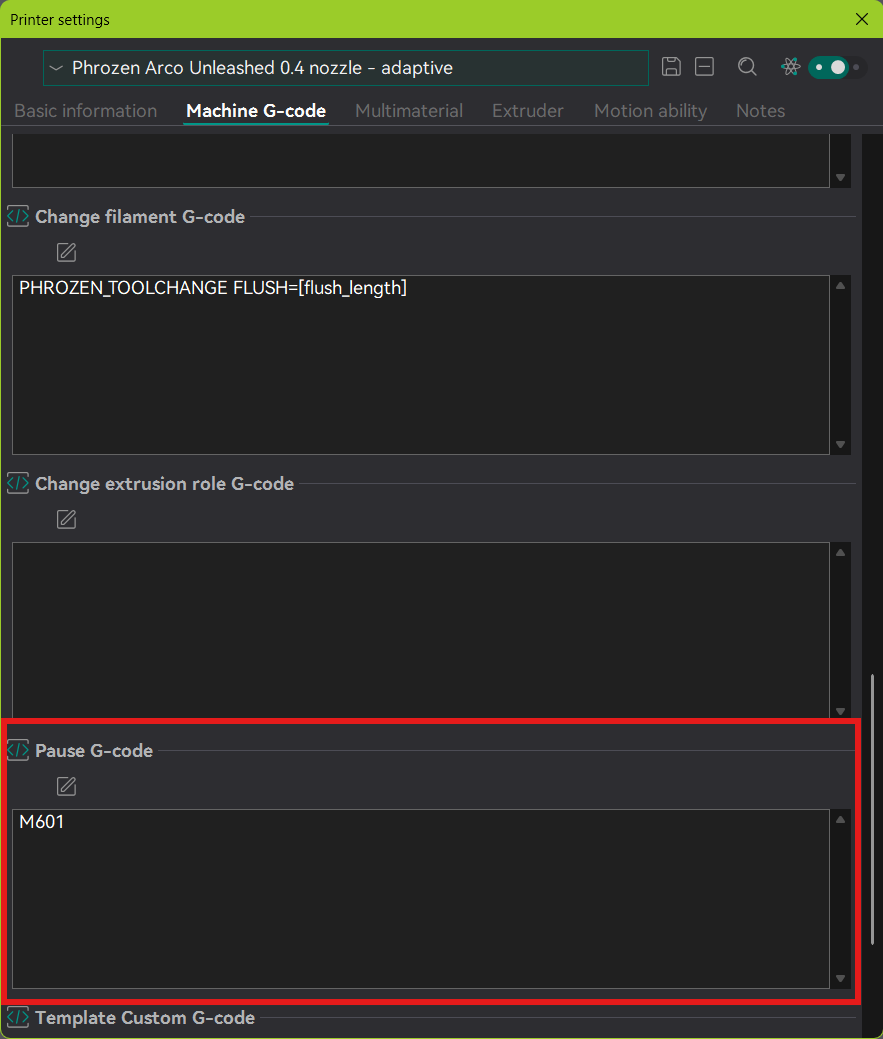
In Printer settings → Machine G-code, all four live on one tab:
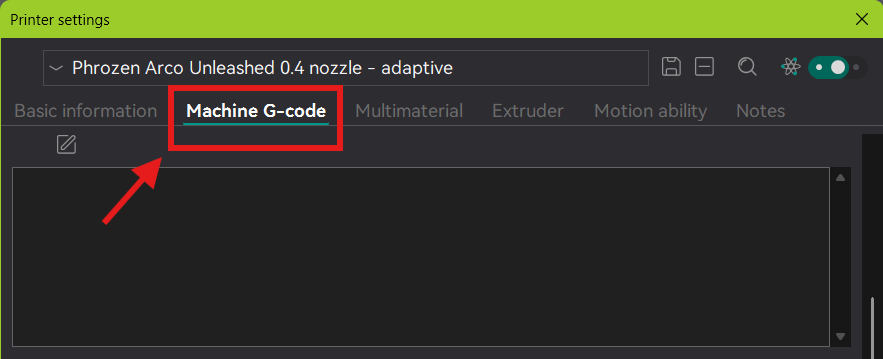
Each is given in full below, ready to copy — useful too for checking an older profile against the current version.
M107
G90
M104 S140 ; nozzle warm-up (stays cool = no ooze during probe)
M140 S[bed_temperature_initial_layer_single] ; bed straight to print temp (no 65C detour)
M109 S140
M190 S[bed_temperature_initial_layer_single] ; heat-soak at target temp
PG28
;AUTO_LEVELING_2
G30
G21
M83
M104 S[nozzle_temperature_initial_layer] ; nozzle up to print temp
M109 S[nozzle_temperature_initial_layer]
{if size(filament_diameter) > 1}PHROZEN_AMS_START MULTI=1{else}PHROZEN_AMS_START MULTI=0{endif}
{if size(filament_diameter) == 1}
T0
{endif}
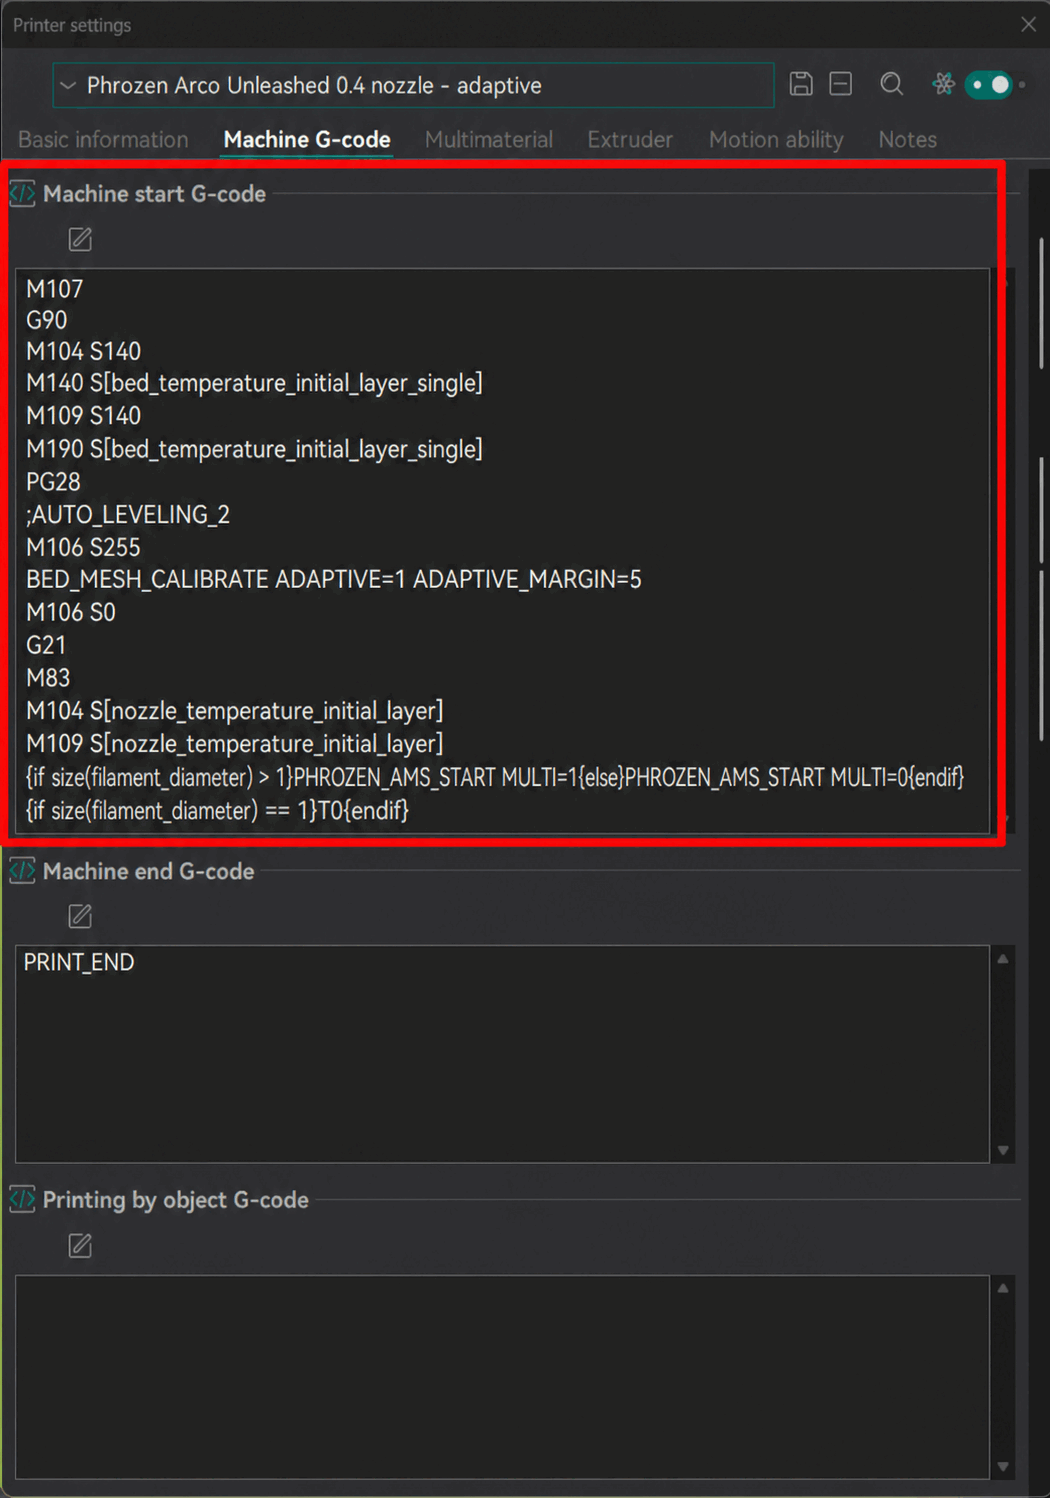
The last lines are the AMS auto-mode:
PHROZEN_AMS_START picks single-colour, multi-colour or AMS
by itself.
That line also arms the filament runout sensor, which is easy to lose by accident. Phrozen’s module watches the toolhead sensor, but only after a print mode has been set:
P0 M1,M2orM3. The macro picks the right one for you. A start G-code that leavesPHROZEN_AMS_STARTout prints with no runout protection at all, and the stock firmware never mentions this. Unleashed does: a console warning appears a few minutes into such a print, andFILA_STATUStells you where you stand at any time:Filament: LOADED (adc 0.2134, threshold 0.3630 — below threshold = loaded) Mode: standalone runout Runout protection: ACTIVEThe same values sit in
printer['arco_fila_status'], so your own macros can readprotection_activeandfilament_present.
Want the adaptive mesh instead? That is what the screenshot above shows. Replace the
G30line with:M106 S255 BED_MESH_CALIBRATE ADAPTIVE=1 ADAPTIVE_MARGIN=5 M106 S0The fan lines keep the nozzle tip clean while probing — Phrozen wraps its own mesh probe the same way, and the plain
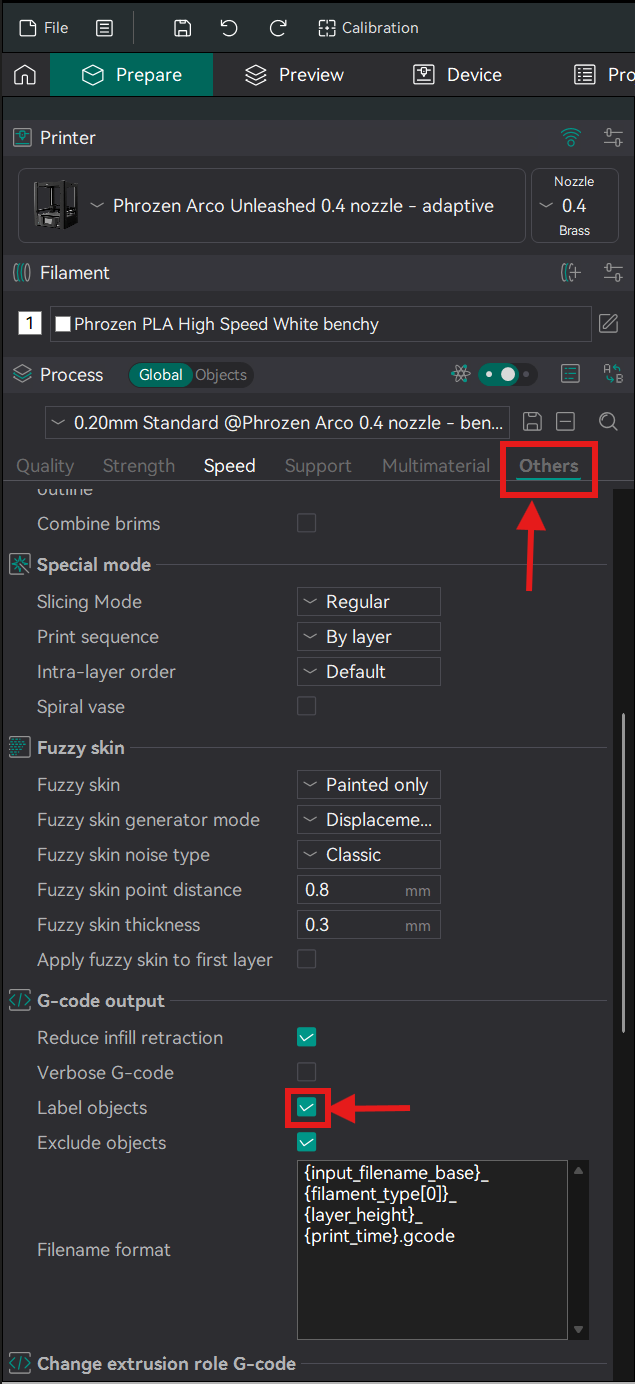
G30load needs no fan because it does not probe.Tick Label objects as well (below). Adaptive meshing reads object bounding boxes from the
EXCLUDE_OBJECT_DEFINElines that checkbox emits. Without the checkbox, Klipper silently probes the whole bed — which looks exactly as if adaptive meshing had failed.Then check one thing on your first slice: the
EXCLUDE_OBJECT_DEFINElines must sit beforeBED_MESH_CALIBRATEin the sliced file. If they do not, setenable_object_processing: Trueunder[file_manager]inmoonraker.conf.What it costs and what it leaves behind: Adaptive bed mesh in the README.
PRINT_END
The AMS-aware colour change: with an AMS it retracts and purges the
flush volume (a sized P10 spit); without one it runs the
manual M600 change.
PHROZEN_TOOLCHANGE FLUSH=[flush_length]
![Change filament G-code = PHROZEN_TOOLCHANGE FLUSH=[flush_length]](assets/manual/orca-5-change-filament.png)
Printing multi-material with an AMS? Add one parameter:
PHROZEN_TOOLCHANGE FLUSH=[flush_length] TEMP=[new_filament_temp]
TEMPpasses the incoming tool’s nozzle temperature. Without it, every colour change after the first re-heats and purges at the temperature the print started with — invisible while all your spools are the same material, and wrong the moment you mix. PETG purged at PLA temperature jams; PLA held at PETG temperature strings and cooks.It is safe to add permanently: with a single material it changes nothing, and it is ignored unless the optional Unleashed × KAOS add-on is installed. One profile then covers every case and you never re-slice when switching. Give your filament presets their real nozzle temperatures — that is what
TEMPreads.
The kit maps M601 to Klipper’s PAUSE.
M601
Others → G-code output → Label objects. Required for the adaptive bed mesh (per-object bounding boxes) and for Mainsail’s per-object exclusion:
Nothing to set for the AMS. There used to be a flag
here, switched by hand from the setup menu or from Mainsail — it is
gone, and nothing replaces it. The unit enumerates as a USB serial
device, the printer follows that by itself, and
PHROZEN_AMS_START picks the right mode at the start of
every print. Attach the AMS and slice; unplug it and print
single-colour. FILA_STATUS in the console shows the current
reading if you want to see it, and the AMS indicator
under Miscellaneous shows it at a glance.
Which slot serves which tool, and refeed. Both live
in one dialog. Run AMS_SETUP from the
Mainsail console and it opens a panel: one row per tool with the four
slots as buttons, and the refeed switch underneath.
| Slot per tool | Left blank, the printer decides — and its default is the diagonal:
T0 from slot 1, T1 from slot 2, and so on. Set
it when the colours went into the AMS in a different order than you
sliced, and you would rather remap than re-slice. |
| Refeed | Off by default. On, an ordinary single-colour print that runs a slot empty carries on from another slot holding the same material instead of stopping. |
The same two settings have plain commands, if you would rather type than click:
AMS_SLOTS ; report the current table
AMS_SLOTS T0=2 T1=1 ; first tool from slot 2, second from slot 1
AMS_SLOTS T0=0 ; clear one entry, let the printer decide again
AMS_REFEED ENABLE=1 ; refeed onTools count from zero, slots from one.
T0is the first tool and slot1is the first slot, soAMS_SLOTS T0=1is the default rather than a change. A slot of0does not mean slot zero — it clears the entry.
Why this exists at all. The printer’s own panel sends both values when a print is started there. A print sent from Mainsail or a slicer never carries that block, so without this the table stays empty and every tool simply takes the slot with its own number. Nothing in Phrozen’s module is modified — the values handed over are exactly the ones the panel would have supplied.
Two real switches in the web interface. The chamber light and the AMS refeed also appear as proper toggle switches, not just as macros: in Mainsail under Miscellaneous, alongside the AMS and USB-stick indicators. The light switch follows the display, so pressing the button on the panel moves the switch in the browser too.
KAOS (Klipper Add-On System) is a separate, third-party add-on for the Arco by sanders.chris (gitlab.com/sanders.chris/phrozenarco) — a popup menu, fan/light/logging control, safety guards, and a rewritten multicolour purge. It is not part of this kit, is not installed by default, and nothing here depends on it. This step is entirely optional.
KAOS and Arco Unleashed are sibling forks of the same ancestor, our neighbouring repository solutionphil/PhrozenArco, which KAOS extended massively into what it is today. That shared parentage is why a bridge is needed at all: both still declare the same inherited Klipper sections, so simply dropping KAOS next to an Unleashed config makes klippy refuse to start. It is also why the fix is tractable — an ownership split rather than a rewrite.
Unleashed × KAOS is our bridge that installs KAOS next to Unleashed instead of over it, so both survive and you can switch it off again cleanly.
It also makes installing KAOS considerably simpler.
KAOS’s own route is a Phrozen firmware package: download a
.zip, unpack it on a PC, copy the nested
phrozen_dev/ folder to a USB stick, plug
it into the printer, run the Phrozen update flow, then power-cycle. With
the bridge, none of that applies — no USB stick, no firmware
package, no unpacking. You type KAOS_ON in the web
console, and it fetches KAOS straight from the project’s repository (~3
MB), verifies it against your configuration, and installs it. Updating
later is one command, KAOS_UPDATE.
🛑 Never install or update KAOS the normal way on Unleashed
Do not use KAOS’s USB-stick packages (
Arco_FW_V199_KAOS_*.zip) or the printer’s Phrozen update flow to install or update it here. UseKAOS_ON/KAOS_UPDATEinstead — always.Those packages are built as Phrozen firmware for the stock printer: the old Debian Buster system with its older Klipper. They are installed by the Phrozen updater, which replaces
printer.cfg,printer_gcode_macro.cfgand the wholephrozen_dev/folder. On Unleashed (Debian Bookworm, Klipper v0.13), that update does two things. It removes[include AddOn.cfg], and with it every feature of this kit. And it drops in files meant for a different operating system and a different Klipper version. The result is a printer that will not start correctly — and unlikeKAOS_OFF, there is no clean way back.The same applies to KAOS’s System Prep helpers: they tune the stock Buster system (one of them is literally
fix-buster-apt-sources.sh) and would work against Unleashed’s own tuning. The bridge deliberately never installs them.If you already run KAOS on a stock printer and are moving to Unleashed: flash the image as usual, then add KAOS again with
KAOS_ON. Flashing wipes the printer, so your KAOS settings start at their defaults again — note down any you have changed before you flash.
The image ships it: the bridge lives in
~/arco-unleashed/unleashed-x-kaos, its console commands are
registered, and its boot guard is in place. None of KAOS itself
is in the image — only our bridge, which does nothing at all
until you ask it to. There is no root step, no USB stick and no download
to prepare.
So Step 10 is one command, below. (If you ever want to remove even
the bridge, or need to undo a half-finished switch by hand,
~/arco-unleashed/unleashed-x-kaos/docs/removal.md is the
complete list.)
From the Mainsail/Fluidd console — each restarts Klipper and refuses to run mid-print:
| Command | What it does |
|---|---|
KAOS_ON |
downloads KAOS (~3 MB, needs network the first time), verifies it, installs and activates |
KAOS_OFF |
deactivates; files stay cached so KAOS_ON is instant
and offline afterwards |
KAOS_UPDATE |
pulls the latest version and re-activates if it was on |
KAOS_STATUS |
what is installed, which version, active or not |
KAOS_OFF returns the printer
byte-for-byte to its pre-KAOS state. If you ever need
to remove it by hand, follow
~/arco-unleashed/unleashed-x-kaos/docs/removal.md — the
order matters.
Once active, type in the console:
KAOS_MENUA popup menu opens in Mainsail/Fluidd with the KAOS settings (lights, sound, fans, logging/language, safety, print features). If your interface does not show popups, use the plain-text version instead:
KAOS_MENU_TEXTOther commands you can type directly:
KAOS_LIGHTS_TOGGLE, KAOS_FILAMENT_LOAD /
KAOS_FILAMENT_UNLOAD, KAOS_PAUSE /
KAOS_RESUME, KAOS_HEALTH_CHECK.
KAOS includes magic_ams, which replaces the Arco’s
proven firmware purge with a slicer-driven one (split into portions with
a cooling kick between). With KAOS_ON and
an AMS attached, the slicer-driven purge runs on every colour change.
KAOS users upstream get the same behaviour, and there it cannot be
switched off at all.
Two things to know:
Add TEMP=[new_filament_temp] to
your Change filament G-code (see Step 9) — magic_ams uses it
for per-tool temperature, which is what makes multi-material
printing correct.
magic_ams comes and goes with KAOS. There is no
console command to step back from it on its own — KAOS_OFF
removes both. To keep KAOS without magic_ams, install it from
the shell with the flag set:
KAOS_MAGIC_AMS=0 bash ~/arco-unleashed/unleashed-x-kaos/scripts/kaos-sideload.sh on.
You can also switch magic_ams off later with
kaos-sideload.sh magic-off, and back on with
magic-on. The choice is remembered, so a later
KAOS_ON does not quietly undo it. In the console,
MAGIC_AMS_STATUS shows what is active.
Worth doing a short two-colour test print the first time, and watching the first colour change.
With no AMS attached (ams = 0)
magic_ams stays inert — colour changes fall back to the manual
M600 exactly as without KAOS.
You do not need this appendix for a normal install. Step 2 flashes the printer without opening it. Come here for one of three reasons:
🛑 The installer never runs when you write the eMMC in a PC. Step 2 rescues the gateway by itself while it flashes, and refuses to write without it. Writing the module in a PC skips all of that — so start with A0 below, while the printer is still running Phrozen’s original system.
In addition to the usual tools you need: a USB-to-eMMC adapter (the white MKS case), a small Phillips screwdriver for the module’s retaining screws, and balenaEtcher on a PC.
When the module is back in and the printer boots, continue at Step 3.
⚠️ Power the printer off and unplug it before opening the lower housing.
🛑 Not a backup of your printer. This rescues Phrozen’s gateway —
phrozen_master,phrozen_slave_ota,device_tableand the~/hdlDatfolder — which exist nowhere else. Nothing more. Your calibration, uploaded G-code, settings and Phrozen’s own system are erased by the write and cannot be brought back.** For a way back to the factory system, take one of the two options in A1 below.
On the self-flash road (Step 2) the installer
does this for you. It rescues the files at the last moment it still can,
and it refuses to write if it cannot. Here it never runs, so it is on
you. phrozen_master, device_table and
~/hdlDat live only in the original system, and no download
or Phrozen package carries them. Without them the display spams
connect to the server fail about eleven times a minute and
stops returning to its home screen after calibration, and AMS detection
hangs — runout protection included, because the work mode lives in
hdlDat.
If you are here for recovery and the printer no longer boots, this is already too late. An archive from an earlier run is then the only copy there will ever be, which is the argument for making one before you need it — and for the spare module in A1: the original keeps booting, so you can collect from it at your leisure.
collect_data_arco.sh is inside
Arco-Unleashed-USB.zip, so it is already on the stick if
you extracted that to the top level. Plug the stick into the
printer.
SSH into the original printer (PuTTY on Windows,
ssh on Mac/Linux): Host = the printer’s
IP (from your router or the Phrozen display),
Port 22, login mks /
makerbase.
Run:
bash ~/printer_data/gcodes/USB/collect_data_arco.sh ~/printer_data/gcodes/USB(~/printer_data/gcodes/USB is where the Arco
auto-mounts the stick.)
If that command fails because the folder is empty, the stick did not auto-mount. Mount it yourself — to that same path, because the script and everything after it expect it there. Find the partition with
lsblk, then:sudo mkdir -p /home/mks/printer_data/gcodes/USB sudo mount /dev/sda1 /home/mks/printer_data/gcodes/USBOnly needed if the folder is empty — normally the Arco mounts the stick there by itself, on the stock system and on Unleashed alike.
It writes arco-phrozen-ams.tar.gz
onto the stick. On your PC, confirm the file is really
there — if it’s missing, re-insert the stick and run the
command again.
When you’re done the stick holds this — keep it, you’ll reuse the same stick in Step 3:
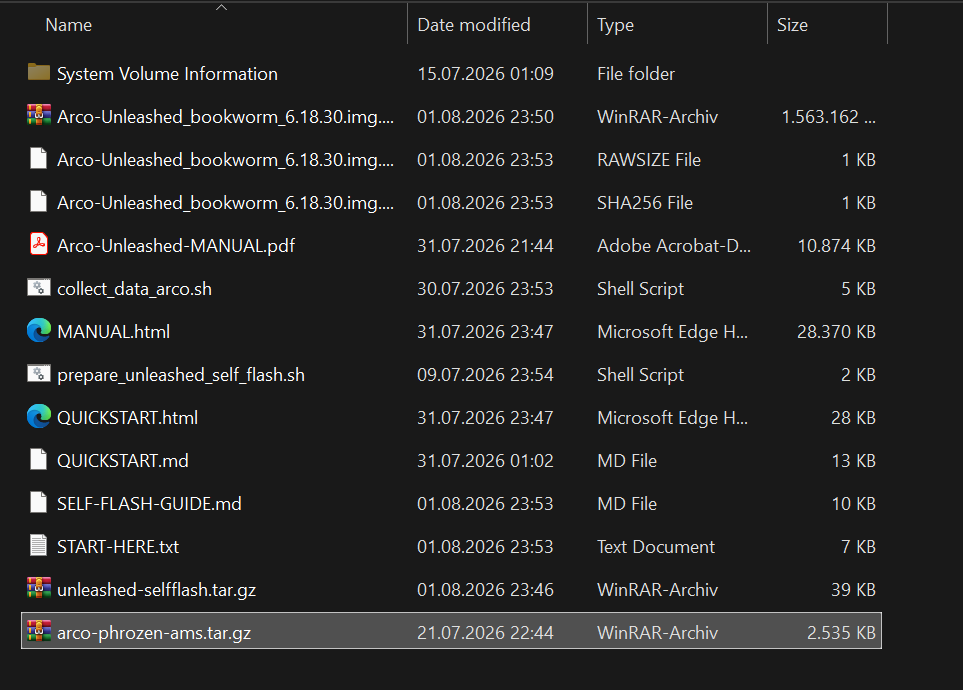
Everything above the highlighted line came out of
Arco-Unleashed-USB.zip, extracted to the
top level of the stick. The highlighted
arco-phrozen-ams.tar.gz is the one file no
download and no Phrozen package can replace — collected here by hand, or
by the installer in Step 2. The new system
re-installs it by itself on first boot.
🛑 This is your only chance to save the factory system. The printer has one eMMC. Appendix A2 writes over it, and the stock Buster install on it is gone. Phrozen do not publish an image of it for download. Asking their support for one means waiting, and what you get is a factory image rather than this printer’s own state. Two ways to keep a road back, and you must choose now: * Keep the original module. Fit a spare eMMC (they are cheap and the same MKS V1.0 part), flash that in Appendix A2, and put the original in a drawer. Swapping the modules back is a two-minute job, but it is not the whole story. Step 5 flashed both MCUs to Klipper v0.13, and the original Buster system needs v0.11. Refitting the module alone gives a printer that boots and finds no hardware. Flash the MCUs back too — see Going back to Phrozen’s system. * Or image it before you overwrite it. With the module in the adapter, take a full dump first: Windows — Win32DiskImager, the Read button (balenaEtcher cannot do this; its Clone is drive-to-drive and produces no file). Mac/Linux —
sudo dd if=/dev/sdX of=buster.img bs=4M, withsdXfromlsblk. It dumps the whole ~31 GB, so have the space free and expect it to take a while.This is not precaution for its own sake. The kit’s own way back,
revert-to-buster/, puts one thing at the top of its requirements: “YOUR OWN buster.img — a 1:1 full-disk dump of a WORKING Buster eMMC”. This step is the only moment it can be made.
Power the printer off and unplug it. Then open the lower housing cover — undo the circled bottom screws with the hex key:
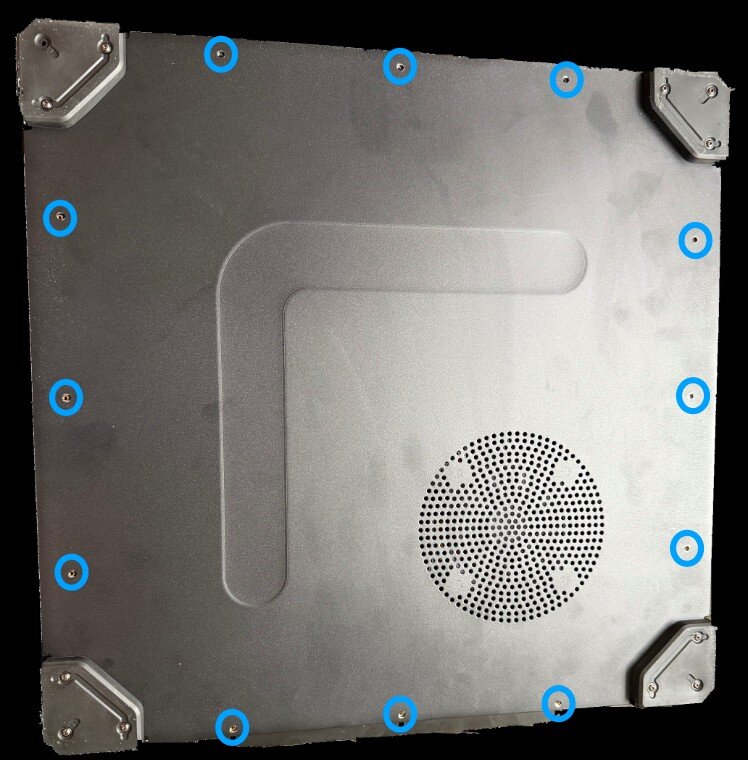
On the Phrozen Bumblebee mainboard, find the MKS eMMC V1.0 module (labelled MKS PI …). It’s held by two Phillips screws (arrows). Undo them:
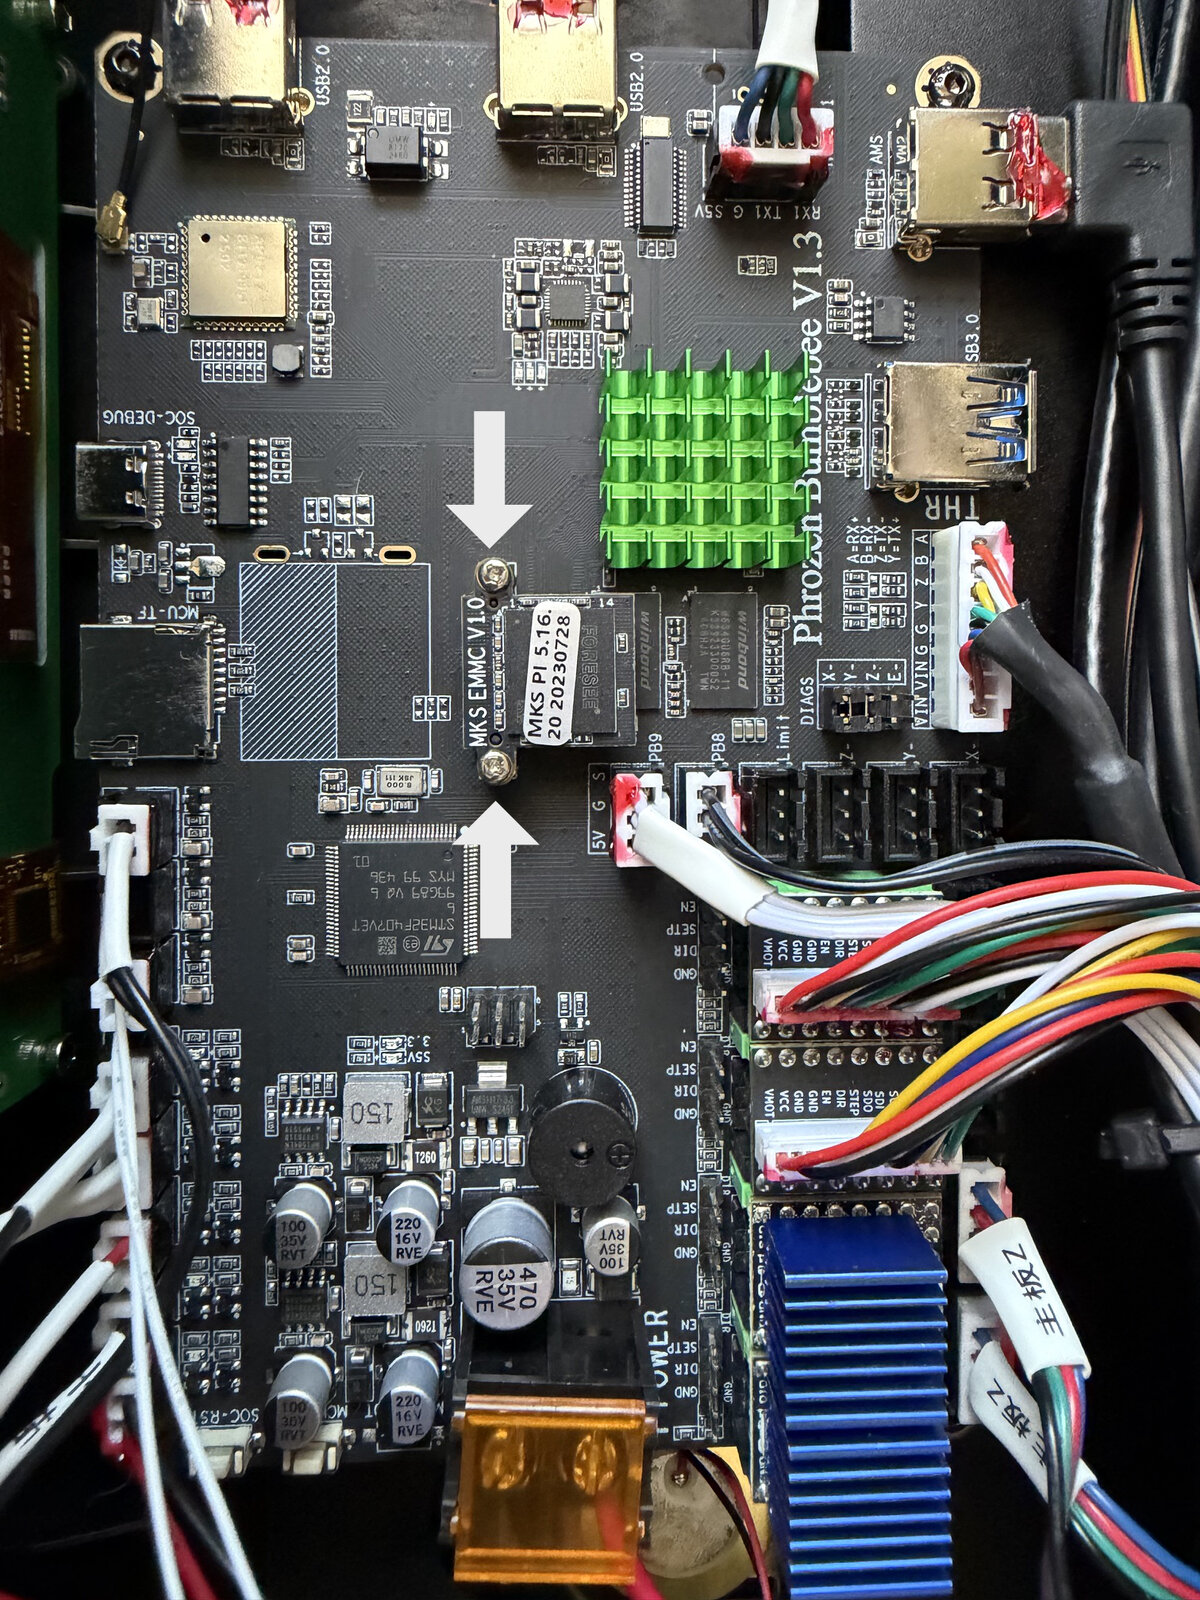
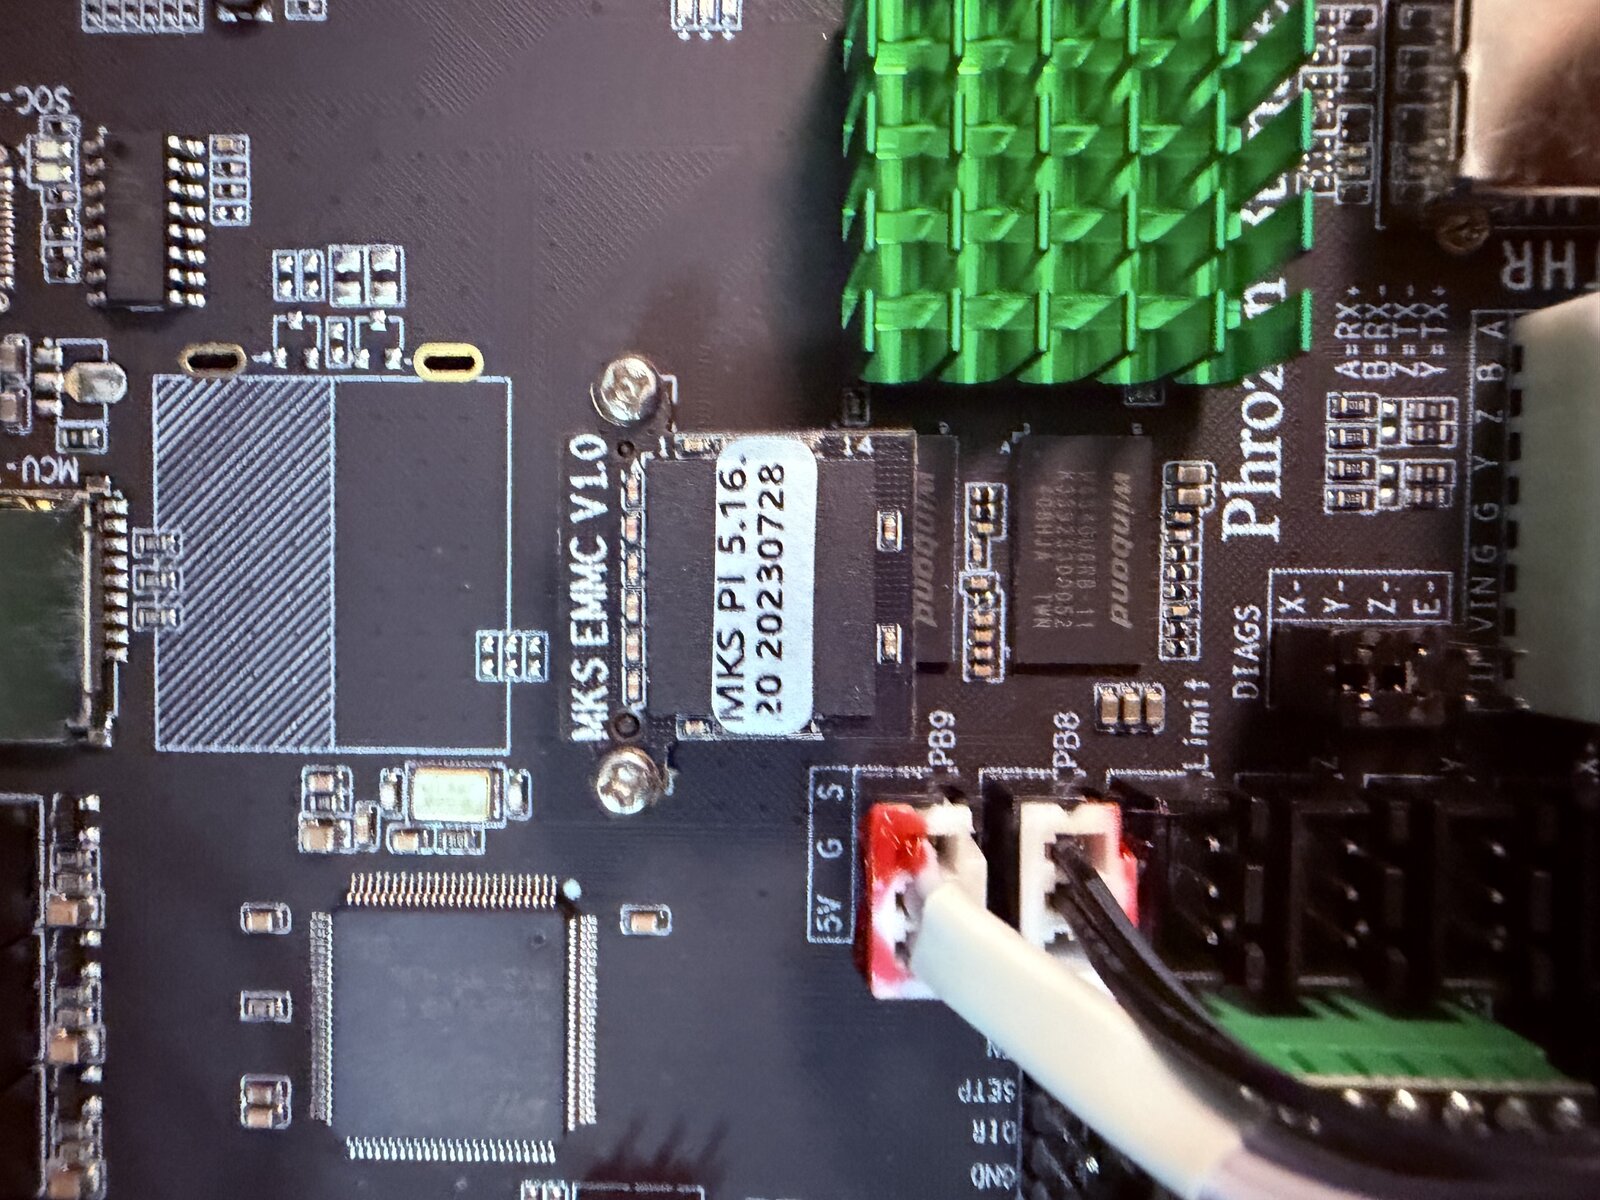
Lift the module out and slide it into the USB-to-eMMC adapter:
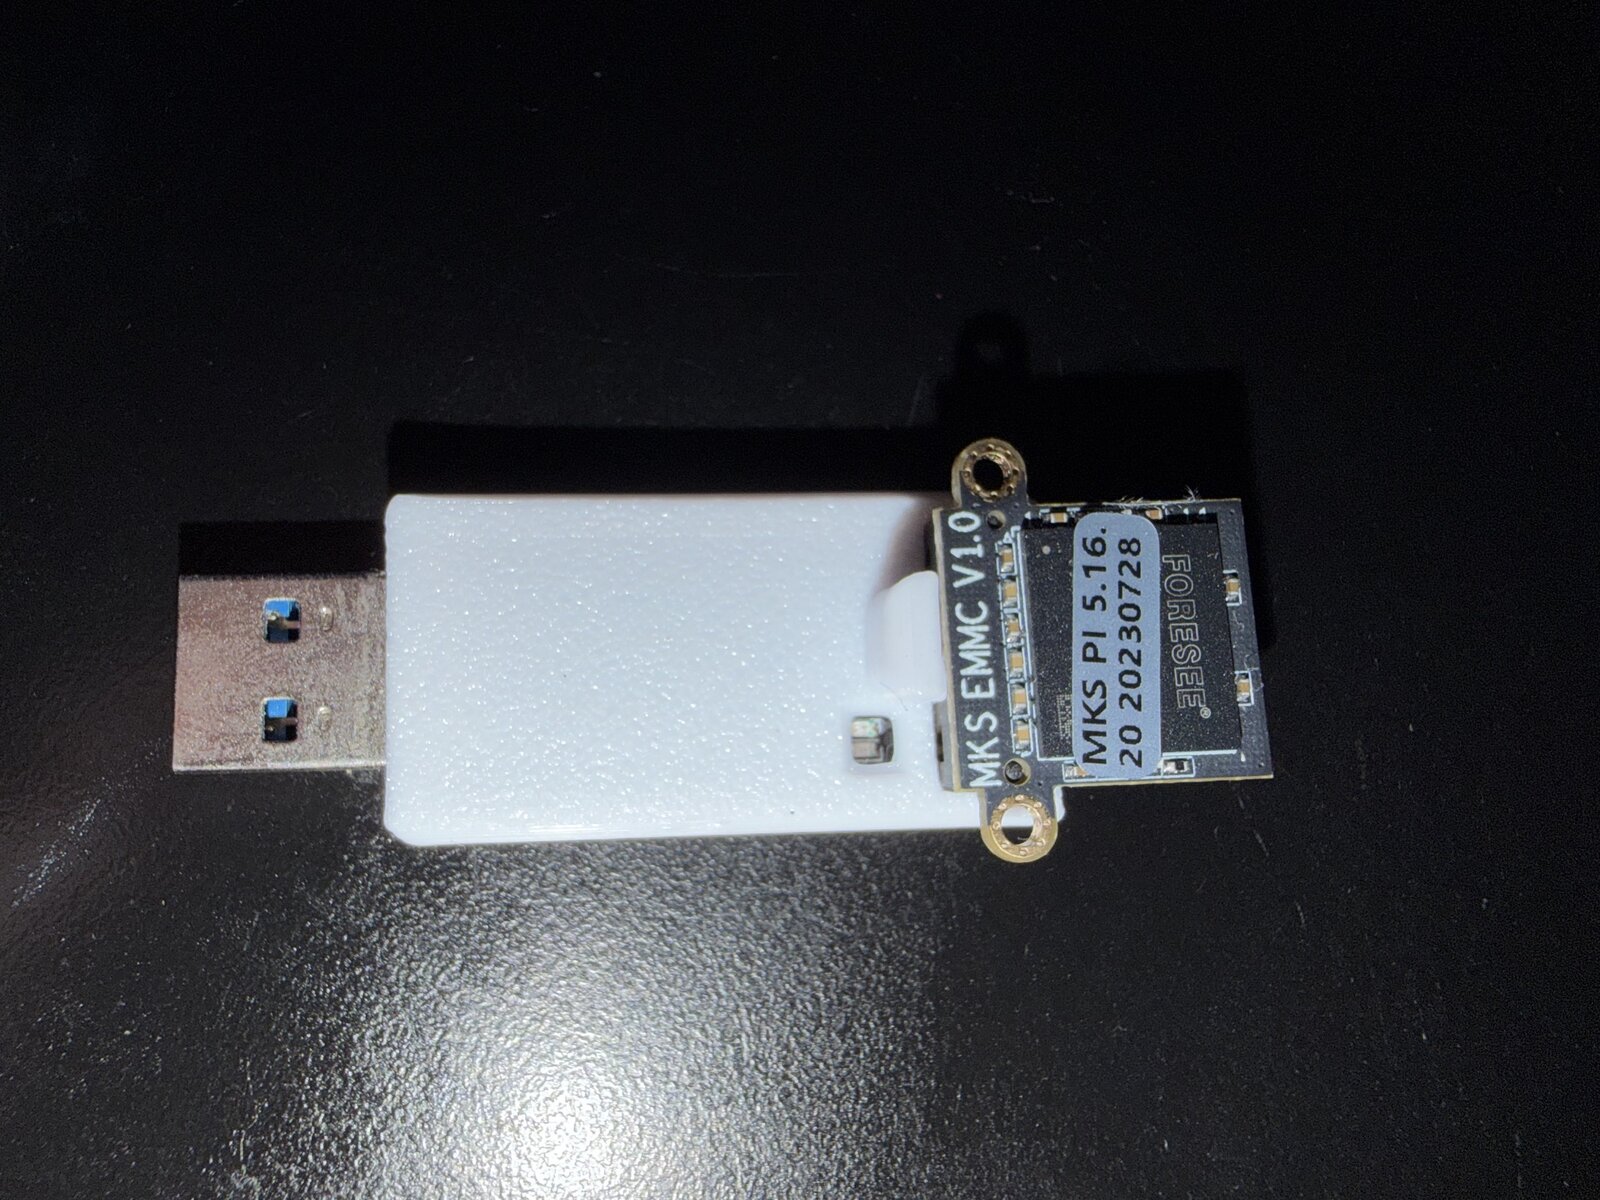
Plug the adapter into your PC and open balenaEtcher. (Use the GUI — no WSL needed.)
2.1 — Flash from file: click Flash from
file and pick the Arco Unleashed .img (unzip the
.img.gz first if your Etcher can’t read .gz
directly).
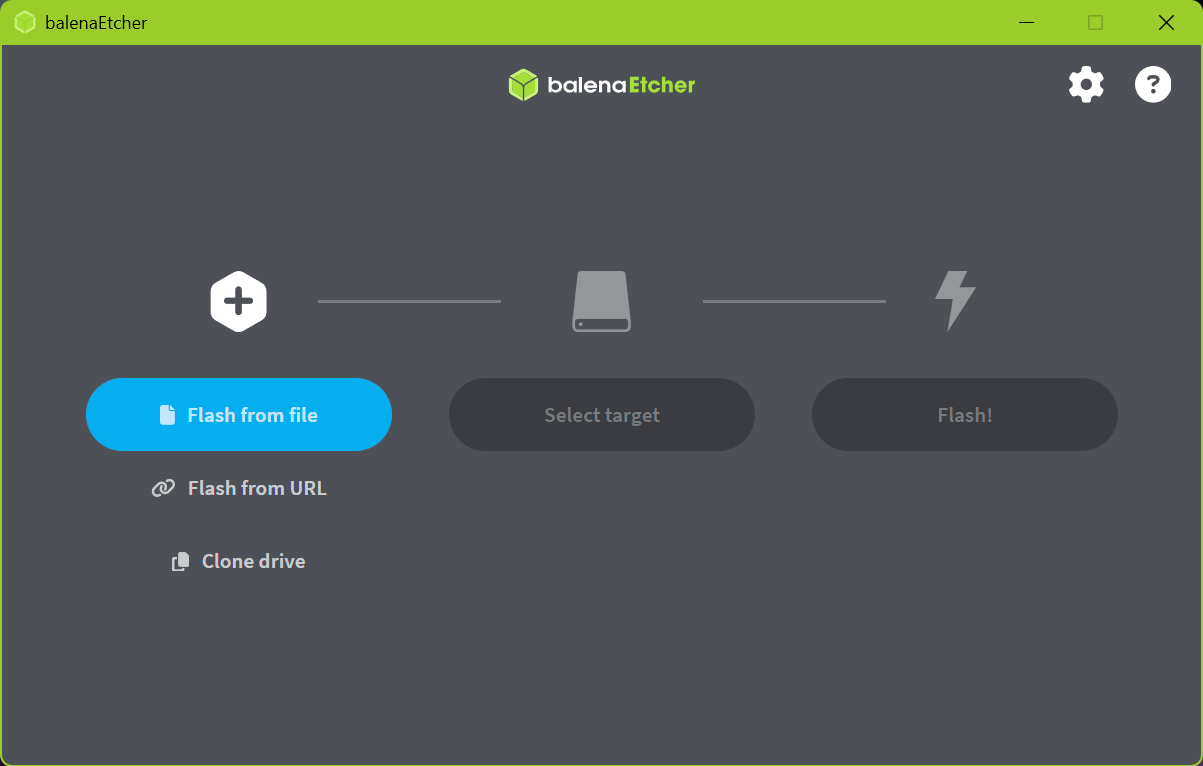
2.2 — Select target: click Select target.
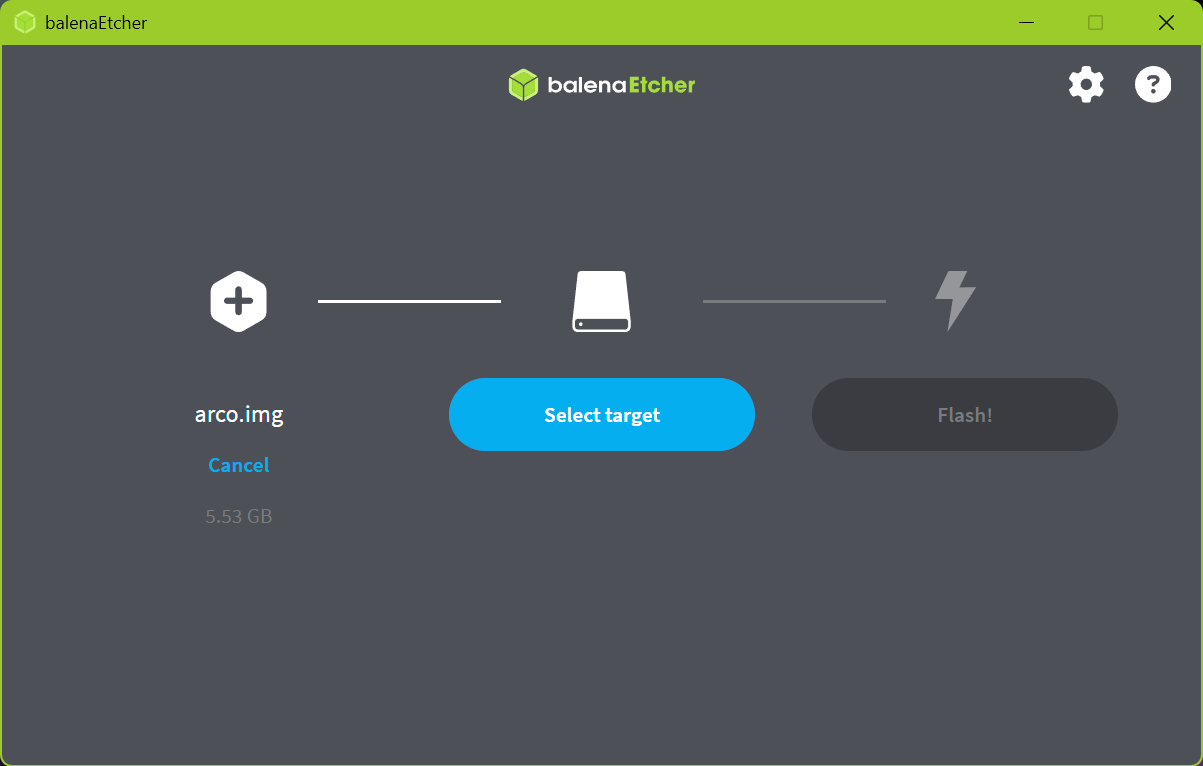
2.3 — Pick the right drive: choose the eMMC (here the ~31 GB “Generic STORAGE … USB Device”). ⚠️ Do not pick your big system disk (the 500 GB “Large drive” is flagged for a reason) — Etcher erases whatever you select.
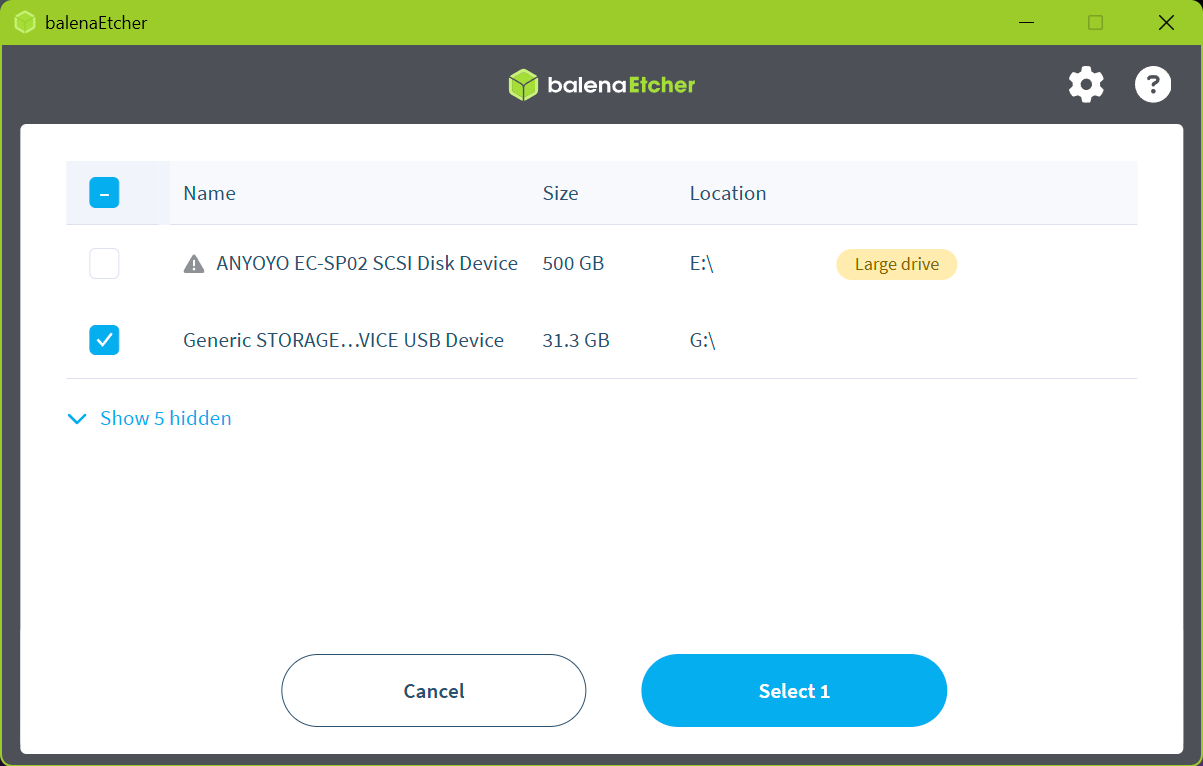
2.4 — Flash! Confirm the file and target, then click Flash!
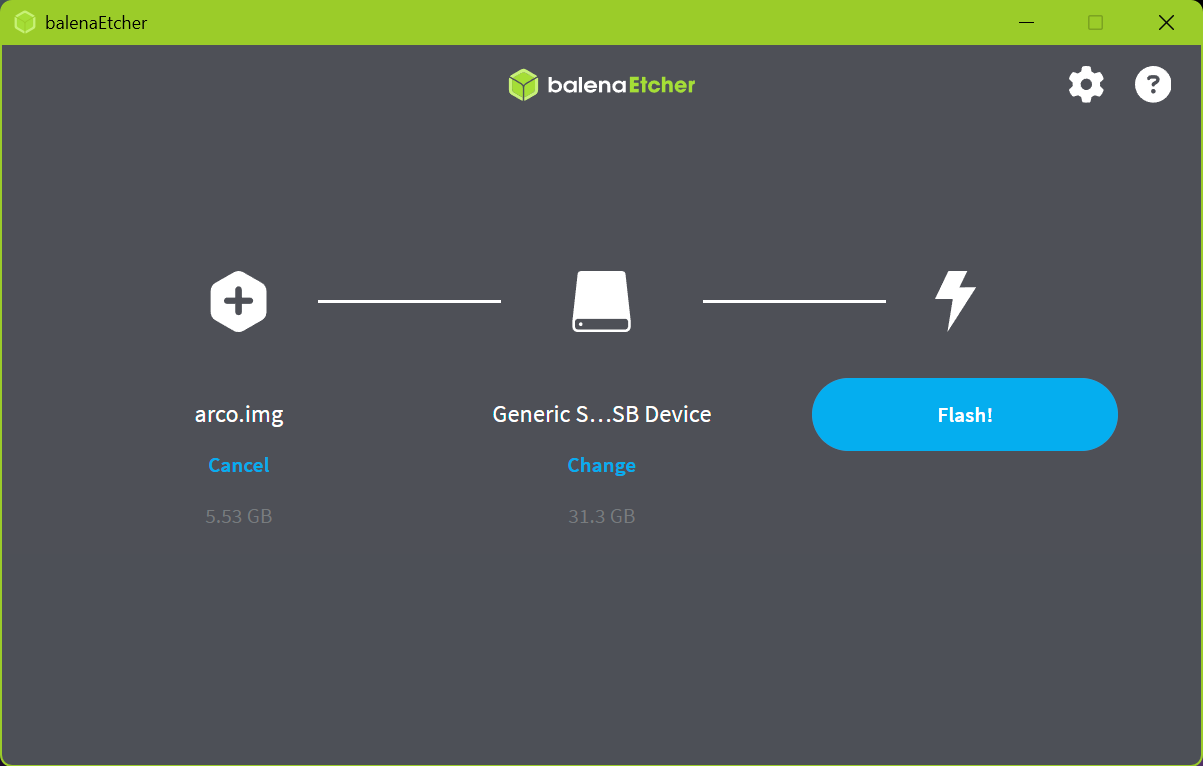
2.5 — Ignore the Windows “format disk” popup. Windows can’t read the Linux partitions and will offer to format the drive — click Cancel / Abbrechen. Never click Format disk.
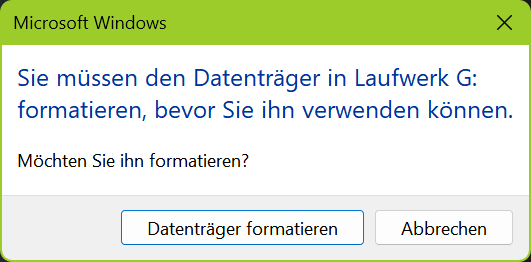
2.6 — Done. When Etcher shows Flash Completed!, safely eject the adapter.
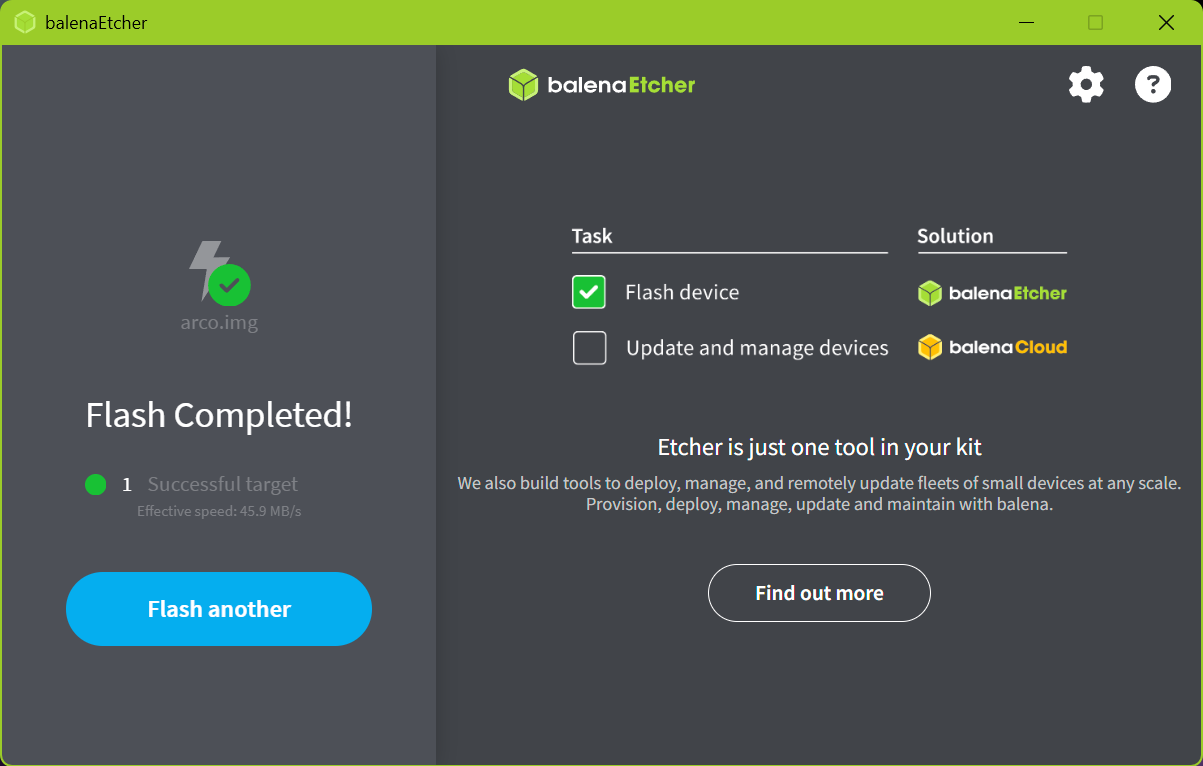
Put the eMMC back into the mainboard (re-fit the two screws) and close the housing.
Which image is it? That decides the route, and choosing wrong leaves a printer that boots and then cannot find its own hardware.
An Unleashed image — a backup of this system — is an ordinary flash pointed at your own file:
sudo bash ~/selfflash/install-unleashed.sh --arm --image /path/to/arco-emmc-backup.img.gzIt verifies the checksum and refuses an image that cannot fit this printer’s eMMC. It also skips the WiFi and first-boot steps, because a restore is not an install and your image already carries the WiFi settings and a completed first boot. A 32 GB image takes appreciably longer than a normal flash, because it writes the whole eMMC.
Once Arco Unleashed is installed, making a backup and writing one back both live in the setup menu under i) Save the WHOLE SYSTEM. The menu lists the images on your stick and hands the chosen one to the same flasher.
A Buster image — Phrozen’s original system, from before you installed Unleashed — is not an ordinary flash, and the command above is the wrong tool for it. The eMMC is only half the machine: the MCU firmware lives on the chips, and a Buster host (Klipper v0.11) will not talk to MCUs running v0.13. Write back only the eMMC and the printer comes up, finds no hardware, and says nothing about why. Use the guided action instead — Going back to Phrozen’s system in the FAQ.
🔌 No USB hub — for this or for flashing. A hub is the most common reason a file copies fine and then reads back different, which surfaces much later as a checksum mismatch. If you see CRC or I/O errors in the log, stop changing settings: the stick is failing, or this printer cannot drive it. Use another, preferably a plain USB 2.0 one.
An armed write stays armed. Arming embeds the
parameters into a fresh initramfs, and they survive a power-cycle — that
is how a retry works after a bad stick. It also means you must cancel a
write you decided against, with --disarm. Leaving it alone
does not undo it.
Every entry below is something that actually happened — on the development printer or to someone testing this kit. They are grouped by when you see them, because the same words on screen mean different things at different stages.
“sha256 MISMATCH” — refusing to flash The image on
the stick is not the image the checksum describes. In practice the
download is almost never the problem, the stick is. In order: 1. Take
the stick off any USB hub and plug it straight into the
printer. A hub is the single most common reason a file copies fine and
reads back different. 2. Copy the image again and eject the stick
properly before unplugging it — Windows may still be flushing its cache
when you pull it. 3. Check the copy on your PC:
certutil -hashfile <image> SHA256 (Windows) or
sha256sum -c <image>.sha256 (Linux). If the PC copy
is already wrong, download it again. 4. If the log also shows
CRC or I/O errors, stop swapping settings — that stick
is failing, or is one this printer cannot drive. Use a different one,
preferably a plain USB 2.0 stick.
Nothing happens on reboot — the old system just
boots The flasher only fires when it finds the armed image on
the stick. Check the stick is in, that the image is at the top level
(not in a folder), and that its name still matches. It stays armed, so
correcting the stick and power-cycling is the retry.
arco-selfflash.log on the stick says what it looked
for.
The display says “Write incomplete” or “Verify FAILED — do
not trust this eMMC” Do not power-cycle repeatedly. Pull the
stick and power-cycle once: - It boots
→ the write was fine and a check misfired. Confirm with
cat ~/arco-unleashed/.kit-commit — if it shows the version
you flashed, the eMMC has it. - It does not boot → the
write really was incomplete. That needs Appendix
A: open the printer, take the eMMC out and write it on a PC. Your
backup on the stick is unaffected.
The stick is in, but the printer does not see it It
auto-mounts at ~/printer_data/gcodes/USB. If that folder is
empty, find the partition with lsblk and mount it
to that same path — the tools look there by name:
sudo mkdir -p /home/mks/printer_data/gcodes/USB
sudo mount /dev/sda1 /home/mks/printer_data/gcodes/USBMore than one image on the stick The tools match by
pattern (Arco-Unleashed*.img.gz,
Arco_FW_V*.zip) and take the first match.
An older firmware zip, or a (1) re-download, can therefore
win silently and install something you did not intend. The flasher warns
when it sees more than one — start from an empty stick and put only the
listed files on it.
The adapter shows no drive, or Etcher cannot see it
Seat the module fully — it is easy to have it in the socket but not
contacted — and try a different USB port, directly on the PC rather than
through a hub. The eMMC is a .img.gz; Etcher handles the
decompression itself, so do not unpack it first.
Flashed fine, but the printer does not come up Check the module is the right way round and its retaining screws are in. If the printer still does not boot and the eMMC is definitely written, look at the MCUs. A printer whose host was replaced but whose MCUs still carry factory firmware cannot start Klipper. That is Step 5.
“Notice — Error occurred” on the display Expected, and not a fault. Klipper cannot start until the MCUs are flashed (Step 5), so the display has nothing to show. Restarting or power-cycling will not clear it. Do not set anything up on the display; wait for the screen to settle, which is how you know the automatic restarts have finished.
The printer never appears on the network Put a
wifi-seed.txt on the stick (SSID= /
PSK= / COUNTRY=, plain text, no quotes, 2.4
GHz — the Arco has no 5 GHz radio) and power-cycle. The printer uses
each seed once, and it recognises a seed by its
content. Writing out an identical file changes nothing, so a retry needs
details that actually differ. If the details were right and it still did
not join, use the setup portal instead — join the
Arco-Unleashed-Setup network from a phone.
The display module was not installed — “no internet and no USB package” The first boot fetches Phrozen’s display module from Phrozen’s own repository, and that did not work. The usual cause is a network that hands out an address but has no route to the internet, which the WiFi check cannot tell apart from a working one. Nothing is lost and nothing is disabled: the printer tries again on the next boot, so either give it real internet and reboot, or take the offline route:
Arco_FW_V*.zip from Phrozen’s
websitebash ~/arco-unleashed/scripts/fetch-phrozen-fw.shThe zip always takes priority over the download, so this also works on a printer that does have internet — and it is the only route that brings PhrozenGo.
The download was refused with “CHECKSUM MISMATCH” The module that arrived is not the build this kit pins, so it was not installed — deliberately, since the display binary has to match the firmware on the panel. Retry once in case the transfer was truncated; a captive portal on the network is the other common cause. If it keeps happening, use the USB route above and open an issue: it means Phrozen moved the pinned commit.
The toolhead flash ends with “FlashError” although the output looked complete Tap RESET on the toolhead board once, then re-run the step. The chip reads its BOOT pin the instant RESET is released and then stays in the bootloader; a tap is sometimes what it takes for the host to see it again. There is no timing window to hit — hold BOOT, tap RESET, release BOOT.
flash_mcus.sh cannot find the toolhead at
all Check the front cover’s fan is unplugged and the printer is
switched on — the flash itself needs power. Only
removing the covers happens with the printer off.
A fix that the changelog promises has not taken
effect Config repairs are applied by a guard that runs when the
klipper service starts. Klipper’s own
RESTART and FIRMWARE_RESTART do
not run it:
sudo systemctl restart klipperAn update brought something that is not set up yet A kit update copies files. It cannot install systemd guards or change system settings, because it runs as the printer user and those need root. So when an update brings a new guard or setting, it says so and asks for a power-cycle:
Self-heal: this update brought something that is not set up on this printer yet:
  MISSING  hostname is still 'mkspi' — unleashed.local cannot resolve

  >> Please POWER-CYCLE the printer once.
That is the whole procedure — switch it off and on, and it is applied
during the next start. Nothing is lost if you leave it until later; you
will simply be asked again after the next update. What it did is written
to printer_data/logs/arco-reconcile.log.
Menu 3 — Check self-heal guards compares what is wired on the printer with what the kit expects, and offers to fix the difference. Use it if you would rather do the repair yourself, or if the printer never asked but something is missing anyway. The command line does the same:
sudo bash ~/arco-unleashed/scripts/optimize-boot.shIt is idempotent — on an up-to-date printer it changes nothing.
Obico disappeared after a Phrozen firmware update
Phrozen’s own start scripts delete moonraker-obico on every
boot, and disabling PhrozenGo works by commenting those lines out —
inside Phrozen’s module. Anything that replaces that module brings the
original lines back. Reinstall Obico, then open 5 — PhrozenGo /
Cloud and disable PhrozenGo again. That records your choice
outside the module, and the kit re-applies the choice automatically
before every start.
update-from-usb.sh says “Permission denied” and
then “bad or truncated tarball” The tarball is fine. The script
was started from a copy outside the kit (/tmp/scripts/…)
and tried to work in the wrong place. Current versions detect this and
update the installed kit anyway; if yours does not, run it from the kit
itself:
bash ~/arco-unleashed/scripts/update-from-usb.shThe printer starts a backup by itself after a restore A backup image contains whatever was armed when it was taken, and restoring it brings that back. Current versions make the arming one-shot, so it lands harmlessly. An image taken before that fix still expects a marker file — create it on the stick before restoring such an image:
touch ~/printer_data/gcodes/USB/.arco-backup-doneWhich backup file is the good one The name tells you
which system it holds — -stock is Phrozen’s,
-unleashed is this one — and the restore menu spells that
out beside each candidate. Beyond that, the sidecars are written last,
on purpose: a .img.gz without its
.sha256 and .rawsize is an interrupted run,
whatever its size. To check a complete one in a second, without reading
the whole file:
cd ~/printer_data/gcodes/USB && sha256sum -c arco-emmc-backup-*.img.gz.sha256“This image does not fit the eMMC in this printer” The backup came from a machine with a larger eMMC — a 32 GB image cannot be written to an 8 GB one. The comparison is against the image’s uncompressed size, which is why a 2 GB file can be refused.
The display heats up, then stops before printing — the same file prints from Mainsail or Fluidd Nothing is wrong with the printer, and nothing is stuck mechanically. Before it starts a print, the display waits for the message Klipper prints when a bed mesh calibration has finished. Once your printer has a saved mesh profile — which it has after the automatic calibration has run once — the kit loads that profile instead of measuring the bed again. Loading is instant and silent, so the message never comes and the display waits for it for ever, with the heaters holding temperature. This update sends the message after a profile load as well, so the display carries on. On a printer that has not had the update yet, start the print from Mainsail, Fluidd or your slicer instead.
The first layer sits too low, and the nozzle scratches the bed This printer has no separate probe: the nozzle itself is the sensor, and the load cells behind it report contact only once there is force. That force is a small, constant amount of nozzle pressed into the bed, and it lands in your first layer — Klipper never sees it. With a thick first layer you may never notice; with a thin one it is unmistakable.
Two values look the same in the interface and only one of them lasts.
The slider in Mainsail writes a live correction, and
PRINT_END clears it after every print on purpose, so your
adjustment is gone by the next one. The permanent value is
[probe] z_offset, and a negative number
raises the nozzle. Somewhere around -0.02 to
-0.03 is a good place to start; your own machine will want
its own value.
Write it in directly and restart Klipper:
[probe]
z_offset: -0.03
The printer can also measure it for you: run
CAL_Z_OFFSET — a button in Mainsail and
Fluidd under Calibration. It homes, parks over the middle of
the bed and starts Klipper’s paper test; lower the nozzle with the
buttons in the dialog until a sheet of paper just drags under it, press
Accept, and a second dialog shows the measured number
beside the one in use and offers to save it. Do it with a
warm bed and a clean nozzle — both
change the number. Klipper comments the line out in [probe]
itself and writes the value into the SAVE_CONFIG section at the end of
printer.cfg, under #*# [probe], where no
G-code can reach it.
Take the paper test to the end. Step down until the sheet is truly gripped — you should not be able to pull it free without tearing it — then back off until it just drags, and press Accept there. Stopping early is the one thing that spoils this measurement, and it spoils it badly.
Check the result on a first layer anyway. If it needs a nudge, move
the Z offset in Mainsail during a print — negative
brings the nozzle down — then run Z_OFFSET_APPLY_PROBE
before the print ends (PRINT_END clears
the live value), and SAVE_CONFIG once it has
finished (it restarts Klipper and would end the print).
A print ends with
bed_mesh: Unknown profile [phrozen] and the display shows
an error The printer has never saved a mesh under that name —
the image ships no calibration on purpose, because another machine’s
numbers are worthless. Current versions make this harmless. To fix it
properly, calibrate once:
G28
BED_MESH_CALIBRATE PROFILE=phrozen
SAVE_CONFIG
The printer halts after a Klipper or Moonraker update,
display dead Moonraker’s “hard recover” runs
git reset --hard plus git clean, which deletes
every untracked file in the Klipper tree — phrozen_dev
among them. printer.cfg declares it, so klippy refuses the
config outright. That is what r — Emergency repair in
the setup menu is for: seven steps, no diagnosis needed, and it restores
the module from the safety copy the kit keeps outside the tree.
AMS messages every few minutes although no AMS is
attached Phrozen’s cloud component polls on a timer. There is
nothing to switch off: the kit follows the AMS itself and swallows that
poll while no unit is present. FILA_STATUS in the console
shows what it sees.
A BlockingIOError: [Errno 11] traceback in
klippy.log Nothing is wrong with the printer.
Klipper always opens a second, legacy G-code channel — a pseudo-terminal
that nothing on this machine reads, and that no setting turns off. Its
buffer fills, the next write to it is refused, and Klipper records the
traceback. It appears at most once each time Klipper starts or
restarts, and often not at all: after the first refusal Klipper
marks the channel dead and never writes to it again. It is safe to
ignore, on every printer. If you opened the log to chase a real fault,
this is not it — keep reading.
“Timer too close” during calibration or a fast print
The real-time tuning is what keeps this machine stable at high
acceleration: performance governor, CPU affinity, IRQ pinning, and the
MCU timing declaration. If they are not all in place the step queue
starves at a burst start. Menu 3 — Check self-heal
guards tells you what is missing, and
optimize-boot.sh puts it back. Do not run anything heavy on
the printer during a calibration.
Belt tension readings disagree with each other
Measure where both spans are equal —
BELT_TENSION parks there, and it is neither the middle of
the bed nor the middle of the travel. Leave the steppers energised:
M84 lets the belts go slack and the reading is void. Aim
for equal pitch between the two belts, not for any particular
frequency.
The cutter position calibration stops dead at X 0.0 — and other travel refused after homing Only with the KAOS add-on, and the rule that fixes it is one line long: home the printer fully once, then calibrate.
KAOS refuses every travel until a home has physically established
where the toolhead is. Klipper’s own homed_axes is not
evidence of that on this machine. The display routinely writes a
position with SET_KINEMATIC_POSITION instead of measuring
one, and Klipper then believes it is homed although nothing has moved.
That is the whole reason the guard keeps its own record.
The display’s cutter calibration never homes. Its very first action
is to lift Z, before any homing at all. That lift is what gets refused,
so the screen sits at 0.0 having done nothing. It is not a crash and
nothing is broken. A full G28 beforehand satisfies the
guard, and KAOS then stands down for the rest of the session.
Watch the end of the calibration. It finishes with
SAVE_CONFIG, which restarts Klipper — and a restart clears
the trust again. Calibrating twice in a row therefore needs a
G28 in between. The same applies after
KAOS_ON, after a firmware restart, and after any print that
ends in SAVE_CONFIG.
If a home does not help. Then the trust wiring
itself is incomplete, which is a different fault. Menu 3 — Check
self-heal guards says so under “Unleashed x KAOS trust chain”.
It reports ok if either KAOS’s own
[homing_override] or the post-home hook is in place. If
neither is there, it names the repair. That state arises on printers set
up before the bridge could install it, or after a Phrozen firmware
update replaces printer.cfg. Bringing the bridge up to date
and restarting the klipper service repairs it:
unleashedsudo systemctl restart klipperthen G28 once. Klipper’s own RESTART does
not run the guard that performs the repair.
Every command is rejected and RESTART does not
help An MCU shutdown latches: RESTART
restarts only the host side, so the latch outlives it and each new
command is answered with the original shutdown message.
FIRMWARE_RESTART is what clears it. When you then read the
log, trust the first error and ignore what follows —
everything after a shutdown is a consequence of it, not a second
fault.
FIRMWARE_RESTARTCollect a support bundle before you ask
ARCO_SUPPORT gathers what anyone helping you will ask for.
It is a button in Mainsail and Fluidd under Maintenance, and it
writes arco-support.tar.gz next to
printer.cfg — in the same file list you use to edit the
config, with a download button beside it. Inside are the tail of both
logs, your config, the kit version and channel, which features and
guards are switched on, and the state of the host: memory, disk, failed
services, boot times.
It is a couple of megabytes rather than the fifty a working
klippy.log reaches, which is more than most places accept
as an attachment. Anything that reads like a key or a password is
blanked out before packing, and the bundle’s own README.txt
says how many lines that was — it is plain text, so you can read it
before you post it. It refuses while a print is running: packing that
much on this board would disturb the print, and the logs are not going
anywhere.
How do I update the kit itself? Type
ARCO_UPDATE in the Mainsail or Fluidd console.
ARCO_UPDATE_CHECK looks first and changes nothing. The kit
shipped in the image is a flat copy of the repository rather than a
clone, so the first ARCO_UPDATE adopts it and updates in
the same run. Adopting leaves your files exactly as they are; git is
simply told where they came from. If anything in the printer
configuration changed, it takes effect when the klipper
service restarts
(sudo systemctl restart klipper); Klipper’s own
RESTART does not run the self-heal guards. Offline, or from
a USB stick, the other route is update-from-usb.sh with a
kit tarball — that one needs no network at all.
I already imaged my eMMC on a PC. Can I use that file here?
Yes, with three small preparations. The flasher wants a compressed image with two sidecars beside it, because that is what it can verify before it writes anything:
arco-emmc-backup-stock.img.gz |
the image, gzipped — a raw .img is not
read |
…img.gz.sha256 |
the checksum of the .gz. Without it the flasher refuses |
…img.gz.rawsize |
the uncompressed byte count. Optional, but it is what lets the flasher reject an image too big for this eMMC, and what drives the progress bar |
The file name is not free. The restore menu looks
for a fixed set of names, so a file called anything else will simply not
appear in it. Use exactly arco-emmc-backup-stock.img.gz for
an image of Phrozen’s system. The -stock part does two more
jobs: it stops a later Unleashed backup from rotating the file away, and
the menu reads it to label the file for you.
On Windows this needs no extra software — PowerShell can do all three. Open PowerShell and paste:
$img = "D:\YOUR_IMAGE_NAME.img"               # what you read off the eMMC
$dst = "F:\arco-emmc-backup-stock.img.gz"     # only F: changes — keep the file name

$in = [IO.File]::OpenRead($img); $out = [IO.File]::Create($dst)
$gz = New-Object IO.Compression.GZipStream($out, [IO.Compression.CompressionMode]::Compress)
$in.CopyTo($gz); $gz.Close(); $out.Close(); $in.Close()

(Get-Item $img).Length | Set-Content -Encoding ascii -NoNewline "$dst.rawsize"
"$((Get-FileHash $dst -Algorithm SHA256).Hash.ToLower())  $(Split-Path $dst -Leaf)" |
  Set-Content -Encoding ascii -NoNewline "$dst.sha256"
The two drive letters are examples — but only the letters.
$imgis entirely yours: point it at the raw file you read off the eMMC, whatever it is called and wherever you saved it. In$dst, change onlyF:to whatever letter Windows gave your stick. The file namearco-emmc-backup-stock.img.gzmust stay exactly as written, or the restore menu will not list it.
Expect it to take a while — several minutes per gigabyte, with no
output until it finishes. If you happen to have 7-Zip,
7z a -tgzip -mx=1 "$dst" "$img" replaces the three middle
lines and is quicker; the two sidecar lines are still needed either
way.
What if it comes out over 4 GB?
FAT32 cannot hold a single file of 4 GiB or more. That is a per-file limit, not a limit on the stick — a 64 GB stick is fine, one 4 GiB file on it is not. So a raw 8 GB image can never sit on the stick at all. Compressed, it normally lands at 2–2.5 GB. It comes out larger if the eMMC’s free space is full of deleted data, because deleted data does not compress.
Reformatting to exFAT or NTFS does not help: the small system that performs the flash runs before Linux is up and can only mount FAT32.
A backup made by the printer splits itself when it has to, so this only concerns an image you made by hand here. If yours is over the limit, cut it into parts the restore will accept — on Linux or macOS:
split -b 3788M --numeric-suffixes=1 -a 3 arco-emmc-backup-stock.img.gz arco-emmc-backup-stock.img.gz.The sidecar then needs the hash of the whole file first, marked as such, followed by one line per part:
printf '# arco-stream-sha256: %s\n' "$(sha256sum arco-emmc-backup-stock.img.gz | cut -d' ' -f1)" \
  > arco-emmc-backup-stock.img.gz.sha256
sha256sum arco-emmc-backup-stock.img.gz.??? >> arco-emmc-backup-stock.img.gz.sha256
Put the parts and that one sidecar on the stick — not the original —
and the restore menu lists it under its plain name, marked with how many
parts it found. On Windows, where there is no comfortable way to split a
file, use Appendix A instead:
write the raw .img straight to the eMMC, no stick
involved.
balenaEtcher does not create images, it only writes
them. To read one off an eMMC use Win32DiskImager’s Read, or
dd on Linux/macOS. Or skip all of this and let the printer
do it: Step 1 writes the image and both sidecars
itself, and reads the result back off the stick to prove it is good.
I have a split backup (.001, .002,
…). How do I check it, or write it from a PC?
Checking it works anywhere — on the printer or on any PC, with the ordinary tool. It names the part that is wrong, which is usually a bad stick rather than a bad backup:
sha256sum -c arco-emmc-backup-unleashed.img.gz.sha256From the printer there is nothing to join. The setup
menu’s restore list shows a split set under its plain name, with the
part count beside it, and hands the whole thing to the flasher:
i) Save the WHOLE SYSTEM → restore. The command line
does the same if you prefer it — point --image at the plain
base name and the flasher finds the parts:
sudo bash ~/selfflash/install-unleashed.sh --arm \
  --image ~/printer_data/gcodes/USB/arco-emmc-backup-unleashed.img.gz
sudo bash ~/selfflash/install-unleashed.sh --arm \
--image ~/printer_data/gcodes/USB/arco-emmc-backup-unleashed.img.gzFrom a PC, on Linux or macOS, it goes straight onto
an eMMC in an adapter, with no software of ours involved.
dd writes wherever you point it and asks nothing. Identify
the target first, and check the size it reports: an eMMC in an adapter
is a few gigabytes, your system disk is not:
lsblk -o NAME,SIZE,TRAN,MODEL      # find the adapter and confirm the size before the next line
cat arco-emmc-backup-unleashed.img.gz.??? | gunzip | sudo dd of=/dev/<your-emmc> bs=4M status=progress
With balenaEtcher, join the parts into one file
first — Etcher writes a single image and cannot take a set. It reads
.img.gz as it is, so there is nothing to decompress:
cat arco-emmc-backup-unleashed.img.gz.??? > arco-emmc-backup-unleashed.img.gzOn Windows, in PowerShell, in the folder that holds the parts:
$out = [IO.File]::Create("$PWD\arco-emmc-backup-unleashed.img.gz")
Get-ChildItem "arco-emmc-backup-unleashed.img.gz.???" | Sort-Object Name | ForEach-Object {
  $in = [IO.File]::OpenRead($_.FullName); $in.CopyTo($out); $in.Close()
}
$out.Close()
The order is the whole point. Both the
??? glob and Sort-Object Name give
.001, .002, .003. Joined in any
other order the result still looks like an image and still starts to
unpack — it fails somewhere in the middle instead, long after you have
committed the eMMC. Write the joined file with Etcher exactly as in A2.
I want Phrozen’s original system back. How?
Through the setup menu, never by writing the image yourself:
unleashed → i) Save the WHOLE
SYSTEM → b) Going back to Buster. It states
plainly what will be gone, asks once, and then flashes the MCUs and
writes the eMMC in the only order that works.
Why it is guided and not a command. Putting Buster back on the eMMC is only half the machine — the MCU firmware sits on the chips. A Buster host runs Klipper v0.11 and will not talk to MCUs running v0.13, so the printer boots, finds none of its own hardware, and says nothing about why. The order is not free either: the MCU flasher needs katapult, dfu-util and a modern Python, which means it needs this system. MCUs first, eMMC second. The other way round, the tools are gone with the system and only opening the printer helps.
What has to be on the stick: an image of the
original system — a .img.gz with its
.sha256 beside it — that you made yourself before
installing Unleashed. Phrozen’s firmware zip is not one: that is an
update package, not a system. The menu lists what it finds and
deliberately ignores two things: the Arco-Unleashed release
image, and any backup whose name contains -unleashed,
because writing that would flash the MCUs down to v0.11 for a system
that needs v0.13.
If you never made one, ask Phrozen
support — they do not publish a stock image, but they have
supplied one on request. It will be a factory image, not your printer’s
own state. The menu also needs a .img.gz with a
.sha256 beside it, so you may have to repackage what they
send. A copy you took yourself (Step 1) needs none
of that, which is the argument for taking one.
What goes away: Klipper v0.13 and Bookworm, the self-heal guards, sensorless XY homing, the AddOn macros, Fluidd, the Arco theme, the WiFi setup portal — and this backup feature itself. Your prints, your Orca profiles and your AMS are unaffected; this is about the printer’s own system, not your files.
I am writing the eMMC in a PC. What do I have to do by hand first?
Two things, and both only work while the printer is still running Phrozen’s original system. On the self-flash road (Step 2) the installer does them for you. When you write the eMMC in a PC the installer never runs, so both are yours to do. Once the module is written, neither can be done at all.
SSH in as mks and run them in this order:
# 1. Rescue Phrozen's gateway — phrozen_master, phrozen_slave_ota, device_table, ~/hdlDat.
#    They are in no
#    download and in none of Phrozen's packages. Without them the display spams and the
#    AMS does not work.
bash ~/printer_data/gcodes/USB/collect_data_arco.sh ~/printer_data/gcodes/USB

# 2. Keep a way back to Phrozen's system: the whole eMMC as one file on the stick.
#    Optional, but only possible now — from Unleashed you can only ever image Unleashed.
sh ~/printer_data/gcodes/USB/prepare_unleashed_self_flash.sh
sudo bash ~/selfflash/install-unleashed.sh --backup
The first is A0 in full, the second Step 1 — including what to do when the backup comes
out larger than FAT32 allows. Keep arco-phrozen-ams.tar.gz
on the stick, and leave that stick plugged in for the new system’s first
boot: the new system re-installs those files by itself.